| Author: | |
| Website: | |
| Page title: | |
| URL: | |
| Published: | |
| Last revised: | |
| Accessed: |
Programs need to do something in response to user actions and actions initiated by the operating system. Such actions, which are external to the program itself (although they may be triggered by the program) are called events.
Traditional procedural programming languages create programs in which the execution path is almost entirely dictated by the program's code. A Windows application, however, is event-driven, in that the user can interact with different elements within the user interface, in any order they choose. The events do not occur in a pre-determined order, and the code that is executed will be the code that is associated with a specific event (referred to in Visual Basic as an event procedure) , regardless of the order in which events occur.
There are different types of events and different ways to trigger them. An event can be triggered in the following ways:
Events are most often triggered by some form of user interaction. Forms and their controls all have their own unique set of events that are specific to a particular type of object. A Button control, for example, has a number of events, including the Click event which is triggered when the user clicks on it, causing the code within the Click event to be executed.
A Textbox control shares some events with the Button control (for example, the Click event) but has other events that the Button control does not, like the TextChanged event, which is triggered each time you enter or delete a character in a text box.
Sometimes objects trigger their own events. A common example is the Tick event of a Timer control (a control, incidentally, that is not visible to the user at run time) . The Tick event will be triggered at a time interval specified (in milliseconds) in its Interval property.
The operating system itself may initiate actions that trigger an event. For example, if a form is partially obscured by another application's window, and the application is closed by the user, Windows will redraw the area of the form that was previously hidden. This will require Visual Basic to invoke the form's Paint event.
An event may also be triggered by the program itself. Beware, however, of creating a recursive event. For example, the TextChanged event is triggered each time the text in a text box changes. If the event procedure defined for the event changes the text in the text box, it will trigger the event procedure . . . which causes the text in the text box to change . . . which triggers the event procedure . . . and so on, ad infinitum.
Recursion can be a powerful programming technique for doing things like processing lists and queues, but in the example just described it simply causes an endless loop that will result in Windows returning a StackOverflow error.
To put some of these ideas into practice, create a new project called "Events", then follow the steps shown below.
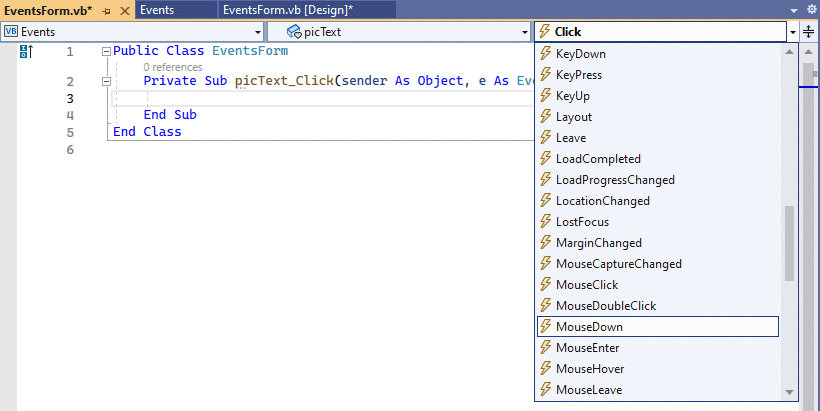
The code window should look like the one illustrated below. Note the drop-down lists at the top of the window. One of them contains a list of all the objects associated with the current form, including the form itself. Another contains a list of events to which the currently selected object can respond. Because the currently selected object is the picTest picture box, its name appears at the currently selected object. the second drop down list displays the name of the default event for the currently selected object, which is the Click event.

The code window displays the empty Click event procedure for the picText object
The event declaration (the line that starts Private Sub . . . ) defines the structure of the event. It contains the name of the object, an underscore character (_) , and the name of the event, followed by a set of parameters inside parentheses. Click on the drop-down event list to see the events that the picture box object supports, and select MouseDown from the list.

Select the MouseDown event from the drop-down event list
You will see the code window change to look like the one illustrated below. You can see that the event declaration for the MouseDown event looks similar to the one defined for the Click event (scroll right using the scroll bar if you can't see all of the code) .

An empty event procedure is created when you select an object's event
The MouseDown event has two parameters:
Some of the properties of the MouseEventArgs object are described in the table below.
| Property | Description |
|---|---|
| Clicks | Returns the number of times the user clicked the mouse button. |
| Button | Returns the button that was clicked (left, middle, right) . |
| Delta | Returns a positive or negative number indicating the number of clicks performed (forward or backward) with the mouse wheel. |
| X | Returns the horizontal coordinate at which the pointer was located when the user clicked. |
| Y | Returns the vertical coordinate at which the pointer was located when the user clicked. |
| Location | Returns a Point object that contains the X and Y coordinates at which the pointer was located when the user clicked. |
| Property | Value |
|---|---|
| Name | lblX |
| Location | 300, 110 |
| Text | X: |
| Property | Value |
|---|---|
| Name | lblY |
| Location | 300, 125 |
| Text | Y: |
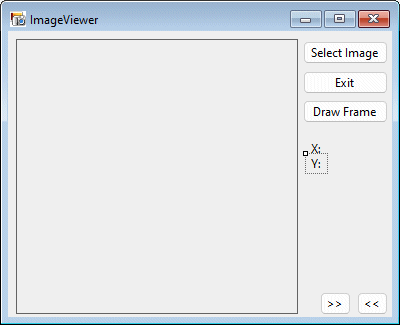
Your form should now look like the one shown below.

The form with its X: and Y: labels
lblX.Text = "X: " & e.X
lblY.Text = "Y: " & e.Y
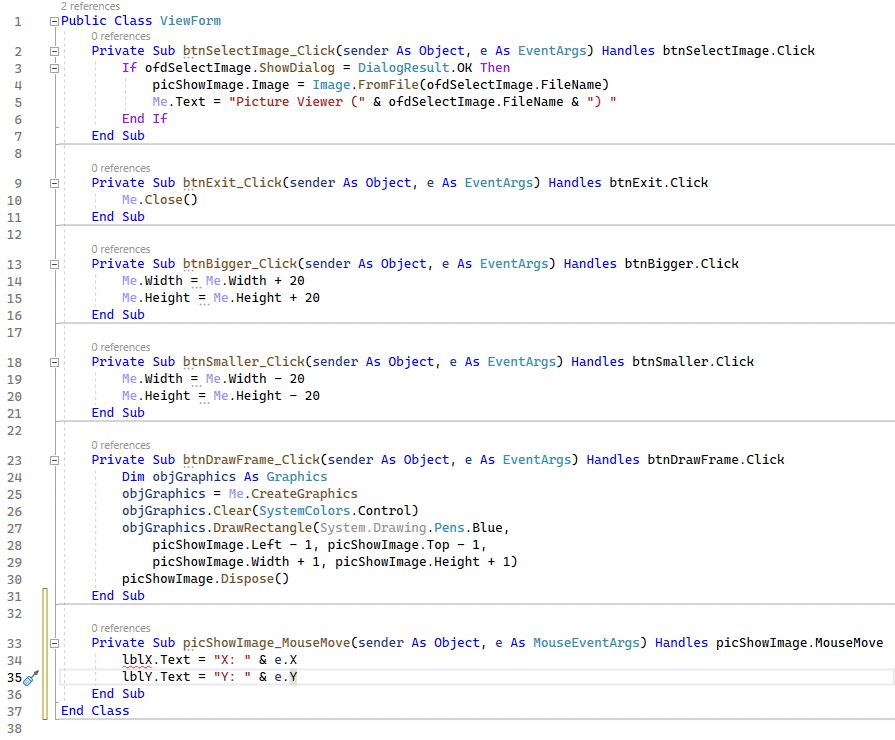
Your code should now appear as shown below.

The revised code for the ImageViewer application
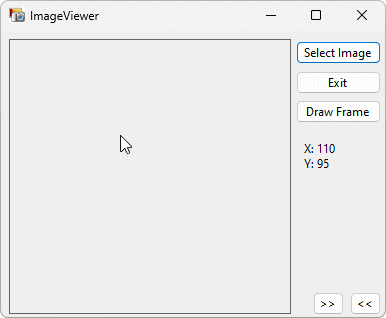
The code works by setting the Text property for each of the labels lblX and lblY as the mouse moves around inside the picture box. For label lblX, for example, the code will amend the Text property to read "X: n", where n is the current x-coordinate of the mouse pointer relative to the left-hand side of the picture box in pixels.

The x and y coordinates reflect the position of the mouse pointer
When you move the mouse pointer out of the picture box, the coordinates of the last point the mouse pointer was over are still displayed. In order to rectify this situation, we need to add some more code.
lblX.Text = ""
lblY.Text = ""
Ideally, it would be nice if the coordinate labels were only visible when the mouse is over the picture box (as things stand, the X: and Y: labels are visible when the program first runs). You can initialise the values for these labels when the program runs as follows:
lblX.Text = ""
lblY.Text = ""