| Author: | |
| Website: | |
| Page title: | |
| URL: | |
| Published: | |
| Last revised: | |
| Accessed: |
Elsewhere in this section we look at a simple encryption program that encodes text messages by substituting each printable character in the ASCII character set with another character, chosen from the first 256 characters of the Unicode character encoding scheme. In this program we are going to encode a text message into a bitmapped image using a very subtle encoding scheme that will make small changes to the image that cannot be detected by the human eye. In fact, the coding is so subtle that providing you choose the right kind of image, it would be extremely difficult for a third party to extract the encoded message without a copy of the program, even if they suspected that the image might contain a hidden message.
The program, as written, does make it rather obvious that the images contain encoded messages, because we have given the encoded image files their own special file extension (.ebm for encoded bitmap). You could just save the image with the normal extension for a bitmap file (.bmp), and no-one would be any the wiser. In fact, the only way to tell the difference between the original bitmap image and the encoded version would be to compare the byte values at the start of the file to see if there are any differences. Note that on average, only about half of the bytes used to encode the message will actually change from their original value, for reasons that will become apparent as you begin to understand how the code works.
Before we proceed, it is probably worth mentioning that what we are doing here is not, strictly speaking, "encryption". The correct term is steganography. Steganography differs from encryption, because the way in which the message is hidden means that only the sender and receiver of the message will be aware that a hidden message exists. By contrast an encrypted message is usually pretty obviously just that, because it consists of a message that is unintelligible to anyone not possessing the necessary key and decryption algorithm.
Stenography encompasses a broad range of techniques used to hide messages, some of which go back several thousand years. Such techniques have included, for example, tattooing a message on a courier's shaved head and allowing the hair to grow again in order to hide the message (slow but effective); the use of invisible ink; and making small changes to the size, spacing and typeface of printed matter in order to convey a hidden subtext.
The computer age has provided countless additional ways in which to hide messages. Digital media files provide excellent hiding places for covert information because of their size. The approach we are taking here is a relatively simple one; we are hiding our messages in bitmapped image files because each pixel in a bitmapped image is preserved in its original state when the image is saved, and does not undergo further encoding of the kind used in other image file formats. There are probably many far more ingenious methods that could be used to hide information in electronic media files.
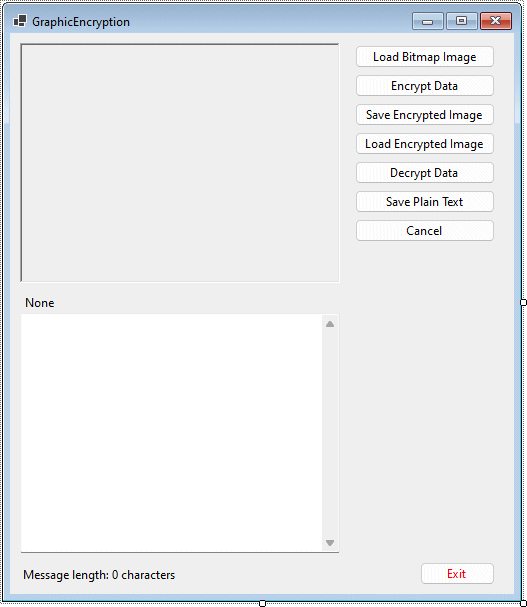
The GraphicEncryption program interface
| Control | Name | Additional Properties |
|---|---|---|
| Form | frmGraphicEncryption | Size: 520, 600 Text: "GraphicEncryption" |
| PictureBox | picImage | BorderStyle: Fixed3D Location: 10, 10 Size: 320, 240 |
| Label | lblMessage | Location: 12, 262 Text: None |
| TextBox | txtMessage | Enabled: False Location: 10, 280 Multiline: True ScrollBars: Vertical Size: 320, 240 |
| Label | lblMessageLength | Location: 10, 534 Text: "Message length: 0 characters" |
| Button | cmdLoadBmp | Location: 345, 12 Size: 140, 23 Text: "Load Bitmap Image" |
| Button | cmdEncrypt | Enabled: False Location: 345, 41 ize: 140, 23 Text: "Encrypt Data" |
| Button | cmdSaveImage | Enabled: False Location: 345, 70 Size: 140, 23 Text: "Save Encrypted Image" |
| Button | cmdLoadEnc | Location: 345, 99 Size: 140, 23 Text: "Load Encrypted Image" |
| Button | cmdDecrypt | Enabled: False Location: 345, 128 Size: 140, 23 Text: "Decrypt Data" |
| Button | cmdSaveText | Enabled: False Location: 345, 157 Size: 140, 23 Text: "Save Plain Text" |
| Button | cmdCancel | Enabled: False Location: 345, 186 Size: 140, 23 Text: "Cancel" |
| Button | cmdExit | ForeColor: Red Location: 410, 529 ext: "Exit" |
| OpenFileDialog | ofdLoadBitmap | - |
| SaveFileDialog | sfdSaveBitmap | - |
| SaveFileDialog | sfdSavePlainText | - |
The program code for the form's class definition is presented below in its entirety. There are no lengthy explanations provided; the code is annotated with numerous comments that should be sufficient to allow the reader to understand how the program works. At the bottom of this page, however, there is a detailed explanation of how message data is encoded into the images, since this is something that may not be entirely obvious from either the code or the accompanying comments - especially if the reader is not too well acquainted with binary logic.
The program code:
Public Class frmGraphicEncryption
'Bitmap variables to hold image data
Dim bmp01, bmp02, bmpTemp As Bitmap
'Variable to temporarily store pixel colour values
Dim clr As Color
'Variables to hold screen coordinates and row and column values
Dim x, y, rows, cols As Integer
'Variable to hold modified colour component values
Dim ORcol As Integer
'Variables to hold actual and maximum permitted message lengths
Dim intMessageLength, intMaxLength As Integer
'Variable to keep track of whether message exists or not
Dim boolMsgFlag As Boolean
Private Sub cmdLoadBmp_Click(sender As Object, e As _
EventArgs) Handles cmdLoadBmp.Click
'Multiplier value used for resizing image if needed
Dim sngMul As Single
'Set OpenFileDialog control to see bitmap files only
ofdLoadBitmap.Filter = "Windows Bitmap Files|*.bmp"
'This code executes if user selects (or types) a valid file name and clicks OK
If ofdLoadBitmap.ShowDialog = DialogResult.OK Then
'Assign image from file to bmp01
bmp01 = New Bitmap(Image.FromFile(ofdLoadBitmap.FileName))
'Display image file's name at top of form
Me.Text = "GraphicEncryption(" & ofdLoadBitmap.FileName & ")"
'Assign a copy of the image to bmp02
bmp02 = New Bitmap(bmp01)
'If the image in bmp01 is too big for the picture box to display,
'scale it down as required
If bmp01.Width > 320 Or bmp01.Height > 240 Then
If(bmp01.Width / 4) >= (bmp01.Height / 3) Then
sngMul = 1 / (bmp01.Width / 320)
Else
sngMul = 1 / (bmp01.Height / 240)
End If
bmpTemp = New Bitmap(bmp01, (bmp01.Width * sngMul), _
(bmp01.Height * sngMul))
bmpTemp.SetResolution(bmp01.HorizontalResolution, _
bmp01.VerticalResolution)
bmp01 = bmpTemp
End If
'Load the [resized] image into the picture box
picImage.Image = bmp01
'Get the height of the original version of the image (as rows)
rows = bmp02.Height
'Get the width of the original version of the image (as cols)
cols = bmp02.Width
'Calculate the maximum number of characters that can be encoded
intMaxLength = rows * cols / 8
'Limit message length to largest 16-bit value
If intMaxLength > 65535 Then intMaxLength = 65535
'Set the text box's maximum length property
txtMessage.MaxLength = intMaxLength
'Display message and inform user of maximum message length allowed
lblMessage.Text = "Type your message here (maximum " _
& intMaxLength & " characters) :"
'Initialise message-related variables and set up display
'to allow user to input message
intMessageLength = 0
x = 0
y = 0
txtMessage.Enabled = True
txtMessage.Focus()
lblMessageLength.Visible = True
cmdLoadEnc.Enabled = False
cmdLoadBmp.Enabled = False
cmdCancel.Enabled = True
End If
End Sub
Private Sub cmdLoadEnc_Click(sender As Object, e As _
EventArgs) Handles cmdLoadEnc.Click
'Multiplier value used for resizing image if needed
Dim sngMul As Single
'Set OpenFileDialog control to see encoded bitmap files only
ofdLoadBitmap.Filter = "Encrypted Bitmap Files|*.ebm"
'This code executes if user selects (or types) a valid file name and clicks OK
If ofdLoadBitmap.ShowDialog = DialogResult.OK Then
'Assign image from file to bmp01
bmp01 = New Bitmap(Image.FromFile(ofdLoadBitmap.FileName))
'Display encoded image file's name at top of form
Me.Text = "GraphicEncryption(" & ofdLoadBitmap.FileName & ")"
'Assign a copy of the image to bmp02
bmp02 = New Bitmap(bmp01)
'If the image in bmp01 is too big for the picture box to display,
'scale it down as required
If bmp01.Width > 320 Or bmp01.Height > 240 Then
If(bmp01.Width / 4) >= (bmp01.Height / 3) Then
sngMul = 1 / (bmp01.Width / 320)
Else
sngMul = 1 / (bmp01.Height / 240)
End If
bmpTemp = New Bitmap(bmp01, (bmp01.Width * sngMul), _
(bmp01.Height * sngMul))
bmpTemp.SetResolution(bmp01.HorizontalResolution, _
bmp01.VerticalResolution)
bmp01 = bmpTemp
End If
'Load the [resized] image into the picture box
picImage.Image = bmp01
lblMessage.Text = "Encrypted message:"
'Initialise message-related variables and set up display
'to allow user to decrypt message
intMessageLength = 0
x = 0
y = 0
lblMessageLength.Visible = True
cmdLoadEnc.Enabled = False
cmdLoadBmp.Enabled = False
cmdDecrypt.Enabled = True
cmdCancel.Enabled = True
End If
End Sub
Private Sub txtMessage_TextChanged(sender As Object, e As _
EventArgs) Handles txtMessage.TextChanged
'This code executes each time the message text input by the user changes
'Get the current message length
intMessageLength = Len(txtMessage.Text)
'If the message is not zero-length and this is the first character
' (boolMsgFlag = False), set boolMsgFlag to True to indicate message
'is in progress and enable Encrypt Data button
If Len(txtMessage.Text) > 0 And txtMessage.ReadOnly = False Then
If boolMsgFlag = False Then
boolMsgFlag = True
cmdEncrypt.Enabled = True
End If
'If message is zero length (user has deleted all characters)
'set boolMsgFlag to False and disable Encrypt Data button
Else
boolMsgFlag = False
cmdEncrypt.Enabled = False
End If
'Update displayed message length
lblMessageLength.Text = "Message length: " & intMessageLength & " characters"
End Sub
Private Sub cmdEncrypt_Click(sender As Object, e As _
EventArgs) Handles cmdEncrypt.Click
'ByteArray() holds the values for each bit in the ASCII code
Dim ByteArray(0 To 7) As Integer
'ByteMask() holds the binary masks used to extract the individual bit values
Dim ByteMask() As Integer = {128, 64, 32, 16, 8, 4, 2, 1}
'LengthArray() Holds the values for each bit in the message length value
Dim LengthArray(0 To 15) As Integer
'LengthMask() holds the binary masks used to extract the individual bit values
Dim LengthMask() As Integer = _
{32768, 16384, 8192, 4096, 2048, 1024, 512, 256, 128, 64, 32, 16, 8, 4, 2, 1}
'Encode the message length into the red pixel component of the first 16 pixels
'This loop will assign either a one or a zero to each element of LengthArray
'The integer value MessageLength is ANDed with each LengthMask element in turn,
'resulting in integer values that are either zero or a binary power within the
'range: [1,2,4,8,16,32,64,128,256,512,1024,2048,4096,8192,16,384,32768]
'The resulting integer value is right-shifted in order to leave 0 or 1
For i = 0 To 15
LengthArray(i) = (intMessageLength And LengthMask(i)) >> (15 - i)
'Get the colour of the pixel
clr = bmp02.GetPixel(i, 0)
'Set ORcol to the value of the pixel's red component,
'with the least significant bit is set to 1
ORcol = clr.R Or 1
'Modify the pixel's colour so that the least significant bit of the red
'component is set to the same value (0 or 1) as bit i in the
'intMessageLength variable
clr = Color.FromArgb((ORcol And (254 + LengthArray(i))), clr.G, clr.B)
'Set the pixel to the modified colour
bmp02.SetPixel(i, 0, clr)
Next
'Encode the bits from one character's ASCII code into 8 pixels
'This loop will assign either a one or a zero to each element of ByteArray
For i = 0 To (intMessageLength - 1)
For j = 0 To 7
'The ASCII code is ANDed with each ByteMask element in turn, resulting in
'integer values that are either zero or a binary power within the range:
'[1,2,4,8,16,32,64,128] - the resulting integer value is right-shifted
'in order to leave 0 or 1
ByteArray(j) = (Asc(txtMessage.Text(i)) And ByteMask(j)) >> (7 - j)
'Get the colour of the pixel
clr = bmp02.GetPixel(x, y)
'Set ORcol to the value of the pixel's blue component,
'with the least significant bit set to 1
ORcol = clr.B Or 1
'Modify the pixel's colour so that the least significant bit of the blue
'component is set to the same value (0 or 1) as bit j in the ASCII
'character code
clr = Color.FromArgb(clr.R, clr.G, (ORcol And (254 + ByteArray(j))))
'Set the pixel to the modified colour
bmp02.SetPixel(x, y, clr)
'If this is the last pixel in the row, go to the start of the next row,
'otherwise go to the next pixel in the row
If x = cols - 1 Then
x = 0
y += 1
Else
x += 1
End If
Next
Next
'Set up the user interface to allow the user to save the encoded image file
txtMessage.Enabled = False
cmdEncrypt.Enabled = False
cmdSaveImage.Enabled = True
End Sub
Private Sub cmdDecrypt_Click(sender As Object, e As _
EventArgs) Handles cmdDecrypt.Click
'ByteArray() holds the values for each bit in the ASCII code
Dim ByteArray(0 To 7) As Integer
'LengthArray() Holds the values for each bit in the message length value
Dim LengthArray(0 To 15) As Integer
'CodedChar holds the result of each decoding operation
Dim CodedChar As Char
'CodedASCII holds the ASCII character code of each character exctracted
Dim CodedASCII As Integer
'Set up the text box for read-only output
txtMessage.Enabled = True
txtMessage.ReadOnly = True
'Get the message length from the red pixel value using the first 16 pixels
For i = 0 To 15
'Get the colour of the current pixel
clr = bmp02.GetPixel(i, 0)
'Get the LSB value for the pixel's red component
LengthArray(i) = (clr.R And 1)
'Add the binary component to the length variable
intMessageLength += 65535 And LengthArray(i) << (15 - i)
Next
For i = 0 To (intMessageLength - 1)
'Initialise the ASCII character code variable to zero
CodedASCII = 0
'extract the eight bits that make up the ASCII character code
For j = 0 To 7
'Get the colour of the current pixel
clr = bmp02.GetPixel(x, y)
'Get the LSB value for the pixel's blue component
ByteArray(j) = (clr.B And 1)
'Add the binary component to the character code
CodedASCII += 255 And ByteArray(j) << (7 - j)
'If this is the last pixel in the row, go to the start of the next row,
'otherwise go to the next pixel in the row
If x = cols - 1 Then
x = 0
y += 1
Else
x += 1
End If
Next
'Output the message to the text box
CodedChar = Chr(CodedASCII)
txtMessage.Text &= CodedChar
Next
'Set up the user interface to allow the user to
'save the decoded message as a text file
cmdDecrypt.Enabled = False
cmdSaveText.Enabled = True
lblMessageLength.Text = "Message length: " & intMessageLength & " characters"
End Sub
Private Sub cmdSaveImage_Click(sender As Object, e As _
EventArgs) Handles cmdSaveImage.Click
'This procedure saves the image with its encrypted message
'as a bitmap file with the extension .ebm
sfdSaveBitmap.Filter = "Encrypted Bitmaps |*.ebm"
If sfdSaveBitmap.ShowDialog = DialogResult.OK Then
bmp02.Save(sfdSaveBitmap.FileName, Drawing.Imaging.ImageFormat.Bmp)
End If
'Set the program back to its initial state
resetProgram()
End Sub
Private Sub cmdSaveText_Click(sender As Object, e As _
EventArgs) Handles cmdSaveText.Click
'This procedure saves the decoded message as a text file
Dim FileWriter As IO.StreamWriter
sfdSavePlainText.Filter = "Text |*.txt"
If sfdSavePlainText.ShowDialog = DialogResult.OK Then
FileWriter = New IO.StreamWriter(sfdSavePlainText.FileName, False)
FileWriter.Write(txtMessage.Text)
FileWriter.Close()
End If
'Set the program back to its initial state
resetProgram()
End Sub
Private Sub cmdCancel_Click(sender As Object, e As _
EventArgs) Handles cmdCancel.Click
'Set the program back to its initial state
resetProgram()
End Sub
Sub resetProgram()
'This procedure resets the program variables and
'restores the user interface to its original state
bmp01 = Nothing
bmp02 = Nothing
bmpTemp = Nothing
Me.Text = "GraphicEncryption"
picImage.Image = Nothing
txtMessage.Clear()
txtMessage.Enabled = False
txtMessage.ReadOnly = False
lblMessage.Text = ""
lblMessageLength.Visible = False
cmdLoadEnc.Enabled = True
cmdLoadBmp.Enabled = True
cmdEncrypt.Enabled = False
cmdSaveImage.Enabled = False
cmdDecrypt.Enabled = False
cmdSaveText.Enabled = False
cmdCancel.Enabled = False
End Sub
Private Sub cmdExit_Click _
(sender As Object, e As EventArgs) Handles cmdExit.Click
'This command exits the program unconditionally
End
End Sub
End Class
The program can encode an ASCII text-message (i.e. a message containing only eight-bit ASCII characters) into a bitmapped image. It does this by setting the value of the least significant bit (LSB) of the blue colour component in each pixel used. Each character in the message is encoded using eight contiguous pixels, and the characters in the message are encoded sequentially into eight-byte blocks within the bitmap, in the same order in which they appear in the original message. In order to encode one character, eight bytes of image data are required.
The possibilities for encoding data into a bitmap are almost endless. You could, for example, use all three colour components to encode the hidden information without noticably changing the image. This would increasing the amount of information that could be hidden (i.e. the encoding density) by a factor of three for any given image. Alternatively, you could increase the number of bytes used for the character encoding in order to allow the full range of Unicode characters to be encoded. This would reduce the encoding density, but would allow you to encode messages containing virtually any kind of character or symbol.
We leave more ambitious implementations to those with the enthusiasm to pursue them. In the meantime, a more detailed look how the existing program encodes an ASCII text message might be illuminating. Let's assume that the message we want to encode is:
"The boy stood on the burning deck ..."
Let us further assume that the bitmap image file "Tigger.bmp" (one of the files in graphic_encryption.zip) will be used as the carrier. By carrier, we mean the medium within which we will hide the information. The following screenshots outline the steps the user must follow in order to end up with an encoded bitmap file containing this information:
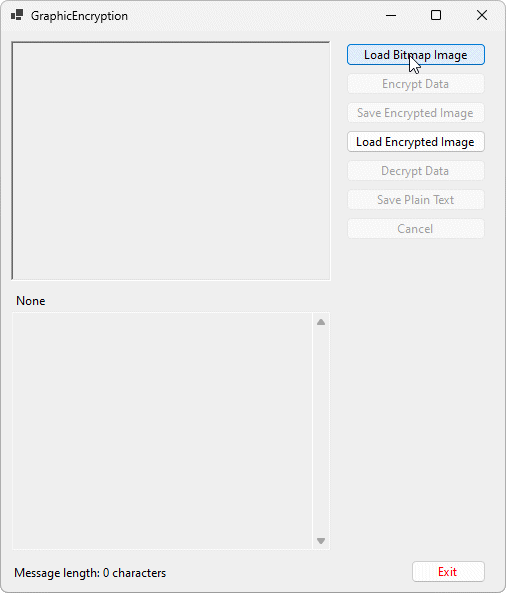
Click on the Load Bitmap Image button
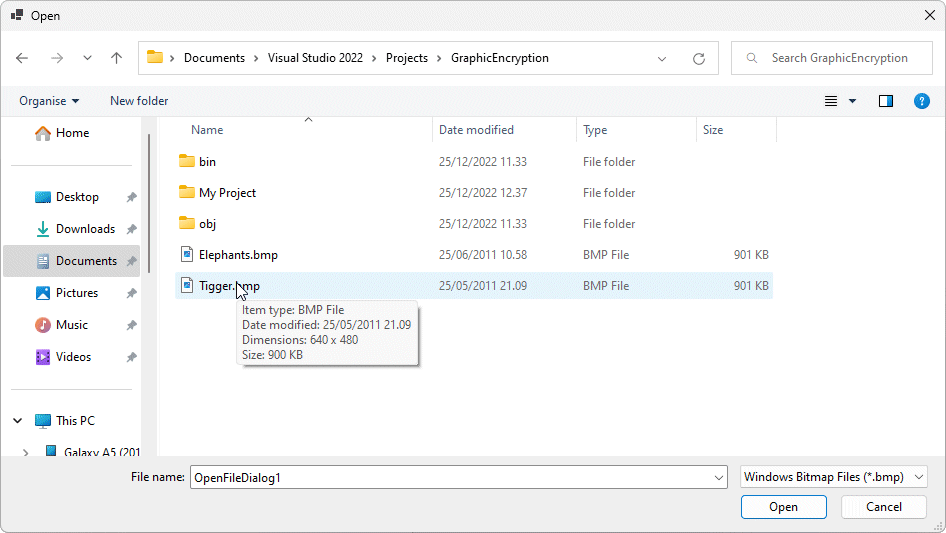
Browse to and select the file "Tigger.bmp", then click the Open button
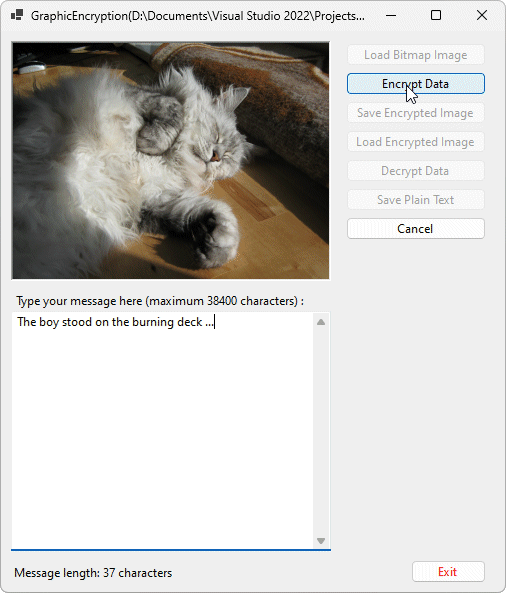
Type the message into the text box and click on the Encrypt Data button
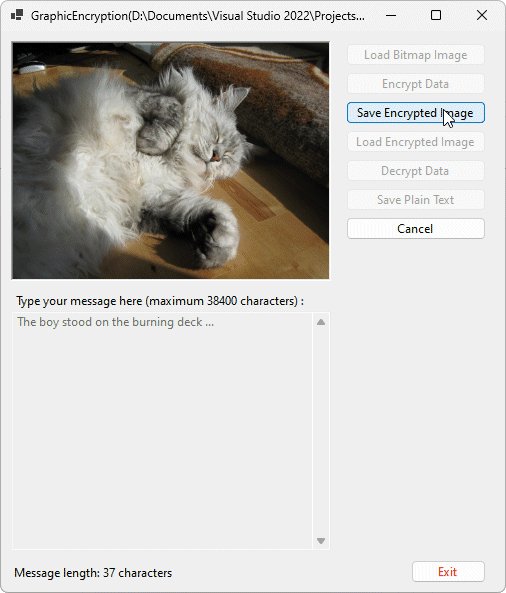
Click on the Save Encrypted Image button
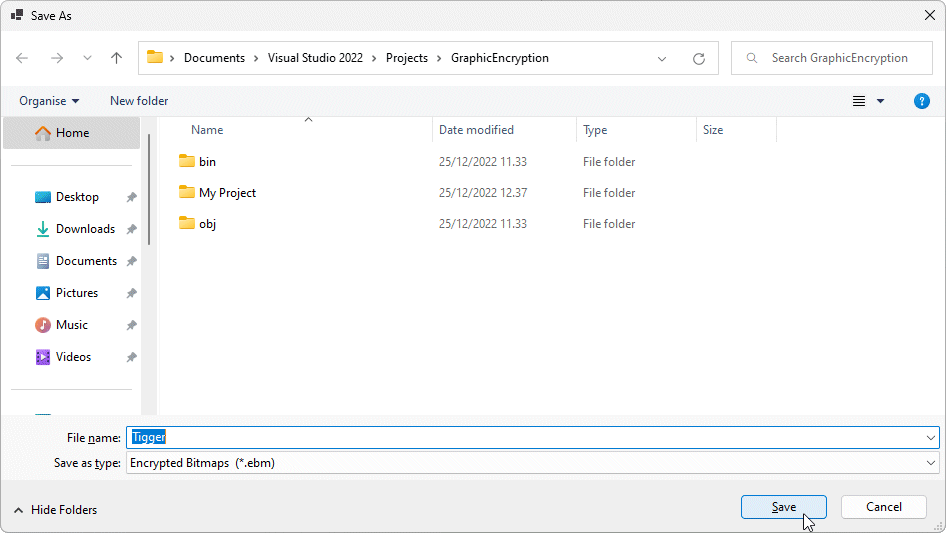
Save the encoded file with the .ebm file extension
The encoding of the message is done within a loop that iterates through the characters in the message one at a time. A second loop, nested within the first, is used to extract the eight bits of the ASCII character code for each character and encode it onto eight contiguous pixels within the image. Let's look at how this works for the first character in the message (in this example, the upper-case letter "T") :
84 AND 128
Binary: 01010100 AND 10000000 = 00000000
Right-shifting 00000000 by 7 places = 0
84 AND 64
Binary: 01010100 AND 01000000 = 01000000
Right-shifting 01000000 by 6 places = 1
84 AND 32
Binary: 01010100 AND 00100000 = 00000000
Right-shifting 00000000 by 5 places = 0
84 AND 16
Binary: 01010100 AND 00010000 = 00010000
Right-shifting 00010000 by 4 places = 1
84 AND 8
Binary: 01010100 AND 00001000 = 00000000
Right-shifting 00000000 by 3 places = 0
84 AND 4
Binary: 01010100 AND 00000100 = 00000100
Right-shifting 00000100 by 2 places = 1
84 AND 2
Binary: 01010100 AND 00000010 = 00000000
Right-shifting 00000000 by 1 place = 0
84 AND 1
Binary: 01010100 AND 00000001 = 00000000
Right-shifting 00000000 by 0 places = 0
To (hopefully) clarify things somewhat, the process is summarised in the following tables:
| ASCII Code (84) | 01010100 | 01010100 | 01010100 | 01010100 |
| Bitmask values (128, 64, 32, 16) | 10000000 | 01000000 | 00100000 | 00010000 |
| Result of AND | 00000000 | 01000000 | 00000000 | 00010000 |
| Result of right-shifting (7, 6, 5 and 4 places) | 00000000 | 00000001 | 00000000 | 00000001 |
| ASCII Code (84) | 01010100 | 01010100 | 01010100 | 01010100 |
| Bitmask values (8, 4, 2, 1) | 00001000 | 00000100 | 00000010 | 00000001 |
| Result of AND | 00000000 | 01000100 | 00000000 | 00000000 |
| Result of right-shifting (3, 2, 1 and 0 places) | 00000000 | 00000001 | 00000000 | 00000000 |
The inner loop of our encoding procedure executes eight times in total in order to encode the bits of a single character into a sequence of eight pixels. The outer loop repeats for as many times as there are characters in the message, until they are all encoded. The encoding of the message length value onto the red component of the first 16 pixels in the image works in exactly the same way - it's just a (potentially) bigger number.
If you understand how the encoding procedure works, you should be able to discern how the decoding algorithm works without too much trouble by looking at the code, so we will forgo any further explanation. Of course, the best way to prove that the code actually works is to try it out, so if we open our encrypted bitmap file, we should be able to retrieve the encoded message. The screenshot below shows the result of doing just that with a longer passage of text which we encoded into the "Elephant.ebm" bitmap file.
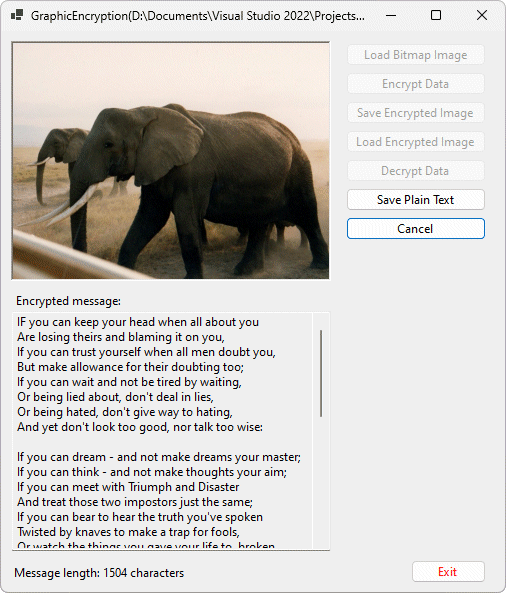
A message has been retrieved from an encrypted bitmap image