Database Coding with Visual Basic
Using the same database (Contacts.accdb) as for the page "An Address Book Database", we will create a database application using Visual Basic program code rather than wizards. The first thing we need to do is to create a connection object to enable us to connect to the database. The type of connection object used depends on the type of database involved. For an Access database, this will be an OLE DB (Object Linking and Embedding Database) connection object.
The connection object is created using Microsoft’s Access Database Engine, also known as Office Access Connectivity Engine (ACE). The first version of this database, developed in 1992, was called JET, which stands for Joint Engine Technology, and was commonly referred to as the Microsoft JET Engine. From this point forward, we will simply refer to it as ACE. The current stable version of ACE at the time of writing is ACE 16, although according to numerous sources (and in our experience) ACE 12.0 works for databases created with multiple versions of Access up to at least Access 2019. Since the database we are using was created with Access 2016, we will be using ACE 12.0.
- Using the Windows Forms App (.Net Framework) template as we did for the "AddressBook" project, create a new project called "AddressBook02".
- Save your project immediately to create the project folder.
- To simplify your code, copy the Contacts.accdb database into the \bin\Debug subdirectory of your project folder.
- Add a button to the application's main form and name it btnLoad.
- Double click on the button to open up the code editor window, and insert the following line of code:
Dim con As New OleDb.OleDbConnection
The variable con now holds a reference to the connection object.
As mentioned above, we identify the version of ACE to be used using a connection string. The connection string must also specify the precise path to the database, which is something you should bear in mind if you create database applications for distribution. Note also that the databse itself needs to be in a trusted location on your computer, or on whatever computer it resides on. If this is not the case, attempting to add or update records may cause problems, because you will need write permission for the target directory.
We define the connection string by setting the ConnectionString property of the connection object, which specifies both the technology to be used to connect to the database (the database provider), and the location of the database file (the data source). If the database were password protected, it would also need to include a valid username and password.
- Add the following line of code to your button's Click event handler:
con.ConnectionString = _
"Provider=Microsoft.ACE.OLEDB.12.0; Data Source=Contacts.accdb; Persist Security Info=False;"
Your code now should look like the illustration below.

This code creates a connection object and a connection string
To open the database, we use the Open() method of the connection object. After we have finished working with the database, it should be closed using the Close() method.
- Add the following code to your button's Click event handler:
con.Open()
MsgBox("A connection to the database is now open.")
con.Close()
MsgBox("The connection to the database is now closed.")
Your coding window should now look like the illustration below. You can run the program now to check that it can open and close the database. Once the program is running, click on the button you created; you should see a message that tells you that the connection to the database is open. Close this message box, and you should see another message box telling you that the connection is closed (if you get an error message, make sure that your database is in the location you specified).

The application can now open and close the database connection
ADO.Net uses an object called a DataSet to hold information read from the database (alternatively, an object called a DataTable is available if you just want to read information, as opposed to writing new or modified information to the database). Another object, called a Data Adapter, is used to communicate between the connection object and the dataset. We will need to create additional variables to hold references to the data adapter and dataset objects. We will also need to create string variables to hold the commands we will be sending to the database. These will be written in Structured Query Language (SQL), which is the common language that all databases understand.
- Add the following lines of code at the points shown in the illustration below:
Dim ds As New DataSet
Dim da As OleDb.OleDbDataAdapter
Dim sql As String
.
.
.
sql = "SELECT * FROM Contact"
da = New OleDb.OleDbDataAdapter(sql, con)
Your code window should now look like the illustration below.
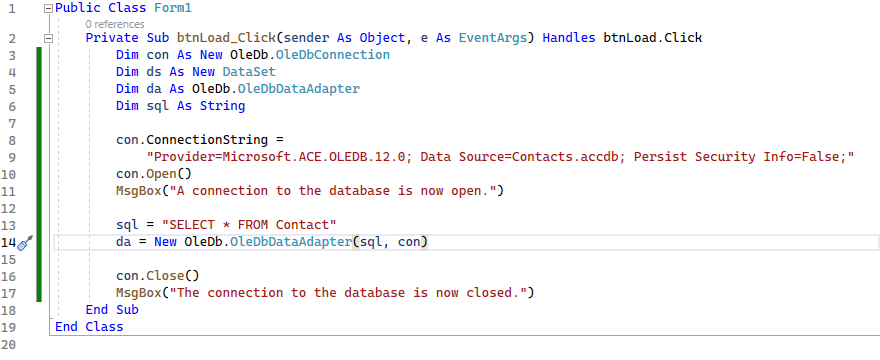
The application now has a data adapter, a dataset and an SQL command
The data adapter can fill a dataset with records from a table using its Fill() method, which takes two parameters. The first parameter will be the name of the variable that holds the reference to the dataset object (in this case ds). The second is a name that will be used to identify this particular data adapter fill, and can be anything you like (but it should be meaningful).
- Add the following line of code, immediately following the line that creates the new data adapter object:
da.Fill (ds, "Contacts")
This code fills the dataset ds with data from the Contact table in the database. The only problem is that the data itself cannot be seen by the user. The next thing we need to do, therefore, is to display the data in an appropriate format. To do this:
- Switch to the form design window, add two text boxes to the form, and name them txtFirstName and txtLastName
- Switch back to the code editor, and add the following lines of code after the line of code that closes the database connection:
txtFirstName.Text = ds.Tables("Contacts").Rows(0).Item(1).ToString()
txtLastName.Text = ds.Tables("Contacts").Rows(0).Item(2).ToString()
The first line of code assigns the contents of row 0, column 1 of the table to the Text property of txtFirstName. The second line of code assigns the contents of row 0, column 2 of the table to the Text property of txtLastName. The ToString() function is called here because any field that does not contain data will return a Null value, which cannot be displayed in a text box - the function replaces the Null value with an empty string ("").
Remember that rows and columns are indexed from zero, and that the first column in the table is the ContactID field, which we are not currently interested in. Row 0 thus points at the first record in the table, column 1 is the FirstName field, and column 2 is the LastName field (you could also use the field name to reference the required column, rather than the column number).
The code editor window should now look like the illustration below.
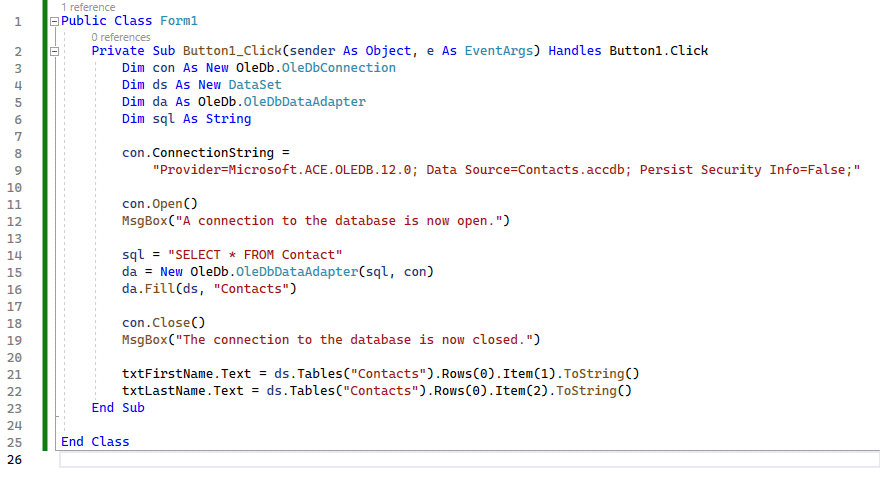
The code editor window should now look like this
If you run the program and click on the button (just click on OK when the connection status messages are displayed, to get rid of the message boxes), you should see the first name "Chris" and the last name "Wells" displayed in the two text boxes.
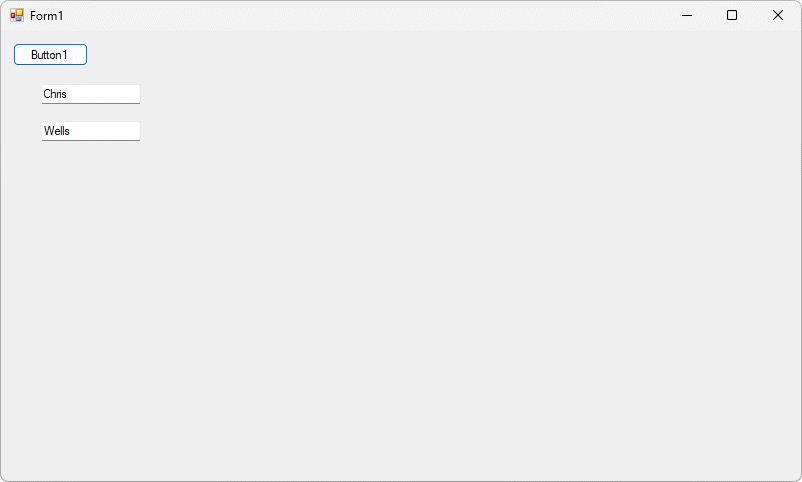
The application can now display some data from a database table
In order to see a different record, we need to use a different row number. In fact, we can scroll through the entire table by incrementing the row number to view each record in turn. Proceed as follows:
- Switch to the form design window, delete the button you created earlier, and switch back to the code editing window.
- Delete all of the code between "Public Class Form1" and "End Class"
- Enter the following code:
Dim con As New OleDb.OleDbConnection
Dim ds As New DataSet
Dim da As OleDb.OleDbDataAdapter
Dim sql As String
- Switch to the form design window again, and double-click anywhere on the main form. Visual Basic will create an empty Form1_Load procedure for you.
- Within the new procedure, enter the following code:
con.ConnectionString = "Provider=Microsoft.ACE.OLEDB.12.0; Data Source=Contacts.accdb; Persist Security Info=False;"
con.Open()
sql = "SELECT * FROM Contact"
da = New OleDb.OleDbDataAdapter(sql, con)
da.Fill(ds, "Contacts")
con.Close()
- Add four buttons to your form as follows:
| Button Name | Button Text |
|---|---|
| btnNext | Next Record |
| btnPrevious | Previous Record |
| btnFirst | First Record |
| btnLast | Last Record |
Your form should look something like the illustration below.
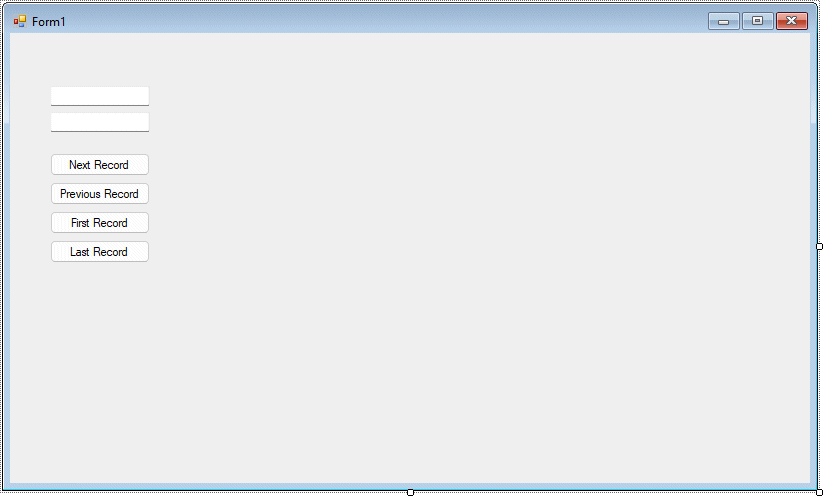
The form now has navigation buttons
- Add the following code to the Form1 declarations:
Dim maxRows As Integer
Dim inc As Integer
- Add the following code to the Form1_Load event procedure:
maxRows = ds.Tables("Contacts").Rows.Count
inc = 0
NavigateRecords()
The two integer variables (maxRows and inc) are used to store the total number of records in the data set (using the Count() method of the Rows property), and to keep track of the current record number when navigating backwards and forwards through table (using the variable inc, which is initialised to 0).
- Add the following procedure underneath the Form1_Load procedure:
Private Sub NavigateRecords()
txtFirstName.Text = ds.Tables("Contacts").Rows(inc).Item(1).ToString()
txtLastName.Text = ds.Tables("Contacts").Rows(inc).Item(2).ToString()
End Sub
The code so far should look like the illustration below.
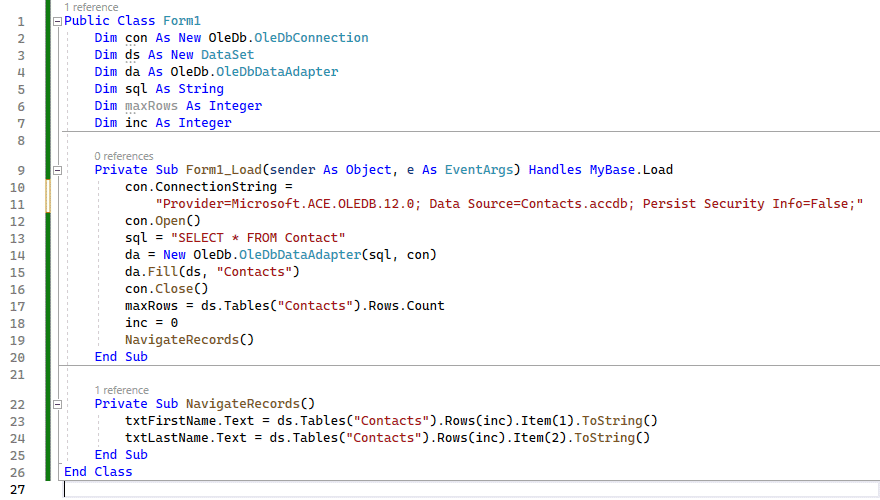
Your code should like like this
- Switch to the form design window again and double-click the Next Record button. Visual Basic will create an empty btnNext_Click() procedure for you.
- Add the following code to the btnNext_Click() procedure.
If inc <> maxRows - 1 Then
inc = inc + 1
NavigateRecords()
Else
MsgBox("No More Rows")
End If
If we have not reached the last record in the table, the code will increment the inc variable, and then call NavigateRecords(). Otherwise, it will display a message telling us there are no more rows. The NavigateRecords() procedure displays whatever record is at the row currently pointed to by inc. We will now add the code for the Previous Record button (switch to the form design window again, and double-click the Previous Record button. Visual Basic will create an empty procedure for you, as before).
- Add the following code to the btnPrevious_Click() procedure:
If inc > 0 Then
inc = inc - 1
NavigateRecords()
Else
MsgBox("First Record")
End If
If we have not reached the first record in the table, this code will decrement the inc variable, and then call NavigateRecords(). Otherwise, it will display a message telling us that we are already at the first record. As before, the NavigateRecords() procedure displays whatever record is at the row currently pointed to by inc.
- Create a btnFirst_Click() procedure, and add the following code:
inc = 0
NavigateRecords()
- Create a btnLast_Click() procedure, and add the following code:
inc = maxRows - 1
NavigateRecords()
Run the programme to test the navigation buttons. You should be able to navigate backwards and forwards through the records in the table, or jump to the first or last records. The next step will be to add controls to allow us to add, delete or update records. Bear in mind throughout this exercise that once the data has been read from the database into the dataset object, the connection with the database is closed. Any changes you make to the data, therefore, will not be written to the database unless, and until, the connection is re-opened, and the changes are committed to the database.
- Add a further five buttons to your form as follows:
| Button Name | Button Text |
|---|---|
| btnAdd | Add Record |
| btnCommit | Commit Changes |
| btnUpdate | Update Record |
| btnDelete | Delete Record |
| btnClear | Clear/Cancel |
Your form should now look something like the illustration below (use the formatting facilities to tidy the form up if necessary).
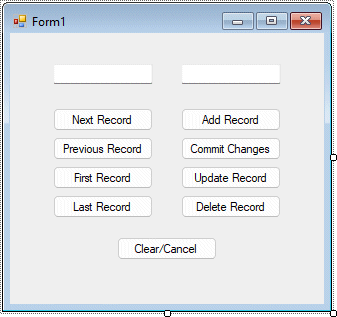
The form with its additional controls
- Add the following code to the Update Record button:
ds.Tables ("Contacts").Rows(inc).Item(1) = txtFirstName.Text.ToString()
ds.Tables ("Contacts").Rows(inc).Item(2) = txtLastName.Text.ToString()
MsgBox ("Record updated")
To test that the code is working:
- Run the application and go to the first record.
- Change the first and last names inside the text boxes to something different, and click on the Update Record button.
- Move to the next record (by clicking on the Next Record button), and then move back to the first record (by clicking on either the Previous Record button or the First Record button). You should see that the changes you made to the first record have been preserved.
- Now close the application, run it again, and go to the first record. You should see the original name information appear, rather than the amended version you so recently entered.
As stated earlier, any changes to the dataset object are not written to the database itself (committed) unless you explicitly instruct the application to carry out this step.
- Edit the code for the Update Record button to read as follows:
Dim cb As New OleDb.OleDbCommandBuilder(da)
ds.Tables ("Contacts").Rows(inc).Item(1) = txtFirstName.Text.ToString()
ds.Tables ("Contacts").Rows(inc).Item(2) = txtLastName.Text.ToString()
da.Update (ds, "Contacts")
MsgBox ("Record updated")
The first line of this amended code (the first addition to the procedure) creates an object called a command builder, the purpose of which is to build an SQL command string for you. The only parameter it requires is the name of a variable that holds a reference to a data adapter (in this case da). A reference to the command builder itself is stored in another variable called cb.
The fourth line of code (which is the other addition to the procedure) uses the data adapter's Update() method to send the changes we have made in the dataset (ds) to the database itself. The parameters passed to the update() method are the name of a variable that holds a reference to a dataset (in this case ds), and the meaningful name that we gave to the dataset (in this case "Contacts"). This second parameter is optional, but may make the code more readable.
You can test the code to ensure that it functions correctly by running the program again, making some changes to the first and last names in the first record, and closing the application down again. When you re-open the application, you should find that the changes you made have been saved.
We will now look at the code needed to add a new record.
- Add the following code to the Add Record button:
btnAdd.Enabled = False
btnUpdate.Enabled = False
btnDelete.Enabled = False
btnCommit.Enabled = True
txtFirstName.Clear()
txtLastName.Clear()
inc = maxRows
maxRows = maxRows + 1
This code switches off (disables) the Add Record button, together with the Update Record button and Delete Record button. At the same time, it switches on (enables) the Commit Changes button. It also clears the textboxes to enable the user to enter the details of the new record, and increments the variable maxRows (since we will be adding a record to the database).
The variable inc is set to the old value of maxRows (if we subsequently click on the Clear/Cancel button, we will check for a difference between these two values to determine whether or not we are cancelling the addition of a record to the database). Note that the Commit Changes button is actually enabled by default when the program starts, although it would obviously be better if it were disabled until needed. With this in mind, do the following:
- Switch to the form design window and click on the Commit Changes button.
- Find the button's Enabled property in the Properties list.
- Set this property to False.
Once you have entered the details for the new record, you will want to save it (commit it) to the database. Just supposing you change your mind before doing so, however, you should be able to cancel the operation.
- Switch to the form design window, double-click on the Clear/Cancel button, and add the following code to the event procedure that has been created for you:
btnCommit.Enabled = False
btnAdd.Enabled = True
btnUpdate.Enabled = True
btnDelete.Enabled = True
If maxRows > inc Then maxRows = inc
inc = 0
NavigateRecords()
This code switches the Commit Changes button off and the other three buttons back on, after which the first record is once again displayed (essentially, by setting the value of inc to 0, and then calling the NavigateRecords() procedure). Before resetting inc, the code sets the value of maxRows back to its previous value (the current value of inc), since we will not now be adding a record to the database. Assuming we do not change our minds, however, we will use the Commit Changes button to save the new record to the database.
- Switch to the form design window, double-click on the Commit Changes button, and add the following code to the event procedure that has been created for you:
If inc <> -1 Then
Dim cb As New OleDb.OleDbCommandBuilder(da)
Dim dsNewRow As DataRow
dsNewRow = ds.Tables("Contacts").NewRow()
dsNewRow.Item("FirstName") = txtFirstName.Text
dsNewRow.Item("LastName") = txtLastName.Text
ds.Tables("Contacts").Rows.Add(dsNewRow)
da.Update(ds, "Contacts")
MsgBox("New Record added to the database")
btnCommit.Enabled = False
btnAdd.Enabled = True
btnUpdate.Enabled = True
btnDelete.Enabled = True
End If
An If . . . statement is used to allow us to check whether or not there is actually a valid record to add. If there is (i.e. inc is not equal to -1), the next two lines of code set up a command builder, and create a DataRow object variable called dsNewRow. The next line of code actually creates the new record.
The next two lines set the values of FirstName and LastName in the new record to the values stored in txtFirstName.Text and txtLastName.Text respectively. The next two lines after that add the new record to the dataset and update the database.
The remaining code simply displays a message that informs the user that the new record has been added to the database, and restores the buttons on the form to the state they were in before the user clicked on the Add Record button.
You can test the Add Record button by running the program and trying it out. You may note certain circumstances under which the program generates an error when you click on the Commit Changes button. As an exercise, try to identify what circumstances cause an error, and try and amend your code to eliminate any problems.
We will now look at the code needed to delete a record.
- Add the following code to the Delete Record button:
Dim cb As New OleDb.OleDbCommandBuilder(da)
ds.Tables("Contacts").Rows(inc).Delete()
maxRows = maxRows - 1
inc = 0
NavigateRecords()
da.Update (ds, "Contacts")
NavigateRecords()
Most of the code here should by now be fairly self-explanatory. The only new element is the Delete() method, the purpose of which is to remove the specified row from the dataset. The inc variable points to the currently selected row, and this is the row that will be deleted from the dataset. The data adapter's Update() method is again called upon to send the changes to the database itself.
The maxRows variable is decremented by one to reflect the fact that we now have one less record in the dataset. The code then displays the first record once more by setting inc to zero, and calling the NavigateRecords() subroutine.
Test the code by running the application again and deleting a record. As with the previous code we have written, you will probably find that under certain circumstances, use of the Delete Record button causes a problem. As an exercise, see if you can amend the code to eliminate any potential problems.
- You may also wish to prompt the user for confirmation before the record is deleted. To achieve this, add the following code to the Delete Record button, before the code already in there:
If MessageBox.Show ("Are you sure?", "Delete", _
MessageBoxButtons.YesNo, MessageBoxIcon.Warning) = DialogResult.No Then
MsgBox ("Operation Cancelled")
Exit Sub
End If
Without going into too much detail, the message box displays two buttons (Yes and No). If the user clicks on the Yes button, the code that follows the If . . . statement will be executed (i.e. the record will be deleted). If the user clicks on the No button, the delete operation will be cancelled. The code exits the subroutine after displaying an appropriate message, without executing the code that follows the If . . . statement.
The application is obviously far from complete, since at the moment it displays only the first and last names of the contact. As a final exercise, you may wish to complete the program by adding the requisite text boxes and labels, and generally improving the look and feel of the user interface. You will also need to write some additional code (for example to clear the remainder of the text boxes when the Add Record button is pressed, and extend the NavigateRecords() procedure). Your final application might look something like the illustration below.
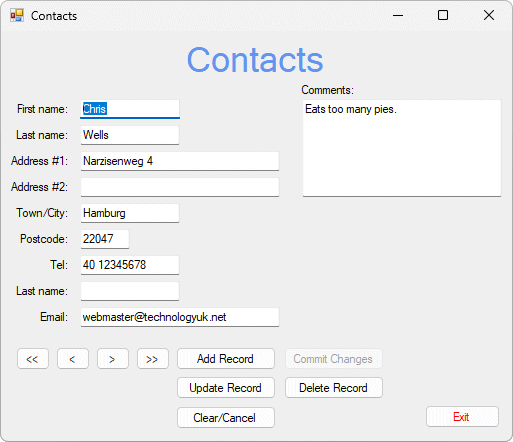
A possible layout for the application
