Visual Basic - The MathTest Project
The MathTest project was the subject of an assignment that I gave to students to give them the opportunity to achieve a broad range of criteria. It is of especial interest here because it is the first example we have looked at of a project that uses multiple forms. It also features control arrays, a code module, and some database programming.
Like the other projects presented on these pages it is somewhat limited in its scope because we don't want to overwhelm those of you who are new to programming. It does however offer plenty of opportunities for further development. The basic idea of this program is to allow users to test their basic arithmetic skills. The user must log in using a valid username and password, and is then presented with a menu screen that allows them to take a test in addition, subtraction, multiplication or division.
Each test can be taken at one of three levels - easy, moderate or hard. If the user has taken a test previously and achieved a pass at a given level, they may not take a test at a lower level. After each test, the user is taken to a results screen that shows them how they fared on each question and their total score for the test. Before leaving this screen, and providing they have passed the test, they are offered the option of recording their result.
The difficulty level of each test is determined by the size of the numbers used for the operands in each question, which we have set on a somewhat arbitrary basis.
- Using the Windows Forms App (.Net Framework) template as we did for the "AddressBook" and "AddressBook02" projects, open a new project called "MathTest" and save the project immediately to create the project folder.
- Download the file "mathtest.zip" from the link below. This file contains the program icon and the database file for the MathTest project. Unzip the contents and copy or save them into your project folder's \bin\Debug\ subdirectory.
Download mathtest.zip here.
- Create an interface like the one illustrated below (this is both the application's login form and its opening screen).
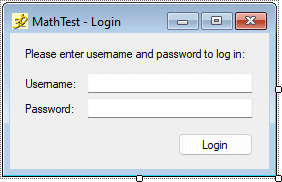
The MathTest login form interface
- Set the control names and other properties as shown in the table below (don't forget to change the application's Startup Object property to match the name of the form).
| Control | Name | Additional Properties |
|---|---|---|
| Form | frmMathTest | Icon: mathtest.ico Size: 275, 175 Text: "MathTest - Login" |
| Label | lblLoginInstruction | Location: 12, 14 Text: "Please enter username and password to log in:" |
| Label | lblUserName | Location: 12, 44 Text: "Username:" TextAlign: MiddleRight |
| Label | lblPassword | Location: 12, 69 Text: "Password:" TextAlign: MiddleRight |
| TextBox | txtUserName | Location: 77, 40 MaxLength: 15 Size: 166, 20 |
| TextBox | txtPassword | Location: 77, 65 MaxLength: 15 Size: 166, 20 |
| Button | cmdLogin | Location: 168, 100 Text: "Login" |
The code for frmMathTest gets the username and password from the user and checks it against the database records to ensure that the user's credentials are valid before allowing them to proceed further. Before we implement this code however, we have a few other things to do. First of all, we will create the program's code module and set up the global variables that will be used by the various forms, including frmMathTest.
- Click on the Project menu and select Add Module...
- Create a code module with the name "modMain"
- The module's code editor window will appear. Add the following code between the Module modMain and End Module statements:
'All of the program's global variables are declared here
'Database variables
Public con As New OleDb.OleDbConnection
Public ds As New DataSet
Public da As OleDb.OleDbDataAdapter
Public sql As String
Public cmd As OleDb.OleDbCommand
Public userName As String 'Variable to hold user login name
'Test result variables
Public scoreAdd As Integer
Public levelAdd As Integer
Public scoreSub As Integer
Public levelSub As Integer
Public scoreMul As Integer
Public levelMul As Integer
Public scoreDiv As Integer
Public levelDiv As Integer
'Test parameter variables
Public type As Integer = 0
Public level As Integer = 0
Public qNum As Integer = 0
Public testScore As Integer = 0
Public pass As Boolean = False
'Question parameter variables
Public op1(0 To 9) As Integer
Public op2(0 To 9) As Integer
Public optr(0 To 3) As Integer
Public ans(0 To 9) As Integer
Public userAns(0 To 9) As Integer
Public multiplier As Integer
'Operator character set, stored as an array
Public opChar() As Char = {"+", "-", "x", "÷"}
'Control array variables
Public RadioArrayType(0 To 3) As RadioButton
Public RadioArrayLevel(0 To 2) As RadioButton
Public LabelArrayQuestion(0 To 9) As Label
Public LabelArrayAnswer(0 To 9) As Label
Public PicArrayMark(0 To 9) As PictureBox
Sub resetTest()
'Re-initialise all test variables to their initial values
Type = 0
level = 0
qNum = 0
multiplier = 0
For i = 0 To 9
op1(i) = 0
op2(i) = 0
ans(i) = 0
userAns(i) = 0
Next
End Sub
The purpose of each of the global variables is hopefully clear from the comments and the variable names used (we have largely ignored the usual Microsoft naming conventions on this occasion). The subroutine resetTest() is defined here because it is called from two different forms. Code modules are quite useful for storing global variables, and for defining subroutines that will be accessed by more than one form. Before writing any more code, it is probably a good idea to create the application's other forms, starting with the menu form.
- Click on the Project menu and select Add Form (Windows Forms)...
- Name the form frmMenu
- Create an interface like the one illustrated below.
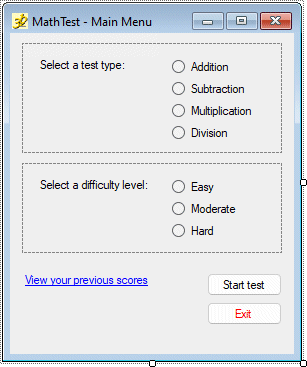
The MathTest menu form interface
- Set the control names and other properties as shown in the table below.
| Control | Name | Additional Properties |
|---|---|---|
| Form | frmMenu | Icon: mathtest.ico Size: 300, 360 Text: "MathTest - Main Menu" |
| Panel | pnlSelectTestType | Location: 12, 10 Size: 260, 110 |
| Label | lblSelectType | Location: 15, 15 Text: "Select a test type:" |
| RadioButton | radAdd | Location: 150, 15 Text: "Addition" |
| RadioButton | radSub | Location: 150, 37 Text: "Subtraction" |
| RadioButton | radMul | Location: 150, 59 Text: "Multiplication" |
| RadioButton | radDiv | Location: 150, 81 Text: "Division" |
| Panel | pnlSelectLevel | Location: 12, 130 Size: 260, 90 |
| Label | lblSelectLevel | Location: 15, 15 Text: "Select a difficulty level:" |
| RadioButton | radEasy | Location: 150, 15 Text: "Easy" |
| RadioButton | radMode | Location: 150, 37 Text: "Moderate" |
| RadioButton | radHard | Location: 150, 59 Text: "Hard" |
| Label | lblResults | Font: Microsoft Sans Serif, 8.25pt, style=Underline ForeColor: Blue Location: 12, 240 Text: "View your previous scores" |
| Button | cmdStart | Location: 197, 240 Text: "Start test" |
| Button | cmdExit | ForeColor: Red Location: 197, 287 Text: "Exit" |
- Click on the Project menu and select Add Form (Windows Forms)...
- Name the form frmTestPage
- Create an interface like the one illustrated below.
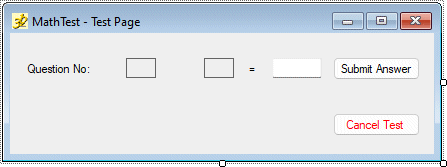
The MathTest test form interface
- Set the control names and other properties as shown in the table below.
| Control | Name | Additional Properties |
|---|---|---|
| Form | frmTestPage | Icon: mathtest.ico Size: 440, 160 Text: "MathTest - Test Page" |
| Label | lblQNo | AutoSize: False Location: 15, 24 Size: 90, 22 Text: "Question No:" TextAlign: MiddleLeft |
| Label | lblOp1 | AutoSize: False BorderStyle: FixedSingle Location: 116, 25 Size: 30, 20 Text: None TextAlign: MiddleCenter |
| Label | lblOperator | AutoSize: False Location: 157, 27 Size: 26, 16 Text: None TextAlign: MiddleCenter |
| Label | lblOp2 | AutoSize: False BorderStyle: FixedSingle Location: 194, 25 Size: 30, 20 Text: None TextAlign: MiddleCenter |
| Label | lblEquals | AutoSize: False Location: 230, 25 Size: 26, 20 Text: "=" TextAlign: MiddleCenter |
| TextBox | txtAnswer | Location: 262, 25 Size: 50, 20 TextAlign: Centre |
| Button | cmdSubmit | Location: 323, 24 Size: 87, 23 Text: "Submit Answer" |
| Button | cmdCancel | ForeColor: Red Location: 323, 80 Size: 87, 23 Text: "Cancel Test" |
- Click on the Project menu and select Add Form (Windows Forms)...
- Name the form "frmTestResults"
- Create an interface like the one illustrated below.
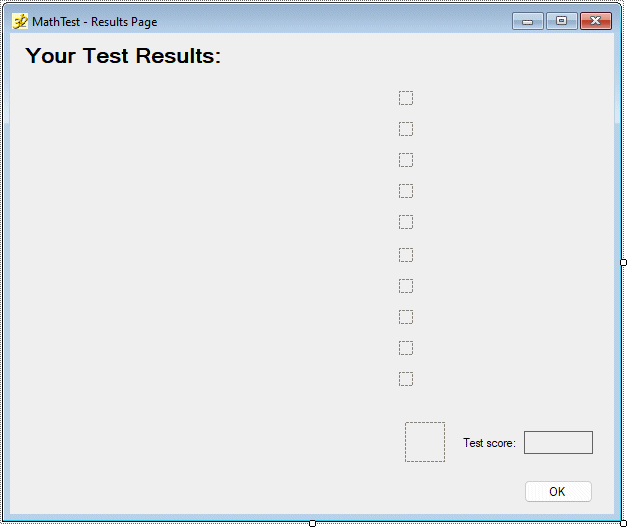
The MathTest results form interface
- Set the control names and other properties as shown in the table below.
| Control | Name | Additional Properties |
|---|---|---|
| Form | frmTestResults | Icon: mathtest.ico Size: 620, 520 Text: "MathTest - Results Page" |
| Label | lblHeader | Font: Microsoft Sans Serif, 16pt, style=Bold Location: 10, 10 Text: "Your Test Results:" |
| Label | lblQ01 | AutoSize: False Font: Consolas, 10pt Location: 10, 58 Size: 360, 16 Text: None TextAlign: MiddleLeft |
| Label | lblQ02 | AutoSize: False Font: Consolas, 10pt Location: 10, 89 Size: 360, 16 Text: None TextAlign: MiddleLeft |
| Label | lblQ03 | AutoSize: False Font: Consolas, 10pt Location: 10, 120 Size: 360, 16 Text: None TextAlign: MiddleLeft |
| Label | lblQ04 | AutoSize: False Font: Consolas, 10pt Location: 10, 151 Size: 360, 16 Text: None TextAlign: MiddleLeft |
| Label | lblQ05 | AutoSize: False Font: Consolas, 10pt Location: 10, 182 Size: 360, 16 Text: None TextAlign: MiddleLeft |
| Label | lblQ06 | AutoSize: False Font: Consolas, 10pt Location: 10, 213 Size: 360, 16 Text: None TextAlign: MiddleLeft |
| Label | lblQ07 | AutoSize: False Font: Consolas, 10pt Location: 10, 244 Size: 360, 16 Text: None TextAlign: MiddleLeft |
| Label | lblQ08 | AutoSize: False Font: Consolas, 10pt Location: 10, 275 Size: 360, 16 Text: None TextAlign: MiddleLeft |
| Label | lblQ09 | AutoSize: False Font: Consolas, 10pt Location: 10, 306 Size: 360, 16 Text: None TextAlign: MiddleLeft |
| Label | lblQ10 | AutoSize: False Font: Consolas, 10pt Location: 10, 337 Size: 360, 16 Text: None TextAlign: MiddleLeft |
| PictureBox | picRes01 | Location: 389, 58 Size: 14, 14 |
| PictureBox | picRes02 | Location: 389, 89 Size: 14, 14 |
| PictureBox | picRes03 | Location: 389, 120 Size: 14, 14 |
| PictureBox | picRes04 | Location: 389, 151 Size: 14, 14 |
| PictureBox | picRes05 | Location: 389, 182 Size: 14, 14 |
| PictureBox | picRes06 | Location: 389, 215 Size: 14, 14 |
| PictureBox | picRes07 | Location: 389, 246 Size: 14, 14 |
| PictureBox | picRes08 | Location: 389, 277 Size: 14, 14 |
| PictureBox | picRes09 | Location: 389, 308 Size: 14, 14 |
| PictureBox | picRes10 | Location: 389, 339 Size: 14, 14 |
| Label | lblCAns01 | AutoSize: False Font: Consolas, 10pt Location: 423, 58 Size: 170, 16 Text: None TextAlign: MiddleLeft |
| Label | lblCAns02 | AutoSize: False Font: Consolas, 10pt Location: 423, 89 Size: 170, 16 Text: None TextAlign: MiddleLeft |
| Label | lblCAns03 | AutoSize: False Font: Consolas, 10pt Location: 423, 120 Size: 170, 16 Text: None TextAlign: MiddleLeft |
| Label | lblCAns04 | AutoSize: False Font: Consolas, 10pt Location: 423, 151 Size: 170, 16 Text: None TextAlign: MiddleLeft |
| Label | lblCAns05 | AutoSize: False Font: Consolas, 10pt Location: 423, 182 Size: 170, 16 Text: None TextAlign: MiddleLeft |
| Label | lblCAns06 | AutoSize: False Font: Consolas, 10pt Location: 423, 213 Size: 170, 16 Text: None TextAlign: MiddleLeft |
| Label | lblCAns07 | AutoSize: False Font: Consolas, 10pt Location: 423, 244 Size: 170, 16 Text: None TextAlign: MiddleLeft |
| Label | lblCAns08 | AutoSize: False Font: Consolas, 10pt Location: 423, 275 Size: 170, 16 Text: None TextAlign: MiddleLeft |
| Label | lblCAns09 | AutoSize: False Font: Consolas, 10pt Location: 423, 306 Size: 170, 16 Text: None TextAlign: MiddleLeft |
| Label | lblCAns10 | AutoSize: False Font: Consolas, 10pt Location: 423, 337 Size: 170, 16 Text: None TextAlign: MiddleLeft |
| Label | lblResultMessage | AutoSize: False Location: 10, 400 Size: 375, 18 Text: None TextAlign: MiddleRight |
| PictureBox | picSymbol | Location: 395, 389 Size: 40, 40 |
| Label | lblScore | AutoSize: False Location: 450, 400 Size: 60, 18 Text: "Test score:" TextAlign: MiddleRight |
| Label | lblTestScore | AutoSize: False BorderStyle: FixedSingle Font: Microsoft Sans Serif, 10pt Location: 514, 398 Size: 69, 23 Text: None TextAlign: MiddleCenter |
| Button | cmdResultsOK | Location: 514, 447 Size: 69, 23 Text: "OK" |
- Click on the Project menu and select Add Form (Windows Forms)...
- Name the form "frmPreviousScores"
- Create an interface like the one illustrated below.
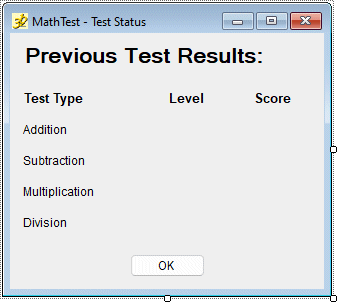
The MathTest test status form interface
- Set the control names and other properties as shown in the table below.
| Control | Name | Additional Properties |
|---|---|---|
| Form | frmPreviousScores | Icon: mathtest.ico Size: 330, 295 Text: "MathTest - Test Status" |
| Label | lblHeader | Font: Microsoft Sans Serif, 16pt, style=Bold Location: 10, 10 Text: "Previous Test Results:" |
| Label | lblType | AutoSize: False Font: Arial, 10pt, style=Bold Location: 11, 57 Size: 120, 16 Text: "Test Type" TextAlign: MiddleLeft |
| Label | lblLevel | AutoSize: False Font: Arial, 10pt, style=Bold Location: 137, 57 Size: 80, 16 Text: "Level" TextAlign: MiddleCenter |
| Label | lblScore | AutoSize: False Font: Arial, 10pt, style=Bold Location: 223, 57 Size: 80, 16 Text: "Score" TextAlign: MiddleCenter |
| Label | lblAdd | AutoSize: False Font: Arial, 9pt Location: 10, 88 Size: 120, 16 Text: "Addition" TextAlign: MiddleLeft |
| Label | lblSub | AutoSize: False Font: Arial, 9pt Location: 10, 119 Size: 120, 16 Text: "Subtraction" TextAlign: MiddleLeft |
| Label | lblMul | AutoSize: False Font: Arial, 9pt Location: 10, 150 Size: 120, 16 Text: "Multiplication" TextAlign: MiddleLeft |
| Label | lblDiv | AutoSize: False Font: Arial, 9pt Location: 10, 181 Size: 120, 16 Text: "Division" TextAlign: MiddleLeft |
| Label | lblAddLevel | AutoSize: False Font: Arial, 9pt Location: 137, 88 Size: 80, 16 Text: None TextAlign: MiddleCenter |
| Label | lblSubLevel | AutoSize: False Font: Arial, 9pt Location: 137, 119 Size: 80, 16 Text: None TextAlign: MiddleCenter |
| Label | lblMulLevel | AutoSize: False Font: Arial, 9pt Location: 137, 150 Size: 80, 16 Text: None TextAlign: MiddleCenter |
| Label | lblDivLevel | AutoSize: False Font: Arial, 9pt Location: 137, 181 Size: 80, 16 Text: None TextAlign: MiddleCenter |
| Label | lblAddScore | AutoSize: False Font: Arial, 9pt Location: 223, 88 Size: 80, 16 Text: None TextAlign: MiddleCenter |
| Label | lblSubScore | AutoSize: False Font: Arial, 9pt Location: 223, 119 Size: 80, 16 Text: None TextAlign: MiddleCenter |
| Label | lblMulScore | AutoSize: False Font: Arial, 9pt Location: 223, 150 Size: 80, 16 Text: None TextAlign: MiddleCenter |
| Label | lblDivScore | AutoSize: False Font: Arial, 9pt Location: 223, 181 Size: 80, 16 Text: None TextAlign: MiddleCenter |
| Button | cmdOK | Location: 120, 221 Text: "OK" |
- Click on the Project menu and select Add Form (Windows Forms)...
- Name the form "frmAdmin"
- Create an interface like the one illustrated below.
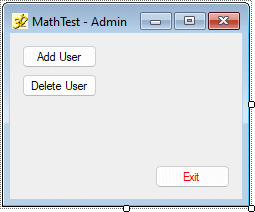
The MathTest admin form interface
- Set the control names and other properties as shown in the table below.
| Control | Name | Additional Properties |
|---|---|---|
| Form | frmAdmin | Icon: mathtest.ico Size: 248, 205 Text: "MathTest - Admin" |
| Button | cmdAddUser | Location: 12, 12 Text: "Add User" |
| Button | cmdDelUser | Location: 12, 41 Text: "Delete User" |
| Button | cmdExit | ForeColor: Red Location: 145, 132 Text: "Exit" |
- We are now ready to add the code to the login form. Open the code editor window for the form frmMathTest and add the following code in the body of the form's class definition:
'This is the application's opening screen - it allows the user to log in
Private Sub cmdLogin_Click(sender As Object, e As EventArgs) _
Handles cmdLogin.Click
'Make sure the user has entered both a username and a password
If txtUserName.Text = "" Then
MsgBox("You have not entered a username.")
txtUserName.Focus()
Exit Sub
ElseIf txtPassword.Text = "" Then
MsgBox("You have not entered a password.")
txtPassword.Focus()
Exit Sub
End If
userName = txtUserName.Text 'Store the username for later use
'Set up the database connection string and open the database
con.ConnectionString = _
"Provider=Microsoft.ACE.OLEDB.12.0; Data Source=mathtest.accdb"
con.Open()
'Create the sql command string
Sql = "SELECT * FROM MathTest WHERE usrLoginName = '" & txtUserName.Text & _
"' AND usrPassword = '" & txtPassword.Text & "'"
da = New OleDb.OleDbDataAdapter(Sql, con) 'Create a data adapter object
da.Fill(ds, "UserInfo") 'Populate the dataset
con.Close() 'Close the database
'Check that the user actually exists
If ds.Tables("UserInfo").Rows.Count = 0 Then
MsgBox("Invalid username or password.")
Exit Sub
ElseIf userName = "admin" Then
'If the admin user has logged in, go to the admin screen
frmAdmin.Show()
Me.Hide()
Else
'Otherwise get the user's test scores and level attained in each type of test
scoreAdd = ds.Tables("UserInfo").Rows(0).Item(3)
levelAdd = ds.Tables("UserInfo").Rows(0).Item(4)
scoreSub = ds.Tables("UserInfo").Rows(0).Item(5)
levelSub = ds.Tables("UserInfo").Rows(0).Item(6)
scoreMul = ds.Tables("UserInfo").Rows(0).Item(7)
levelMul = ds.Tables("UserInfo").Rows(0).Item(8)
scoreDiv = ds.Tables("UserInfo").Rows(0).Item(9)
levelDiv = ds.Tables("UserInfo").Rows(0).Item(10)
'Display the main menu screen and hide the login screen
frmMenu.Show()
Me.Hide()
End If
End Sub
Private Sub cmdExit_Click(sender As Object, e As EventArgs)
End 'Exit the program immediately
End Sub
- Before proceeding further, run the program and log in using the default user name ("user") and password ("pass") to check that everything is working OK (if so, you should see the main menu screen appear).
- We are now ready to add the code to the menu form. Open the code editor window for the form frmMenu and add the following code in the body of the form's class definition:
Private Sub frmMenu_Load(sender As Object, e As EventArgs) _
Handles MyBase.Load
'Make sure no menu items are selected when form first loads
initMenuArrays() 'Set up the control arrays for the menu form
For i = 0 To 3
RadioArrayType(i).Checked = False
Next
For i = 0 To 2
RadioArrayLevel(i).Checked = False
Next
End Sub
Sub initLevels()
'Enable choice of levels and clear any existing selection
For i = 0 To 2
RadioArrayLevel(i).Enabled = True
RadioArrayLevel(i).Checked = False
Next
End Sub
Private Sub radAdd_Click(sender As Object, e As EventArgs) _
Handles radAdd.Click
'This procedure executes if the user selects the addition test type
initLevels() 'Reset levels to none selected
If radAdd.Checked = True Then
Select Case levelAdd
'Make sure user cannot select a level lower than the highest level
'they have previously attained, and set default selection
Case 0
RadioArrayLevel(0).Checked = True
Case 1
RadioArrayLevel(0).Checked = True
Case 2
RadioArrayLevel(0).Enabled = False
RadioArrayLevel(1).Checked = True
Case 3
RadioArrayLevel(0).Enabled = False
RadioArrayLevel(1).Enabled = False
RadioArrayLevel(2).Checked = True
End Select
End If
End Sub
Private Sub radSub_Click(sender As Object, e As EventArgs) _
Handles radSub.Click
'This procedure executes if the user selects the subtraction test type
initLevels() 'Reset levels to none selected
If radSub.Checked = True Then
Select Case levelSub
'Make sure user cannot select a level lower than the highest level
'they have previously attained, and set default selection
Case 0
RadioArrayLevel(0).Checked = True
Case 1
RadioArrayLevel(0).Checked = True
Case 2
RadioArrayLevel(0).Enabled = False
RadioArrayLevel(1).Checked = True
Case 3
RadioArrayLevel(0).Enabled = False
RadioArrayLevel(1).Enabled = False
RadioArrayLevel(2).Checked = True
End Select
End If
End Sub
Private Sub radMul_Click(sender As Object, e As EventArgs) _
Handles radMul.Click
'This procedure executes if the user selects the multiplication test type
initLevels() 'Reset levels to none selected
If radMul.Checked = True Then
Select Case levelMul
'Make sure user cannot select a level lower than the highest level
'they have previously attained, and set default selection
Case 0
RadioArrayLevel(0).Checked = True
Case 1
RadioArrayLevel(0).Checked = True
Case 2
RadioArrayLevel(0).Enabled = False
RadioArrayLevel(1).Checked = True
Case 3
RadioArrayLevel(0).Enabled = False
RadioArrayLevel(1).Enabled = False
RadioArrayLevel(2).Checked = True
End Select
End If
End Sub
Private Sub radDiv_Click(sender As Object, e As EventArgs) _
Handles radDiv.Click
'This procedure executes if the user selects the division test type
initLevels() 'Reset levels to none selected
If radDiv.Checked = True Then
Select Case levelDiv
'Make sure user cannot select a level lower than the highest level
'they have previously attained, and set default selection
Case 0
RadioArrayLevel(0).Checked = True
Case 1
RadioArrayLevel(0).Checked = True
Case 2
RadioArrayLevel(0).Enabled = False
RadioArrayLevel(1).Checked = True
Case 3
RadioArrayLevel(0).Enabled = False
RadioArrayLevel(1).Enabled = False
RadioArrayLevel(2).Checked = True
End Select
End If
End Sub
Private Sub cmdStart_Click(sender As Object, e As EventArgs) _
Handles cmdStart.Click
type = 0 'Initialise test type to none
level = 0 'Initialise level to zero
For i = 0 To 3
'Get user selection for type of test to be taken
If RadioArrayType(i).Checked = True Then
type = i + 1
End If
Next
For i = 0 To 2
'Get user selection for level of test to be taken
If RadioArrayLevel(i).Checked = True Then
level = i + 1
End If
Next
If type = 0 Then
'If the user has not selected a test type, prompt them
MsgBox("You have not selected a test type.")
Else
'Otherwise, open the test page and close the menu page
frmTestPage.Show()
Me.Close()
End If
End Sub
Private Sub lblResults_Click(sender As Object, e As EventArgs) _
Handles lblResults.Click
'If the user has previous test scores on record, display them
If levelAdd = 0 And levelSub = 0 And levelMul = 0 And levelDiv = 0 Then
MsgBox("You have no test scores currently on record.")
Else
frmPreviousScores.Show()
End If
End Sub
Public Sub initMenuArrays()
'Set up the control arrays for the menu form
RadioArrayType(0) = radAdd
RadioArrayType(1) = radSub
RadioArrayType(2) = radMul
RadioArrayType(3) = radDiv
RadioArrayLevel(0) = radEasy
RadioArrayLevel(1) = radMode
RadioArrayLevel(2) = radHard
End Sub
Private Sub cmdExit_Click(sender As Object, e As EventArgs) _
Handles cmdExit.Click
End 'Exit the program immediately
End Sub
- The code for the test form needs to be added next. Open the code editor window for the form frmTestPage and add the following code in the body of the form's class definition:
Private Sub frmTestPage_Load(sender As Object, e As EventArgs) _
Handles MyBase.Load
'Generate the first question when the form loads
generateQuestion()
End Sub
Private Sub cmdCancel_Click(sender As Object, e As EventArgs) _
Handles cmdCancel.Click
'If the user cancels the test, reset the test variables and close the form
resetTest()
frmMenu.Show()
Me.Close()
End Sub
Private Sub cmdSubmit_Click(sender As Object, e As EventArgs) _
Handles cmdSubmit.Click
'This procedure executes when the user clicks on the Submit button
If txtAnswer.Text = "" Then
'Make sure the user has entered an answer
MsgBox("You have not given an answer.")
txtAnswer.Focus()
Exit Sub
End If
userAns(qNum) = CInt(txtAnswer.Text) 'Convert the answer to an integer and save it
qNum += 1 'Increment the question number
If qNum > 9 Then
'If ten questions have been answered, the test is complete
MsgBox("You have completed the test!")
frmTestResults.Show() 'Open the test result form
Me.Close() 'Close the test form
Else
'If test is not complete, generate another question
generateQuestion()
txtAnswer.Focus()
End If
End Sub
Private Sub txtAnswer_KeyPress _
(sender As Object, e As Windows.Forms.KeyPressEventArgs) _
Handles txtAnswer.KeyPress
'This routine handles characters typed into the answer box and discards
'all non-numeric keystrokes
If(e.KeyChar < "0" Or e.KeyChar > "9") And e.KeyChar <> vbBack Then
e.Handled = True
End If
End Sub
Public Sub generateQuestion()
Dim temp As Integer 'Variable to hold result of intermediate calculations
Randomize() 'Create a new seed for generating random numbers
Select Case type 'Determine what type of test has been selected
Case 1 'Addition test
Select Case level 'Determine which test level has been selected
Case 1
'Generate random numbers between 1 and 15
op1(qNum) = Rnd() * 14 + 1
op2(qNum) = Rnd() * 14 + 1
Case 2
'Generate random numbers between 10 and 25
op1(qNum) = Rnd() * 15 + 10
op2(qNum) = Rnd() * 15 + 10
Case 3
'Generate random numbers between 25 and 100
op1(qNum) = Rnd() * 75 + 25
op2(qNum) = Rnd() * 75 + 25
End Select
ans(qNum) = op1(qNum) + op2(qNum) 'Calculate correct answer
Case 2 'Subtraction test
Select Case level 'Determine which test level has been selected
Case 1
'Generate random numbers between 1 and 15
op1(qNum) = Rnd() * 14 + 1
op2(qNum) = Rnd() * 14 + 1
Case 2
'Generate random numbers between 10 and 25
op1(qNum) = Rnd() * 15 + 10
op2(qNum) = Rnd() * 15 + 10
Case 3
'Generate random numbers between 25 and 100
op1(qNum) = Rnd() * 75 + 25
op2(qNum) = Rnd() * 75 + 25
End Select
'If first operand is smaller than second operand, swap them
'to ensure that result of subtraction will always be positive
If op1(qNum) < op2(qNum) Then
temp = op2(qNum)
op2(qNum) = op1(qNum)
op1(qNum) = temp
End If
ans(qNum) = op1(qNum) - op2(qNum) 'Calculate correct answer
Case 3 'Multiplication test
Select Case level 'Determine which test level has been selected
Case 1
'Generate random numbers between 2 and 12
op1(qNum) = Rnd() * 10 + 2
op2(qNum) = Rnd() * 10 + 2
Case 2
'Generate random numbers between 10 and 25
op1(qNum) = Rnd() * 15 + 10
op2(qNum) = Rnd() * 15 + 10
Case 3
'Generate random numbers between 25 and 50
op1(qNum) = Rnd() * 25 + 25
op2(qNum) = Rnd() * 25 + 25
End Select
ans(qNum) = op1(qNum) * op2(qNum) 'Calculate correct answer
Case 4 'Division test
Select Case level 'Determine which test level has been selected
Case 1
'Generate random divisor(number to divide by) between 2 and 6
op2(qNum) = Rnd() * 4 + 2
'Generate multiplier between 2 and 6
multiplier = Rnd() * 4 + 2
'Calculate dividend(number to be divided) as divisor x multiplier
op1(qNum) = op2(qNum) * multiplier
Case 2
'Generate random divisor (number to divide by) between 7 and 12
op2(qNum) = Rnd() * 5 + 7
'Generate multiplier between 7 and 12
multiplier = Rnd() * 5 + 7
'Calculate dividend (number to be divided) as divisor x multiplier
op1(qNum) = op2(qNum) * multiplier
Case 3
'Generate random divisor (number to divide by) between 13 and 25
op2(qNum) = Rnd() * 12 + 13
'Generate multiplier between 13 and 25
multiplier = Rnd() * 12 + 13
'Calculate dividend (number to be divided) as divisor x multiplier
op1(qNum) = op2(qNum) * multiplier
End Select
ans(qNum) = op1(qNum) / op2(qNum) 'Calculate correct answer
End Select
'Display question on test page form
txtAnswer.Text = ""
lblOp1.Text = op1(qNum)
lblOp2.Text = op2(qNum)
lblOperator.Text = opChar(type - 1)
lblQNo.Text = "Question " & qNum + 1
End Sub
- Before you can run a complete test and see the results, you need to add the code that displays the results of the test to the user. Open the code editor window for the form frmTestResults and add the following code in the body of the form's class definition:
Private Sub frmTestResults_Load(sender As Object, e As EventArgs) _
Handles MyBase.Load
'This routine compares the user's answers to the questions with the correct
'answers, calculates the user's test score, and displays the results
initResultArrays() 'Set up the control arrays for the results form
testScore = 0 'Initialise test score to zero
pass = False 'Initialise pass status to False
For i = 0 To 9
'Display each question and the user's answer
LabelArrayQuestion(i).Text = _
"Question" & CStr(i + 1).PadLeft(3) & CStr(op1(i)).PadLeft(10)
LabelArrayQuestion(i).Text &= " " & opChar(type - 1) & _
CStr(op2(i)).PadLeft(5) & " ="
LabelArrayQuestion(i).Text &= CStr(userAns(i)).PadLeft(6)
If ans(i) <> userAns(i) Then
'If the user's answer is not correct, display a cross
PicArrayMark(i).Image = Image.FromFile("cross.bmp")
Else
'If the user's answer is correct, display a tick
PicArrayMark(i).Image = Image.FromFile("tick.bmp")
End If
'Display the correct answer for each question
LabelArrayAnswer(i).Text = _
" (Correct answer = " & CStr (ans(i)).PadLeft (3) & ") "
Next
For i = 0 To 9
'Calculate the user's test score
If userAns(i) = ans(i) Then
testScore += 1
End If
Next
lblTestScore.Text = testScore & "/10" 'Display user's test score
Select Case level
'Determine whether the user has achieved the pass mark for the test at the
'level attempted and display an appropriate message based on the outcome
Case 1
If testScore < 10 Then
lblResultMessage.Text = _
"Sorry, you need to get all questions right to pass."
picSymbol.Image = Image.FromFile("thumbs_dn.bmp")
Else
pass = True
lblResultMessage.Text = "Well done, you got all the questions right!"
picSymbol.Image = Image.FromFile("thumbs_up.bmp")
End If
Case 2
If testScore < 9 Then
lblResultMessage.Text = _
"Sorry, you are only allowed one mistake at this level."
picSymbol.Image = Image.FromFile("thumbs_dn.bmp")
Else
pass = True
lblResultMessage.Text = "Well done, you got all the questions right!"
picSymbol.Image = Image.FromFile("thumbs_up.bmp")
End If
Case 3
If testScore < 8 Then
lblResultMessage.Text = _
"Sorry, you are only allowed two mistakes at this level."
picSymbol.Image = Image.FromFile("thumbs_dn.bmp")
Else
pass = True
lblResultMessage.Text = "Well done, you got all the questions right!"
picSymbol.Image = Image.FromFile("thumbs_up.bmp")
End If
End Select
End Sub
Private Sub cmdResultsOK_Click(sender As Object, e As EventArgs) _
Handles cmdResultsOK.Click
Dim response As Integer _
'Variable to hold value returned by message box (vbYesNoCancel)
If pass = True Then _
'Option to save test result is given if user has achieved pass mark
'Offer user the choice of saving the test result
response = MsgBox("Do you want to save your test result?" & vbNewLine & _
" (this will overwrite any existing result for this test) ", vbYesNoCancel)
If response = vbCancel Then
Exit Sub 'If user clicks Cancel, do nothing
ElseIf response = vbYes Then
'If user clicks Yes, insert result into appropriate field in dataset
Select Case type
Case 1
scoreAdd = testScore
levelAdd = level
ds.Tables("UserInfo").Rows(0).Item(3) = testScore
ds.Tables("UserInfo").Rows(0).Item(4) = level
Case 2
scoreSub = testScore
levelSub = level
ds.Tables("UserInfo").Rows(0).Item(5) = testScore
ds.Tables("UserInfo").Rows(0).Item(6) = level
Case 3
scoreMul = testScore
levelMul = level
ds.Tables("UserInfo").Rows(0).Item(7) = testScore
ds.Tables("UserInfo").Rows(0).Item(8) = level
Case 4
scoreDiv = testScore
levelDiv = level
ds.Tables("UserInfo").Rows(0).Item(9) = testScore
ds.Tables("UserInfo").Rows(0).Item(10) = level
End Select
Dim cb As New OleDb.OleDbCommandBuilder(da) _
'Create a command builder object
da.Update(ds, "UserInfo") 'Update the database
MsgBox("Test result saved") _
'Inform the user that the result has been saved
End If
End If
'Reset the test variables, open the menu form and close the results form
resetTest()
frmMenu.Show()
Me.Close()
End Sub
Public Sub initResultArrays()
'Set up the control arrays for the results form
LabelArrayQuestion(0) = lblQ01
LabelArrayQuestion(1) = lblQ02
LabelArrayQuestion(2) = lblQ03
LabelArrayQuestion(3) = lblQ04
LabelArrayQuestion(4) = lblQ05
LabelArrayQuestion(5) = lblQ06
LabelArrayQuestion(6) = lblQ07
LabelArrayQuestion(7) = lblQ08
LabelArrayQuestion(8) = lblQ09
LabelArrayQuestion(9) = lblQ10
LabelArrayAnswer(0) = lblCAns01
LabelArrayAnswer(1) = lblCAns02
LabelArrayAnswer(2) = lblCAns03
LabelArrayAnswer(3) = lblCAns04
LabelArrayAnswer(4) = lblCAns05
LabelArrayAnswer(5) = lblCAns06
LabelArrayAnswer(6) = lblCAns07
LabelArrayAnswer(7) = lblCAns08
LabelArrayAnswer(8) = lblCAns09
LabelArrayAnswer(9) = lblCAns10
PicArrayMark(0) = picRes01
PicArrayMark(1) = picRes02
PicArrayMark(2) = picRes03
PicArrayMark(3) = picRes04
PicArrayMark(4) = picRes05
PicArrayMark(5) = picRes06
PicArrayMark(6) = picRes07
PicArrayMark(7) = picRes08
PicArrayMark(8) = picRes09
PicArrayMark(9) = picRes10
End Sub
- Before proceeding further, run the program and log in using the default user name and password, and take a test (or as many tests as you like) to check that everything is working OK so far.
- In order for the user to be able to see how they have performed on previous tests, we need to add some code to the test status form. Open the code editor window for the form frmPreviousScores and add the following code in the body of the form's class definition:
Private Sub frmPreviousScores_Load(sender As Object, e As EventArgs) _
Handles MyBase.Load
'Display user's score for each test taken, and at what level achieved
If levelAdd > 0 Then
lblAddLevel.Text = levelAdd
lblAddScore.Text = scoreAdd
Else
lblAddLevel.Text = "N/A"
lblAddScore.Text = "N/A"
End If
If levelSub > 0 Then
lblSubLevel.Text = levelSub
lblSubScore.Text = scoreSub
Else
lblSubLevel.Text = "N/A"
lblSubScore.Text = "N/A"
End If
If levelMul > 0 Then
lblMulLevel.Text = levelMul
lblMulScore.Text = scoreMul
Else
lblMulLevel.Text = "N/A"
lblMulScore.Text = "N/A"
End If
If levelDiv > 0 Then
lblDivLevel.Text = levelDiv
lblDivScore.Text = scoreDiv
Else
lblDivLevel.Text = "N/A"
lblDivScore.Text = "N/A"
End If
End Sub
Private Sub cmdOK_Click(sender As Object, e As EventArgs) _
Handles cmdOK.Click
Me.Close() 'Close the form
End Sub
- Run the program again, log in using the default user name and password, and click on the link "View your previous scores" on the application's main menu form to check that the above code is doing what it is supposed to do (you don't need to take any further tests to access this bit of the program). The screenshots below show the program in operation.
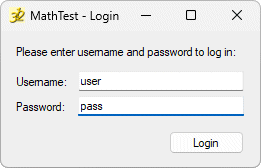
Log in using "user" and "pass"
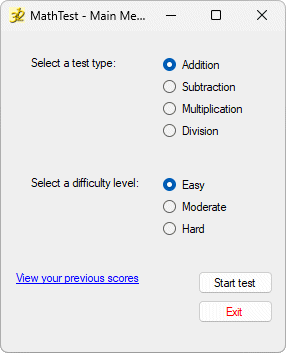
The current selection is Subtraction (Easy)
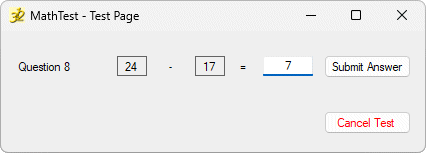
The questions at this level are relatively easy
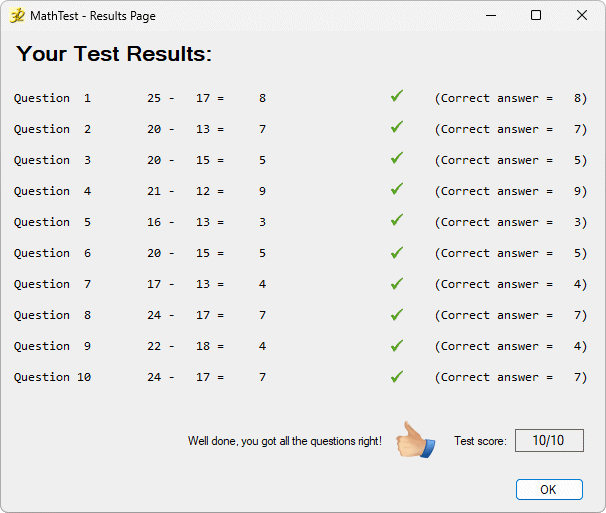
Even I can get ten out of ten!
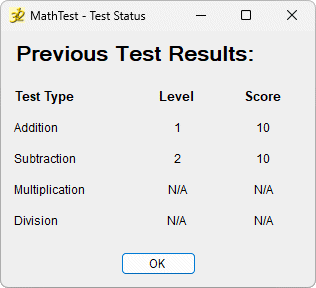
So far so good . . .
- The final piece of code is for the program's admin screen, and allows the admin user to add or delete users to or from the database. Open the code editor window for the form frmAdmin and add the following code in the body of the form's class definition:
Dim newUser As String 'New user login name
Dim newPass As String 'New user password
Dim delUser As String 'Name of user to be deleted
Dim result As Integer 'Result of attempt to execute database command
Private Sub cmdAddUser_Click(sender As Object, e As EventArgs) _
Handles cmdAddUser.Click
'This subroutine adds a new user to the database
result = 0 'Initialise the value of result to zero
'Get new user's details
newUser = InputBox("Please enter a username: ")
If newUser = "" Then Exit Sub
newPass = InputBox("Please enter a password: ")
If newPass = "" Then Exit Sub
'Create the sql command string
sql = "INSERT INTO MathTest(usrLoginName, usrPassword) VALUES('" & newUser & "', '" & newPass & "')"
con.Open() 'Open the database
cmd = New OleDb.OleDbCommand(sql, con) 'Create a command object
On Error Resume Next 'Prevent the program from crashing by trapping system errors
result = cmd.ExecuteNonQuery() 'Attempt to insert user details into the database
cmd.Dispose() 'Dispose of the command object
con.Close() 'Close the database
If result = 1 Then
MsgBox("User added.") 'The operation was successful
Else
MsgBox("Could not add user.") 'The program encountered an error
End If
End Sub
Private Sub cmdDelUser_Click(sender As Object, e As EventArgs) _
Handles cmdDelUser.Click
'This subroutine deletes a user from the database, if they exist
result = 0 'Initialise the value of result to zero
'Get the name of the user to delete
delUser = InputBox("Please enter a username: ")
If delUser = "" Then Exit Sub
If LCase(delUser) = "admin" Then
'Prevent the admin user from deleting themself!
MsgBox("You cannot delete the Admin user!")
Exit Sub
End If
'Create the sql command string
sql = "DELETE FROM MathTest WHERE usrLoginName = '" & delUser & "'"
con.Open() 'Open the database
cmd = New OleDb.OleDbCommand(sql, con) 'Create a command object
On Error Resume Next 'Prevent the program from crashing by trapping system errors
result = cmd.ExecuteNonQuery() 'Attempt to delete the user from the database
cmd.Dispose() 'Dispose of the command object
con.Close() 'Close the database
If result = 1 Then
MsgBox("User deleted.") 'The operation was successful
Else
MsgBox("User not found.") 'The program encountered an error
End If
End Sub
Private Sub cmdExit_Click(sender As Object, e As EventArgs) _
Handles cmdExit.Click
End 'Exit the program immediately
End Sub
- Run the program again and test its functionality to ensure that everything is working, including the admin function. You will of course need to login as the admin user to do that - the username is "admin" and the password is "pass". Once you are logged in as the admin user, add a couple of new users and delete them again to test the code.
General Notes
The application is intentionally somewhat unsophisticated in order to reduce the overall complexity of the interface design and the amount of code needed. The choice of numbers used for the different levels for each type of test is somewhat arbitrary, as are the pass marks chosen. A more sophisticated version might allow the administrative user to set up the range of numbers used for each level for each type of test, change the pass marks, or change the number of questions in a test.
It would also be feasible to change the program so that the user could determine how many questions they wanted to answer in a test, or for the admin user to set a time limit for tests at the various levels. There are in fact a great number of possibilities for extending the program's functionality and adding new features. I leave that to those of you with the inclination to do so.
The main purpose of this exercise is to demonstrate how a number of different forms can work together in an application. One point to note in this respect is that the application's main form (which is the login screen, frmMathTest) is never closed, only hidden. Otherwise, the application would close as soon as frmMathTest was closed. You could of course choose a different form to serve as the application's Startup form in the project's properties window.
The startup form can be hidden when not required, but should not be closed while the application is active. Other forms can be either hidden (which means they are still open but invisible to the user) or closed, depending on circumstances. If you want the form's on load event to run each time the form re-appears, it probably needs to be closed first.
Although the comments throughout the code go a long way towards explaining what is going on, there are one or two points that you should be aware of. Logging in to the program is relatively straightforward (the username and password either exist or they don't). Reading, adding or updating user test scores should also be non-problematic if the database is where it is supposed to be.
When it comes to the admin function however, problems can arise if the administrative user tries to insert a new user with a username that already exists (which would create a duplicate value in a field that does not accept duplicates), or tries to delete a user that does not exist (which would try and carry out a delete operation on a non-existent record). When either of these things occur, the database generates a system error and effectively halts (or if you prefer, crashes) the program.
There are various ways in which we could enhance the code in the admin form to ensure this does not cause a problem. To keep things simple, I have again chosen a somewhat simplistic approach by using the command "on error resume next" which effectively ignores the error and resumes program execution at the line of code immediately following the point where the error occurs.
The down side is that this is probably not the ideal way to handle such errors. The good thing is it works perfectly well in this instance, because all we really want to know for the moment is whether the insert or delete commands have been successful. Since these commands return an integer value of 1 if they are successful, we can test for this value in the code and display the appropriate user message. We will look at more sophisticated procedures for trapping and handling system errors elsewhere.
The other thing worth mentioning is the use of the randomize() function each time we generate a question. Maybe the best way to convince yourself that this is necessary is to comment out this command and run one of the tests twice at the same level, making a note of the questions. You should find (although I give no guarantee of this!) that the same (apparently random) numbers generated for the first test run are generated for the second test. This is because under the same set of conditions (i.e. providing nothing else has changed) the Rnd() function alone will keep coming up with the same numbers.
A computer, by its very nature, is incapable of generating a truly random number! What the Randomize() function does is to generate a seed based on the values generated by the system clock, which is then used by the Rnd() function to generate different numbers each time it is called. Although still not truly random, the numbers generated are always different because the system time is different each time the Randomize() function is called (in Windows systems, this is apparently expressed as the number of 100 nanosecond intervals that have elapsed since January 1601).
