| Author: | |
| Website: | |
| Page title: | |
| URL: | |
| Published: | |
| Last revised: | |
| Accessed: |
Information of various kinds can be stored on a web server in a database, or in a file. We will look at how to create and use a database in another article. In this article, we explore ways in which PHP is used to create, access and edit files and how we can create and manage a directory structure. We will also see how PHP is used to upload files from a client device to a server, as well as how to download files from a server to a client device.
The kind of files we may be required to work with can be broadly categorised as document files, media files, and executable files. The simplest kind of document file is a text file of the kind created using a basic text editor such as Microsoft’s Notepad application. Files of this kind can be created, accessed, edited and deleted using PHP.
Other kinds of document file include those produced using software packages such as Microsoft Office, Libre Office or Adobe Acrobat. These files are typically binary files (as opposed to purely text-based files), and have proprietary formats. They cannot be created or edited using PHP, but we can use PHP to copy or delete such files, and to move them from one location to another.
Media files include image files, audio files, and video files. These files are also binary files. Each type of media file has its own unique internal format, and cannot be created or edited using PHP. We can however use PHP to copy or delete such files, and to move them from one place to another.
Both media files and document files of various types can be embedded in web pages. This is usually achieved using standard HTML code. Creating animations and slideshows, or controlling the playback of audio and video files in web pages, is usually handled using HTML and JavaScript code that runs on the client device (although the HTML and JavaScript code can also be generated dynamically on the server using PHP).
In this article, we are mostly concerned with how PHP can be used to create and manipulate text-based files, and how it works with the file system on a web server, using PHP. PHP provides a large number of built-in functions for handling file operations and managing files and directories. We will be looking at some of the more commonly used of these functions in this article. You can find a comprehensive list of filesystem functions on the PHP Group website.
PHP also provides the SplFileObject class which allows developers to adopt an object-oriented approach to handling files, and which is becoming increasingly widely used by PHP practitioners, especially when dealing with larger files. In this article we are going to be looking at purely procedural means of handling files and directories. An object-oriented approach will be dealt with in a future article, but for those wishing to investigate further, a good place to start would be the PHP Group website.
If you have read the article “Form Processing with PHP“ in this section you may recall the example code we used to create a file on the server to hold the text-based data entered into a form and submitted by a user. The script we wrote employed PHP’s built-in file_put_contents() function, which is the equivalent of calling the PHP functions fopen(), fwrite() and fclose() in succession in order to write data to a file. We will now look at each those functions in more detail.
The standard way to open a function for reading or writing in PHP is to use the fopen() function, which accepts up to four arguments. The first argument is a string value containing the name of the file to be opened, which should include the path to the file if it is to be created in, or accessed from, a directory other than the current local directory. The filename can also be the URL of a file. In fact, if the filename takes the form “scheme://...”, PHP will automatically assume it to be a URL and handle it accordingly.
For now, we are interested in creating a new file rather than opening an existing file. If PHP identifies the filename as referring to a local file, it will try to open the file for writing in the current directory, or whatever local directory is specified by the specified path. The file will only be created if the specified directory exists, and then only if PHP has permission to access that directory.
The second argument accepted by fopen() specifies the mode in which the file to be opened. In order to create a new file, this argument needs to be set to one of the modes that allows data to be written to a file (as opposed to one of the read-only modes). Most of the file modes available in PHP are described in the table below.
| Mode | Description |
|---|---|
| “r” | Open the file for reading only and position the file pointer at the beginning of the file. If the file does not exist, fopen() will fail and an error warning is generated. |
| “r+” | Open the file for reading and writing and place the file pointer at the beginning of the file. If the file does not exist, fopen() will fail and an error warning is generated. |
| “w” | Open the file for writing only. Place the file pointer at the beginning of the file and truncate the file to zero length. If the file does not exist, it will be created. |
| “w+” | Open the file for reading and writing. Place the file pointer at the beginning of the file and truncate the file to zero length. If the file does not exist, it will be created. |
| “a” | Open the file for writing only, and place the file pointer at the end of the file. If the file does not exist, it will be created. In this mode, the fseek() function has no effect, and writes are always appended. |
| “a+” | Open the file for reading and writing, and place the file pointer at the end of the file. If file does not exist, it will be created. In this mode, the fseek() function only affects the reading position. Writes are always appended. |
| “x” | Create and open the file for writing only, and place the file pointer at the beginning of the file. If the file already exists, fopen() will fail and an error warning is generated. |
| “x+” | Create and open the file for reading and writing, and place the file pointer at the beginning of file. If the file already exists, fopen() will fail and an error warning is generated. |
| “c” | Open the file for writing only. If the file does not exist, it will be created. Otherwise, the file pointer is positioned at the beginning of the file. The file is not truncated. |
| “c+” | Open the file for reading and writing. If the file does not exist, it will be created. Otherwise, the file pointer is positioned at the beginning of the file. The file is not truncated. |
We can create a new file using the “w”, “w+”, “a”, “a+”, “x”, “x+”, “c” or “c+” mode. We need to be careful to choose the correct mode, however. Calling fopen() to open a file for writing using “w” or “w+” will create a new file if no file with the specified filename already exists, but it will also overwrite an existing file with that filename. Any data in the existing file will be lost as a result.
Calling fopen() using “x” or “x+” will also create a new file if no file with the specified filename exists. If a file with that name does already exists, it will not be overwritten. Even so, an error message will be generated, which is also not really what we want to happen.
Ideally, we want to ensure that a new file will be created only if a file with the specified filename does not exist. If there is already a file with that name, our code should take some alternative action, such as informing the user that the file they are attempting to create already exists. The following example should serve to illustrate how this might work:
<?php
$filename = "test.txt";
if(!file_exists($filename)) {
$handle = fopen($filename, "x");
echo "File created.";
fclose($handle);
}
else {
echo "The file $filename already exists.";
}
?>
The first time you run this code (and assuming there is no existing file with that name in the current directory), the output should be “File created.” You can verify that this is the case by checking the contents of the current directory to see whether the file test.txt does indeed now exist.
If you run the code a second time - and assuming that a file with the specified name was created the first time you ran the code - the file_exists() function returns true, and you will see the message “The file test.txt already exists.”.
The return value from the fopen() function is a file pointer resource if the function call is successful, or false if it fails. In the above example, the file pointer resource value is assigned to the $handle variable when the file is created. Any subsequent file operations, including closing the file, must reference this variable.
You may have noticed that, once we have created the file, we explicitly close it using the fclose() function. It is considered good practice to close a file once we have carried out any planned file operations, even though PHP will do so automatically on termination of a script. By doing so, we avoid tying up memory resources unnecessarily and ensure that other processes that need to access the file can do so.
The fclose() function accepts a file pointer resource as its sole argument, and closes the file pointed to by the file pointer resource, assuming that the file pointer resource is valid and points to a file that has been opened using fopen(). Closing a file invalidates the file pointer resource. In order to access the file again, we have to re-open the file.
Note that although we have not done so in the example provided in this article, it’s a good idea to check the value returned by fclose() to determine whether or not the file was closed successfully. If everything is OK, the function returns true, otherwise, it returns false.
We have not yet talked about the (optional) third and fourth arguments accepted by fopen(). The third argument is a Boolean value that specifies whether or not fopen() should search for the specified file in the directory (or directories) specified by the include_path property in the PHP configuration file php.ini. If this argument is not supplied, it defaults to false.
The fourth argument can be used to specify a context stream resource, a meaningful discussion of which is somewhat beyond the scope of an introductory article. The interested reader can find more detailed information about stream contexts on the PHP Group’s website. This argument defaults to null.
In our example, we have created a file called test.txt, but we have not written any data to the file yet, so the file size reported for it by the filesystem will be zero bytes. The next thing we will do, therefore, is to look at how we can write some text-based data to the file.
Writing text-based data to a file can be accomplished using the PHP fwrite() function. The function accepts three arguments. The first argument is a file pointer resource that identifies the file to which the data should be written. We have already seen that a file pointer resource is returned by a successful call to fopen(). The second argument is a string containing the data to be written to the file.
The third (optional) argument is an integer length argument that specifies how many bytes of data will be written to the file, and has a default value of null. If a value is specified for length, it will determine the maximum number of bytes that may be written to the file. If the string passed to fwrite() as its first argument contains more than the specified number of bytes, it will be truncated.
If we want to write data to an open file, it must have been opened using a mode that allows data to be written to the file. There are several options open to us, but let’s assume that we want to create a new file, write some personal data to it, and then close the file. Consider the following example:
<?php
$filename = "myData.txt";
$myName = "John Doe";
if(!file_exists($filename)) {
$handle = fopen($filename, "w");
fwrite($handle, $myName . "\n");
fclose($handle);
}
else {
echo "The file $filename already exists.";
}
?>
The first time you run this code (and assuming there is no existing file called myData.txt in the current directory), you should now see a new file in the current directory with that name. If you open the file, you should see the text “John Doe”, which should be followed by a blank line (you can check this by clicking on the next line – you should see the cursor at the start of the line). If you run the script a second time, it will generate the message “The file myData.txt already exists.”
So far, so good, but it will often be the case that we want to write data to an existing file, overwriting the data that is already in it. This could be the case, for example, if the data held in the file needs to be updated. Consider the following example:
<?php
$filename = "myData.txt";
$inputStr = "Name: John Doe\n";
$inputStr .= "Date of birth: 30.06.1999\n";
$inputStr .= "Email: johndoe@somedomain.com\n\n";
if(file_exists($filename)) {
$handle = fopen($filename, "w");
fwrite($handle, $inputStr);
fclose($handle);
}
else {
echo "The file $filename does not exist.";
}
?>
If you run this code - and assuming the file myData.txt exists - it will overwrite the data in the file with the name, date of birth, and email address of the fictional John Doe. If you open the myData.txt file, you should see each item of data on a separate line, as illustrated below. The email address will be followed by two blank lines (we’ll explain why shortly).
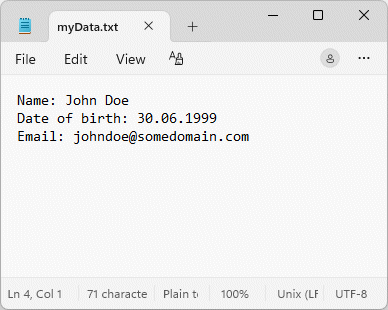
Each item of data appears on a separate line
Obviously, there is not much point in running the same script more than once - it will simply overwrite the existing data by truncating the file to zero bytes and then write exactly the same data to it. The only change you will notice is an updated timestamp on the myData.txt file.
We mentioned earlier that the PHP function file_put_contents(), which is the equivalent of calling the PHP functions fopen(), fwrite() and fclose() in succession, can also be used to write data to a file. The file_put_contents() function takes up to four arguments, the first of which is a string containing the name of the file to be written to, including the path.
The second argument is the data to be written to the file, which can be a string, an array, or a stream resource (for example, the contents of another file, or the result of an HTTP request). The third (optional) argument is an integer value that can be one or more of the following constants in any combination:
| Flag | Description |
|---|---|
| FILE_USE_INCLUDE_PATH | Search for the specified file in the directory (or directories) specified by the include_path property in the PHP configuration file php.ini. If this argument is not supplied, it defaults to 0. |
| FILE_APPEND | If the specified file already exists, append the data to the file rather than overwriting it. |
| LOCK_EX | Acquire an exclusive lock on the file before writing data to it - the equivalent of calling the flock() function in between a call to fopen() and a call to fwrite(). |
The fourth (also optional) argument is used to specify a context stream resource, a meaningful discussion of which, as we said earlier, is somewhat beyond the scope of this article. This argument defaults to null.
If specified file does not exist, it will be created. Otherwise, the existing file will be overwritten unless the FILE_APPEND flag is set. We could use the file_put_contents() function to rewrite the previous example as follows:
<?php
$filename = "myData.txt";
$inputStr = "Name: John Doe\n";
$inputStr .= "Date of birth: 30.06.1999\n";
$inputStr .= "Email: johndoe@somedomain.com\n\n";
if(file_exists($filename)) {
file_put_contents($filename, $inputStr);
}
else {
echo "The file $filename does not exist.";
}
?>
The final thing to mention here is that you may come across code that uses the fputs() function instead of fwrite(). The fputs() function is an alias of fwrite(). It takes the same arguments and returns the same value. The examples in this article will be using the fwrite() function.
Let’s suppose that, instead of overwriting the existing data, we want to add some new data to the file. We might, for example, want to add the name, date of birth and email address of another person. Consider the following example:
<?php
$filename = "myData.txt";
$inputStr = "Name: Chris Wells\n";
$inputStr .= "Date of birth: 25.02.1955\n";
$inputStr .= "Email: webmaster@technologyuk.net\n\n";
if(file_exists($filename)) {
$handle = fopen($filename, "a");
fwrite($handle, $inputStr);
fclose($handle);
}
else {
echo "The file $filename does not exist.";
}
?>
This code looks identical to the previous example apart from the different name, date of birth and email address. In fact, the only difference is that we have changed the mode argument supplied to fwrite() from “w” to “a”. You may recall that the “a” stands for append mode, so the file pointer is moved to the end of the file before any data is written to it. If we open the myData.txt file now, we should see something like this:

The new data is appended to the end of the file
We might want to continue adding data to the file in order to create a contact list containing the name, date of birth and email address of each new person we add to the list. In order to make the data easy to read, we leave a blank line after the email address. But we don’t want to run this latest example more than once either, because doing so will append the same information to the end of the file and we will have a duplicate entry!
We can also use the file_put_contents() function to append data to a file if we use the FILE_APPEND flag in the function call. For example, we could re-write the previous example as follows:
<?php
$filename = "myData.txt";
$inputStr = "Name: Chris Wells\n";
$inputStr .= "Date of birth: 25.02.1955\n";
$inputStr .= "Email: webmaster@technologyuk.net\n\n";
if(file_exists($filename)) {
file_put_contents($filename, $inputStr, FILE_APPEND);
}
else {
echo "The file $filename does not exist.";
}
?>
In order to read data from a file, you must open the file in the appropriate mode (“r”, “r+”, “w+”, “a+”, “x+” or “c+”). Once the file is open, there are various PHP functions that can be used to read the file data. For text files, the data can be read one line at a time using the fgets() function, or one character at a time using the fgetc() function. In either case, it is likely that the number of lines or characters will not be known in advance.
If we want to read all of the data in a text file, we can use a loop construct to read each line or character in turn until the end of the file is encountered. In order to ensure that we don’t try to read data beyond the end of a file, we use the feof() function to check if the end-of-file indicator (EOF) has been reached.
The example below reads the content of the myData.txt file we have been working with in previous examples. It reads each line in the file, and echoes it to the screen on a separate line. When the file is first opened, the file pointer is positioned at the start of the file, and the fgets() function will read the first line of text in the file. After each line has been read, the file pointer will be positioned at the start of the next line of text, or at the end of the file if the last line has been read. Here is the code:
<?php
$filename = "myData.txt";
if(file_exists($filename)) {
$handle = fopen($filename,"r");
while(!feof($handle))
{
echo fgets($handle) . "<br>";
}
fclose($handle);
}
?>
Note that, because the browser will ignore the “\n” escape sequence, we need to insert a single HTML line break tag (<br>) after each line. Running the script should produce output similar to the following in your browser window:

The file data retrieved using fgets(), as seen in a browser window
We will get the same output if we substitute the fgetc() function for fgets(). The fgetc() function works in similar fashion to fgets() except that it reads the file one character at a time, and repositions the file pointer to point to the next character in the file after each read. In order to get the same output as before in the browser window, we again need to replace each instance of the newline escape sequence with “<br>”. Here is the revised code:
<?php
$filename = "myData.txt";
if(file_exists($filename)) {
$handle = fopen($filename,"r");
while(!feof($handle))
{
$char = fgetc($handle);
if($char == "\n") {
$char = "<br>";
}
echo $char;
}
fclose($handle);
}
?>
This example produces exactly the same output as for the previous example in which we used fgets() to retrieve the file data, but from an efficiency point of view it makes more sense to use fgets() because it involves far fewer function calls (and fewer lines of code).
PHP also provides functions that allow us to read the contents of an entire file. The first of these functions we will look at is the file_get_contents() function, which takes up to five arguments, all of which except for the first argument are optional. The first argument is a string containing the name of the file to be read, which should include the path to the file.
The second (optional) argument is a Boolean value that specifies whether or not file_get_contents() should search for the specified file in the directory (or directories) specified by the include_path property in the PHP configuration file php.ini. If this argument is not supplied, it defaults to false.
The third (also optional) argument is used to specify a context stream resource, a meaningful discussion of which, as we said earlier, is somewhat beyond the scope of this article. The default value for this argument is null.
The fourth argument is an integer value that, if positive, specifies an offset from the start of the file where read operation should begin, and defaults to 0. If negative, the offset is from the end of the file. The final argument is also an integer value that specifies the number of bytes to read. By default, this value is null, and the read operation will continue to the end of the file.
The value returned by file_get_contents() is a string containing the contents of the file, or false if the read operation fails. The following example demonstrates how we might use file_get_contents() to retrieve and display the contents of a file:
<?php
$filename = "myData.txt";
if(file_exists($filename)) {
$myData = file_get_contents($filename);
$myData = str_replace("\n", "<br>", $myData);
echo $myData;
}
else {
echo "The file \"$filename\" does not exist.";
}
?>
Running the script produces output identical to the previous two examples. As before, we must replace each instance of the substring newline escape sequence with “<br>” in order for the browser to display each line separately.
We can also use PHP’s fread() function to read the entire contents of a file, although it is marginally slower than file_get_contents(), and is better suited to situations in which we want to read a specific amount of data, or when working with binary files. The function takes two arguments - a file pointer resource and an integer value that specifies how many bytes to read. The following script uses fread() and produces the same result as the previous examples:
<?php
$filename = "myData.txt";
if(file_exists($filename)) {
$handle = fopen($filename, "r");
$myData = fread($handle, filesize($filename));
$myData = str_replace("\n", "<br>", $myData);
echo $myData;
}
else {
echo "The file \"$filename\" does not exist.";
}
?>
The number of bytes to be read can be determined using the filesize() function, which takes as its only argument a string containing the name of the file to be read, including the path to the file. If the filesize() function succeeds, it returns an integer value representing the size of the file in bytes. Otherwise, it returns false.
Another useful function is the readfile() function, which allows us to retrieve the entire contents of a file without having to explicitly open and close it. The function takes three arguments, the first of which is a string containing the name of the file to be read, which should include the path to the file.
The second (optional) argument is a Boolean value that specifies whether or not readfile() should search for the specified file in the directory (or directories) specified by the include_path property in the PHP configuration file php.ini. If this argument is not supplied, it defaults to false.
The third (also optional) argument can be used to specify a context stream resource, a meaningful discussion of which is somewhat beyond the scope of an introductory article, as we have previously stated. The default value for this argument is null.
If the readfile() function is successful, it writes the file data to the output buffer - in our case, the browser window - and returns an integer value that represents the number of bytes read. If the function fails, it returns false, and a warning is generated. The following code demonstrates how we might use readfile():
<?php
$filename = "myData.txt";
if(file_exists($filename)) {
echo "<pre style=\"font-family: serif>";
readfile($filename);
echo "</pre>";
}
else {
echo "The file \"$filename\" does not exist.";
}
?>
Running the script should produce output like the illustration below in your browser window. Note that we have used the HTML <pre> tag to make sure the newline characters are observed, but we use inline styling to make sure that the text is not output using an ugly fixed-width font.

As before, the file data is displayed in a serif font
The readfile() function can also be used to output the content of a URL, if the allow_url_fopen property in the php.ini configuration file is set to “ON”. For example:
<?php
$filename = "https://technologyuk.net/assets/demo-javascript/javascript-demo-01.html";
readfile($filename);
?>
If we run this script, we should see something like the illustration below in the browser window (we chose the file because it is a stand-alone file that contains all of the HTML, CSS and JavaScript code required to be displayed correctly in the browser window).
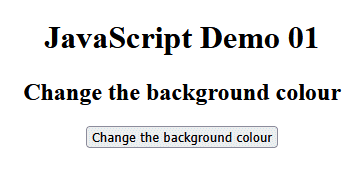
The contents of the file javascript-demo-01.html are rendered by the browser
The last function we want to look at, in the context of reading data from a file, is the file() function, which takes three arguments, the first of which is a string containing the name of the file to be read, and which should include the path to the file. The function returns an array in which each array element consists of one line from the file, or false on failure.
The second (optional) argument consists of one or more of the following integer constants:
FILE_USE_INCLUDE_PATH - search for the file in the directory (or directories) specified by the include_path property in the PHP configuration file php.ini.
FILE_IGNORE_NEW_LINES - omit the newline escape sequence from the end of each array element.
FILE_SKIP_EMPTY_LINES - ignore any empty lines.
FILE_NO_DEFAULT_CONTEXT - don't use the default context.
The third (also optional) argument can be used to specify a context stream resource, a meaningful discussion of which is somewhat beyond the scope of an introductory article, as we have previously stated. The default value for this argument is null.
As with the readfile() function, the file() function can be used to retrieve the contents of a file referenced by a URL if the allow_url_fopen property in the php.ini configuration file is set to “ON”. Unlike readfile(), it doesn’t send the file data to the output buffer, but we can achieve the same result using the echo command together with a foreach() loop. For example:
<?php
$filename = "https://technologyuk.net/assets/demo-javascript/javascript-demo-06.html";
$fileArray = file($filename);
foreach($fileArray as $line) {
echo $line;
}
?>
This time the result will look somewhat different because we used a different URL, but if we run the script, we should see something like the illustration below in the browser window.

The contents of the file javascript-demo-06.html are rendered by the browser
If we want to see the code as it appears in the source file (as opposed to the result of the browser rendering the code), we could do something like the following:
<?php
$filename = "https://technologyuk.net/assets/demo-javascript/javascript-demo-01.html";
$fileArray = file($filename);
echo "<pre>";
foreach($fileArray as $line_number => $line) {
echo htmlspecialchars($line) . "<br />";
}
echo "</pre>";
?>
The properties of a file are usually referred to as file attributes. A file’s attributes include information about the file, such as its size in bytes, its type, the time and date at which it was created or last modified, and whether or not it can be read from or written to. The table below lists some of the PHP functions that can be used to retrieve a file’s attributes, and gives a brief description of each.
| Function | Description |
|---|---|
| fileatime() | Accepts a string containing a filename, including the path to the file, as its argument. Returns an integer value representing the time the file was last accessed as a Unix timestamp, or false on failure. |
| filectime() | Accepts a string containing a filename, including the path to the file, as its argument. Returns an integer value representing the time the file’s inode was last changed as a Unix timestamp, or false on failure. An inode is a data structure that stores metadata about a file or directory object (note that neither the filename nor the file data itself are stored in the file’s inode). |
| filemtime() | Accepts a string containing a filename, including the path to the file, as its argument. Returns an integer value representing the time the contents of the file were last changed as a Unix timestamp, or false on failure. |
| filesize() | Accepts a string containing a filename, including the path to the file, as its argument. Returns an integer value representing the size of the file in bytes, or false on failure. |
| filetype() | Accepts a string containing a filename, including the path to the file, as its argument. Returns a string value representing the type of the file (fifo, char, dir, block, link, file, socket or unknown), or false on failure. |
| is_executable() | Accepts a string containing a filename, including the path to the file, as its argument. Returns true if the file exists and is executable and false otherwise. |
| is_readable() | Accepts a string containing a filename, including the path to the file, as its argument. Returns true if the file exists and is readable and false otherwise. |
| is_writeable() | Accepts a string containing a filename, including the path to the file, as its argument. Returns true if the file exists and is writeable and false otherwise. |
The following script demonstrates how we can use the functions described above to retrieve some of the file attributes of the myData.txt file:
<?php
$filename = "myData.txt";
if(file_exists($filename)) {
$lastAccessed = date("Y-m-d \a\\t H:i:s", fileatime($filename));
$inodeChanged = date("Y-m-d \a\\t H:i:s", filectime($filename));
$modified = date("Y-m-d \a\\t H:i:s", filemtime($filename));
$size = filesize($filename);
$type = filetype($filename);
$readable = $writeable = "";
if(is_readable($filename)) {
$readable = "Yes";
}
else {
$readable = "No";
}
if(is_writeable($filename)) {
$writeable = "Yes";
}
else {
$writeable = "No";
}
if(is_executable($filename)) {
$executable = "Yes";
}
else {
$executable = "No";
}
echo "File attributes for $filename:<br><br>";
echo "Last accessed: $lastAccessed<br>";
echo "Inode changed: $inodeChanged<br>";
echo "Modified: $modified<br>";
echo "Size: $size bytes<br>";
echo "Type: $type<br>";
echo "Readable: $readable<br>";
echo "Writeable: $writeable<br>";
echo "Executable: $executable";
}
else {
echo "The file \"$filename\" does not exist.";
}
?>
If you run the above script, you should see the following output in your browser window:
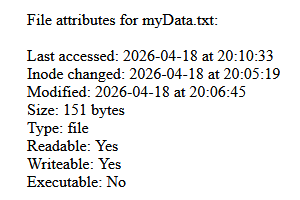
Some of the file attributes for myData.txt
Note that many of the functions used for working with files, including some of the functions used to retrieve a file’s attributes, will generate a warning if the specified file does not exist. It’s always a good idea to check whether or not a file exists using the file_exists() function before attempting to access the file. It’s also a good idea to call the is_readable() or is_writeable() functions before attempting to read from or write to a file, respectively.
We can also retrieve information about a file using PHP’s stat() function, which takes the name of a file, including the path to the file, as its sole argument. The return value is an array that contains the metadata for the file. The table below lists the key-value pairs returned by stat().
| Index | Key | Description |
|---|---|---|
| 0 | dev | Device number. On Windows, this is the serial number as a 64-bit unsigned integer of the volume that contains the file. |
| 1 | ino | |
| 2 | mode | Inode protection mode. On Windows, write permission depends on the read-only file attribute, and the same value is reported for all users, group and owner. ACL is not taken into account. |
| 3 | nlink | |
| 4 | uid | Userid of owner (always 0 on Windows). |
| 5 | gid | Groupid of owner (always 0 on Windows). |
| 6 | rdev | Device type, if inode device. |
| 7 | size | Size in bytes. |
| 8 | atime | Time of last access (Unix timestamp). |
| 9 | mtime | Time of last modification (Unix timestamp). |
| 10 | ctime | Time of last inode change (Unix timestamp). |
| 11 | blksize | Block size of filesystem IO (always -1 on Windows). |
| 12 | blocks | Number of 512-byte blocks allocated (always -1 on Windows). |
The following script demonstrates how we might use the stat() function:
<?php
$filename = "myData.txt";
if(file_exists($filename)) {
$fileStats = stat($filename);
echo "File size: " . $fileStats["size"] . " bytes<br>";
echo "Last modified: " . date("d-m-Y \a\\t H:i:s", $fileStats["mtime"]) . "<br>";
echo "Last accessed: " . date("d-m-Y \a\\t H:i:s", $fileStats["atime"]) . "<br>";
echo "Owner: " . $fileStats["uid"] . "<br>";
echo "Group: " . $fileStats["gid"] . "<br>";
echo "File permissions: " . $fileStats["mode"] . "<br>";
echo "Inode number: " . $fileStats["ino"] . "<br>";
echo "Number of links: " . $fileStats["nlink"] . "<br>";
}
else {
echo "The file $filename does not exist.";
}
?>
The output from this script should be something like the illustration below. Note that output will vary, depending on the file used and the type of platform on which it resides (in our case, a desktop computer running Windows).
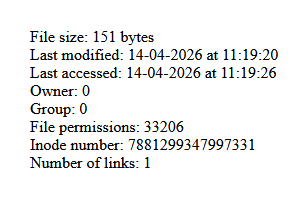
The stat() function returns an array containing a file’s metadata
There are any number of reasons why we might want to rename a file or directory. We might, for example, want to change a temporary filename to something more descriptive of the file’s contents, to comply with an organisation’s naming conventions, to ensure that a series of related files can be sorted into the correct order, or to store different versions of a document.
PHP provides the rename() function for the purpose of renaming a file or directory. The function takes three arguments. The first argument is a string containing the name of the file or directory whose name we want to change. The second argument is a string containing the new file or directory name, and the third argument is a context stream resource, a discussion of which, as previously stated, is beyond the scope of this article.
The rename() function returns true if it succeeds in changing the name of the file or directory. Otherwise, it returns false. The following script demonstrates how we might use the rename() function:
<?php
$name = "John Doe";
$email = "johndoe@somedomain.com";
$handle = fopen("tmpData.txt", "w");
fwrite($handle, "Name: " . $name . "\n");
fwrite($handle, "Email: " . $email);
fclose($handle);
if(file_exists("tmpData.txt")) {
if (rename("tmpData.txt", "johnDoe.txt")) {
echo "File renamed successfully.";
} else {
echo "Unable to rename file.";
}
}
else {
echo "The file \"tmpData.txt\" does not exist.";
}
?>
If we run this script in our web server’s root directory, it will create the file tmpData.txt in that directory, write some data to it, and then close it. The script then changes the name of the file to johnDoe.txt. If we navigate to the root directory, we should see the johnDoe.txt file. If we open the file, we should see the data that was written to it, as shown in the illustration below.
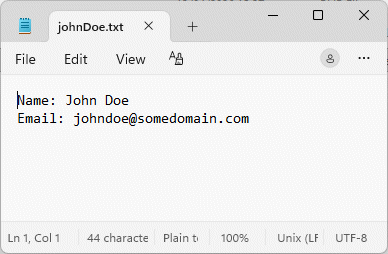
The file tempData.txt has been renamed to johnDoe.txt
The ability to copy files is important for a number of reasons. We might want to make back-up copies of files that contain important data and store them in another location on the server, or even on a remote server. Of course, most large-scale applications that gather and store a large amount of data will have that data backed up regularly by automated backup processes, but there will be occasions when we want to make copies of one or more files individually.
Copies of program source code files and scripts are often created so that modifications to the source code stored in those files can be made, and tests carried out, before the proposed changes are accepted. If the changes made to the code turn out not to produce the desired results, the original can be used to restore the program or script to its previous state.
Copying files is also a sensible precaution to take when we are thinking of moving files from one location to another. It eliminates the risk of data being lost if the file transfer process runs into an unexpected problem. Once the data has been transferred, and the transferred data has been checked for integrity, the original files can be safely deleted, or (more likely) archived on a secondary storage device.
PHP provides the copy() function to enable us to create a copy of a file. The function takes three arguments. The first argument is a string containing the name of the file to be copied (the source file). The second argument is a string containing the name of the copy we are going to create (the destination file). The third argument is a context stream resource, a discussion of which, as previously stated, is beyond the scope of this article.
The code below demonstrates how we might use the copy() function to copy a file from one location to another. For the purposes of this exercise, we will manually create a directory called archive in the server’s document root directory and create a copy of the file johnDoe.txt in that directory. Here is the code:
<?php
$source = "johnDoe.txt";
$destination = "archive/johnDoe.txt";
if(!file_exists($destination)){
if(copy($source, $destination)) {
echo "File copied successfully.";
}
else {
echo "Unable to copy file.";
}
}
else
{
echo "The destination file already exists.";
}
?>
Note that our code checks whether or not a file called johnDoe.txt already exists in the archive folder. If so, the code generates a message informing the user of this fact, and does not attempt to create a copy. If we do not perform this check, and if a file called johnDoe.txt does already exist in the archive directory, it will be overwritten by the copy() function without generating an error or a warning message.
PHP provides the unlink() function for the purpose of deleting files. This function accepts two arguments, the first of which is a string containing the name of a file, including the path to the file. The second (optional) argument is a context stream resource, a discussion of which, as previously stated, is beyond the scope of this article. The unlink() function returns a Boolean value. If the call to unlink() is successful, it returns true. Otherwise, it returns false.
Once we have successfully copied the johnDoe.txt file to the archive directory, we no longer need to keep the original file in the root directory. The following script illustrates how we can use the unlink() function to delete the original johnDoe.txt file:
<?php
$filename = "johnDoe.txt";
if(file_exists($filename)) {
if(unlink($filename)) {
echo "The has been successfully deleted.";
}
else {
echo "Unable to delete file.";
}
}
else
{
echo "The file does not exist.";
}
?>
Running this script once in the root directory will delete the original file and we will see the message “The has been successfully deleted.”. If we run the script a second time, the file will no longer exist in the root directory, and we will see the message “The file does not exist.”.
If the files we are working with on a server are shared, and are therefore likely to be accessed and modified by multiple users, we need to ensure that access is properly controlled in order to prevent the occurrence of race conditions – i.e. conditions in which access to a file is not mutually exclusive, and two or more users attempt to access or modify the file at the same time.
When accessing a shared file, we can prevent race conditions occurring by locking the file so that nobody else can access it until we have completed whatever process we are undertaking, thereby ensuring data integrity. PHP provides the flock() function to enable us to acquire a lock on a file.
The flock() function takes three arguments, the first of which is a file pointer resource, typically created using the fopen() function, that identifies the file to be locked. The second argument is an integer constant that defines the nature of the locking operation, and can be one of the following:
LOCK_SH – Acquire a shared lock for reading. Multiple processes can read a file but no process can acquire an exclusive lock.
LOCK_EX – Acquire an exclusive lock for writing. Only one process can write to or modify the file.
LOCK_UN – Release a shared or exclusive lock. Other processes can access the file for reading or writing.
The LOCK_NB constant can be added as a bitmask to one of the above locking constants. By default, flock() will block script execution until a lock is acquired. Using the LOCK_NB bitmask causes the file locking to be non-blocking, and flock() returns immediately regardless of whether or not a lock has been acquired. The third (optional) argument will block other processes if set to 1.
The function returns true on success and false on failure. The following script demonstrates how we might use the flock() function:
<?php
$filename = "myData.txt";
$inputStr = "Name: Fred Bloggs\n";
$inputStr .= "Date of birth: 09.09.1999\n";
$inputStr .= "Email: fblogs@someotherdomain.com\n\n";
if(file_exists($filename)) {
$handle = fopen($filename, "a");
if (flock($handle, LOCK_EX)) {
fwrite($handle, $inputStr);
flock($handle, LOCK_UN);
}
else {
echo "Unable to acquire lock.";
}
fclose($handle);
}
else {
echo "The file $filename does not exist.";
}
?>
So far in these articles we have not been concerned with the directory structure of our website because the examples we have provided can be run from our web server’s root directory. Once we start to develop real-world websites and web applications, however, we could potentially need to create hundreds of files to contain the HTML, CSS, JavaScript and PHP files required.
Keeping all of these files in the root directory is simply an option. It will be necessary to create a logical and clearly-defined directory structure in order to ensure that our source files are accessible and can be easily managed, especially if the development process will involve a number of web developers. It will also enable us to assign specific permissions to individual directories in order to safeguard sensitive data.
The precise nature of a directory structure will of course depend on the nature of the website or web application we intend to build. For the technologyuk.net website, for example, we have created sub-directories for each of the subject areas (computing, mathematics, software development, etc.) with separate sub-directories for common assets such as CSS and JavaScript source files, include files, and user-downloadable resources.
A directory (sometimes called a folder) is essentially a special kind of file that contains references to other computer files, including other directories. PHP provides a number of built-in functions for working with directories. We’ll start by looking at how we can create a new directory using PHP.
Let’s say we want to create a directory called “temp” to hold temporary files. This can be achieved using PHP’s mkdir() function. This function accepts up to four arguments, the first of which - the only mandatory argument - is the name of the directory to be created, including the path to the directory.
The second argument is an octal (base-8) integer value that specifies the permissions granted to the directory. If you are running XAMPP on a Windows computer, this argument is ignored. As far as we can tell, it defaults to 0777, which provides the greatest degree of access possible - read, write and execute permission - for the owner, the assigned group (if one exists), and for other users. It defaults to 0705 (rwx---r-x) on the server hosting the technologyuk.net website, and the second argument is again ignored.
The last three digits, from right to left, refer to the permissions granted to the owner, the group assigned to the directory (if any), and everybody else, respectively. The following table lists the values that can be assigned in each position, together with the level of access they confer:
| Value | Permission | Description |
|---|---|---|
| 7 | rwx | Read, write, and execute (4+2+1) |
| 6 | rw- | Read and write (4+2) |
| 5 | r-x | Read and execute (4+1) |
| 4 | r-- | Read only |
| 3 | -wx | Write and execute (2+1) |
| 2 | -w- | Write only |
| 1 | --x | Execute only |
| 0 | --- | No permission |
The following examples should clarify how this works:
755 (rwxr-xr-x) - owner has full access, group / others can read and execute only.
644 (rw-r--r--) - owner can read and write, group / others can only read.
600 (rw-------) - owner can read and write, group / others have no access.
700 (rwx------) - owner has full access, group / others have no access.
The third argument is a Boolean value that specifies whether or not the mkdir() function behaves recursively, i.e. whether or not any parent directories of the directory specified will also be created with the same permissions. This argument defaults to false.
The final argument is used to specify a context stream resource, a meaningful discussion of which, as we said before, is somewhat beyond the scope of this article. This argument also defaults to null.
Here is the code we will use to create our “temp” directory as a sub-directory of the document root directory:
<?php
$dirName = "temp";
if(!file_exists($dirName)) {
if(mkdir($dirName)) {
echo "Directory created successfully.";
}
else {
echo "Unable to create directory";
}
}
else {
echo "The directory already exists.";
}
?>
The first time we run this script, and assuming we do not already have a directory called “temp” in the document root directory, the directory will be created and you will see the message “Directory created successfully.” in the browser window. If you run the script a second time, you will see the message “The directory already exists.”
The temp directory is created in our server’s document root because that is the directory in which we are running the script. It is important to note that if the script lives in a different directory it would create the temp directory as a sub-directory of that directory. It might seem prudent, then, to specify the filename of any new directory we create using an absolute path from the root directory, which is usually specified using a forward slash (“/”).
Unfortunately, using the forward slash in XAMPP on a Windows computer will be interpreted by Apache as referring to the root directory of the drive on which XAMPP resides rather than the root directory of our website (which in our case is "C:\vhosts\myserver").
The answer is to either use relative paths or to use PHP’s $_SERVER['DOCUMENT_ROOT'] superglobal, which specifies the root directory under which the current script is executing. In the previous example we effectively used a relative path because we were running the script from the root directory of our website, but we could rewrite that example as follows:
<?php
$dirName = $_SERVER['DOCUMENT_ROOT'] . "/temp";
if(!file_exists($dirName)) {
if(mkdir($dirName)) {
echo "Directory created successfully.";
}
else {
echo "Unable to create directory";
}
}
else {
echo "The directory already exists.";
}
?>
The advantage of using the $_SERVER['DOCUMENT_ROOT'] superglobal to specify an absolute path from the root directory is that we can run the same script from any sub-directory of our website and achieve the same result. The disadvantage is that it’s somewhat unwieldy. The general consensus seems to be that using relative paths is the preferred method.
In order to determine what file permissions a file or directory has, we can use the fileperms() function, which takes the name of a file or directory (including the path to the file or directory) as its argument. If the call to fileperms() is successful, the return value will be a base-10 (decimal) integer that represents the file or directory’s permissions.
We are only interested in the lower bits of the return value, which represent the file permissions in the form we would pass to the mkdir() function as its second argument. In order to see the file permissions in a meaningful format, we need to extract the four least significant decimal digits and convert the result to an octal number. To get the permissions of our newly-created assets directory, we could do something like this:
<?php
echo substr(sprintf("%o", fileperms("temp")), -4);
// 0777
?>
This result is as expected because we did not specify the file permissions to be granted to the assets directory when we created it, so it has the default file permissions. If your XAMPP server is running on a Windows computer, everybody has full rights to the directory (rwx - read, write, and execute). This is something we should change for security reasons - we certainly don’t want the entire world to be able to write to this directory!
For most of the directories and subdirectories on a website, the owner will have full access. Assigned groups and other users (essentially, everybody other than the owner) will typically have read and execute rights. Theoretically, we can change the access rights of a file or directory using PHP’s chmod() function.
The chmod() function takes two arguments – the filename, including the path to the file or directory, and an octal number that specifies the access rights. If the function succeeds, it returns true. Otherwise, it returns false, and a warning is generated. In order to change the access rights on the temp directory so that everyone other than the owner has read and execute rights only, we could do something like this:
<?php
$dirName = "temp";
if(file_exists($dirName)) {
$perms = substr(sprintf("%o", fileperms($dirName)), -4);
echo "Original directory permissions for \"$dirName\": $perms.<br><br>";
if(chmod($dirName, 0755)) {
$perms = substr(sprintf("%o", fileperms($dirName)), -4);
echo "Directory permissions for \"$dirName\" are now set to $perms.";
}
else {
echo "Unable to change file permissions.";
}
}
else {
echo "The directory does not exist.";
}
?>
Unfortunately, if your XAMPP server is running on a Windows computer, the file permissions for the temp directory will not be changed despite the chmod() function returning true. It does however work when we run the script from the root directory of the technologyuk.net website.
We’re not going to pursue the subject of file and directory permissions further at this point because the default permissions assigned to files and directories, and the precise behaviour of functions such as mkdir() and chmod(), are platform dependent.
When we create a real-world website or web application on a live server, we typically create the directory structure manually rather than using a PHP script to create it dynamically. The same applies to assigning directory permissions, although in most cases the default permissions assigned to a directory will be what we require. If not, we can change the permissions manually, typically using an FTP client.
The contents of a directory can be listed using the readdir() function. The only (optional) argument accepted by readdir() is a directory handle resource, which should point to a directory. The directory handle resource is obtained using the opendir() function, which takes the name of a directory as its first argument. If no argument is suppied to readdir(), the default value is null, and the last handle opened with opendir() will be used.
The readdir() function reads one directory entry at a time, starting with the first entry, and returns a string containing the name of the file or directory currently being read, or false if there are no more entries. If we want to read all of the entries in a directory, we need to call readdir() repeatedly using a loop that terminates once there are no more directory entries to be read.
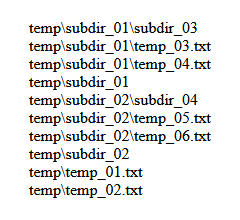
Within our temp directory, we have created two sub-directories (subdir_01 and subdir_02) and two text files (temp_01.txt and temp_02.txt), both of which contain some random text. The directory contents are listed in Windows explorer as shown here:

The contents of the temp directory
The following script lists the contents of the temp directory:
<?php
$dirName = "temp";
if(file_exists($dirName)) {
if(is_dir($dirName)) {
$handle = opendir($dirName);
while($file = readdir($handle)) {
echo "$file<br>";
}
closedir($handle);
}
else {
echo "$dirName is not a directory.";
}
}
else {
echo "The directory does not exist.";
}
?>
Running this script outputs a directory listing, i.e. a list of all the files and directories found in the directory to which the $dirname variable refers. The single and double dots in the listing represent the current location and its parent.
.
..
subdir_01
subdir_02
temp_01.txt
temp_02.txt
There are a couple of things to note here. First of all, we have used the is_dir() function to make sure that the filename we have provided as its argument refers to a directory. If so, the is_dir() function returns true, otherwise it returns false.
The second thing to note is that, we should close a directory once we have finished working with it using the closedir() function. The function takes a directory handle resource created with opendir() as its only argument. If not provided, the argument defaults to null and the last handle created with opendir() is used.
We can also read the contents of a directory using the scandir() function, which takes three arguments. The first argument is a string containing the name of the directory to be scanned, including the path to the directory.
The second (optional) argument is an integer constant that determines the sorting order to be used when listing the directory contents. The options available for this argument are:
SCANDIR_SORT_ASCENDING - ascending alphabetical order (the default)
SCANDIR_SORT_DESCENDING - descending alphabetical order
SCANDIR_SORT_NONE - unsorted
The third (also optional) argument is used to specify a context stream resource, a meaningful discussion of which, as we said before, is somewhat beyond the scope of this article. This argument defaults to null.
If successful, the scandir() function returns an array of file and directory names. Otherwise, it will return false and a warning will be generated. The following script demonstrates how we might use scandir() to scan the temp directory:
<?php
$dirName = "temp";
if(file_exists($dirName)) {
if(is_dir($dirName)) {
$dirList = scandir($dirName);
foreach($dirList as $entry) {
echo "$entry<br>";
}
}
else {
echo "$dirName is not a directory.";
}
}
else {
echo "The directory does not exist.";
}
?>
Unless anything has changed in our temp directory, the result of running the script should be identical to the result we saw with the previous example. With scandir(), however, we don’t need to open the directory in order to read its contents, which means we don’t need to close it again after we’ve scanned it either.
Note that the scandir() function only reads the top-level contents of a directory. In our temp directory, we have also created text files and sub-directories within subdir_01 and subdir_02. If we want to list all of the contents of the directory hierarchy, we can use scandir() recursively. For example, we might do something like this:
<?php
function dirList(string $dirName, &$dirArray = []) {
$files = scandir($dirName);
foreach ($files as $key => $value) {
$path = $dirName . DIRECTORY_SEPARATOR . $value;
if (!is_dir($path)) {
$dirArray[] = $path;
}
else if ($value != "." && $value != "..") {
dirList($path, $dirArray);
$dirArray[] = $path;
}
}
return;
}
$dirName = "temp";
$dirArray;
if(file_exists($dirName)) {
if(is_dir($dirName)) {
dirList($dirName, $dirArray);
foreach($dirArray as $entry) {
print_r($entry);
echo "<br>";
}
}
else {
echo "$dirName is not a directory.";
}
}
else {
echo "The directory does not exist.";
}
?>
When we run this script, we get the following output:
The temp directory hierarchy
Sometimes we might want to remove a directory and its contents from the filesystem because it is no longer required and no longer contains any files or subdirectories. PHP provides the rmdir() function to enable us to remove an empty directory.
The rmdir() function takes two arguments, the first of which is a string containing the name of the directory to be removed, including the path to the directory. The second (optional) argument is used to specify a context stream resource, a meaningful discussion of which, as we said before, is somewhat beyond the scope of this article. This argument defaults to null.
If successful, the rmdir() function returns true, otherwise it returns false. The following script demonstrates how we might use rmdir() to remove the empty temp/subdir_01/subdir_03 directory:
<?php
$dirName = "temp/subdir_01/subdir_03";
if(file_exists($dirName)) {
if(is_dir($dirName)) {
if(rmdir($dirName)) {
echo "Directory successfully deleted!";
}
else {
echo "Unable to delete directory.";
}
}
else {
echo "$dirName is not a directory.";
}
}
else {
echo "The directory does not exist.";
}
?>
The first time we run this script (and assuming the directory exists and contains no files or subdirectories), we see the message “Directory successfully deleted!”. If we run the script a second time, we see the message “The directory does not exist.”.
If we now change the name of the directory we want to remove to temp/subdir_01 and run the script again, we run into a problem. We will see the following messages:
Warning: rmdir(temp/subdir_01): Directory not empty
Unable to delete directory.
The rmdir() function can only be used to remove empty directories. If we want to remove a directory and all of its contents including any sub-directories and their contents, we have to try a different approach.
We can delete all of the files in a directory by using a combination of the unlink() function, which we described earlier in this article, and glob(), which is a pattern matching function. For example:
<?php
$dirName = "temp/subdir_01";
if(file_exists($dirName)) {
if(is_dir($dirName)) {
foreach (glob("$dirName/*") as $file) {
if (is_file($file)) {
unlink($file);
}
}
echo "All files have been deleted from $dirName.";
}
else {
echo "$dirName is not a directory.";
}
}
else {
echo "The directory does not exist.";
}
?>
Running this script gets rid of the two text files stored in the temp/subdir_01 directory and leaves it empty. We can now use rmdir() to delete the temp/subdir_01 directory.
Sometimes we want to delete a directory together with all of its files and sub-directories, regardless of how deeply nested those files and sub-directories might be. Once again, we need to take a recursive approach. The following script demonstrates how we can delete the temp directory and everything in it:
<?php
function deleteDir($dir) {
if (!is_dir($dir)) {
return;
}
$files = scandir($dir);
foreach ($files as $file) {
if ($file !== "." && $file !== "..") {
$filePath = $dir . "/" . $file;
if (is_dir($filePath)) {
deleteDir($filePath);
}
else {
unlink($filePath);
}
}
}
rmdir($dir);
}
$dirName = "temp";
if(file_exists($dirName)) {
if(is_dir($dirName)) {
deleteDir($dirName);
echo "The $dirName directory has been deleted.";
}
else {
echo "$dirName is not a directory.";
}
}
else {
echo "The directory does not exist.";
}
?>
Running the above script will delete the temp directory and everything in it. If you run the script a second time, you should see the message “The directory does not exist.”