| Author: | |
| Website: | |
| Page title: | |
| URL: | |
| Published: | |
| Last revised: | |
| Accessed: |
The Oxford English Dictionary defines a table as "A set of facts or figures systematically displayed, especially in columns". Essentially, this is the kind of information that HTML tables were designed to accommodate, i.e. the kind of information that is most easily understood when it is displayed in some kind of meaningful order in rows and columns.
In the past, many web developers have used tables as a means of constructing complex page layouts in HTML documents. This practice is now frowned upon, because it is not what the HTML table element was designed for. There are far better ways to create page layouts, which we will be discussing elsewhere. The true purpose of an HTML table is to display tabular data - exactly the same kind of date we see in tables elsewhere, in fact.
We come across tables all the time. If you work in data processing you will know that tables are at the heart of every database system. If you are interested in or participate in a team sport, you will be familiar with league tables of one kind or another. If you use public transport you will probably consult a timetable from time to time. If you study chemistry you will be familiar with the periodic table. You can undoubtedly think of many more examples.
Although tables can contain all kinds of information, they all have certain characteristics in common. They all consist of rows and columns of data. They all have labels at the top of each column or in the left-hand column of each row (or sometimes both) that tell you what kind of information is displayed in that row or column. And they all present their information in a format that enables us to find what we are looking for quickly and easily.
HTML tables are extremely flexible, and enable us to replicate just about any kind of table we might come across elsewhere. Bear in mind however that making tables look professional and aesthetically pleasing usually requires a certain amount of styling that is not possible with HTML alone. The examples in this page will therefore include some styling. More advanced styling of tables will be covered in the section "Introduction to CSS".
Before we start looking at tables in earnest, it is probably a good idea to familiarise ourselves with the range of HTML elements that are available for use with tables, and briefly explain their purpose. The table below (look - we're using a table already!) lists these elements alphabetically and provides a brief description of each.
| Table Element | Description |
|---|---|
| <caption> … </caption> | Caption - specifies the caption (or title) of a table, which will be displayed centre-aligned above the table by default. |
| <col …> | Column - used within a <colgroup> element to specify style properties for all of the cells in one or more table column. |
| <colgroup> … </colgroup> | Column Group - specifies a group of one or more columns in within a table - used with the <col> element to specify style properties for all of the cells in one or more table column. |
| <table> … </table> | Table - defines a two-dimensional table consisting of rows and columns of cells containing data items; each row is defined using a table row (<tr>) element), and each cell is defined using a table data (<td>) element. The table may additionally include one or more of the <caption>, <col>, <colgroup>, <thead>, <tfoot>, or <tbody> elements. |
| <tbody> … </tbody> | Table Body - used to enclose the table row (<tr>) elements that make up the main body of a table; must appear inside the <table> element, but after any <caption>, <colgroup>, or <thead> elements. Can be scrolled independently of any table header or footer. |
| <td> … </td> | Table data cell - defines a single cell containing data in an HTML table; any text appearing in a table date element is left-aligned by default. |
| <tfoot> … </tfoot> | Table footer - used to enclose the table row (<tr>) elements that make up the footer of a table; must appear inside the <table> element, but after any <caption>, <colgroup>, <thead> or <tbody> elements. The contents of a table footer will appear at the bottom of each page when printing a table that spans multiple pages. |
| <th> … </th> | Table header cell - defines the header cell for a single table column in an HTML table - rendered as bold, centre-aligned text by default. |
| <thead> … </thead> | Table header - used to enclose the table row (<tr>) elements that define the column headings for the table; must appear inside the <table> element, but after any <caption> or <colgroup> elements and before any <tbody> or <tfoot> elements. The contents of a table header will appear at the top of each page when printing a table that spans multiple pages. |
| <tr> … </tr> | Table Row - defines a row of cells in a table, and contains one or more table header (<th>) or table data (<td>) cells. |
You will not use all of the elements listed in every table you create. The elements you will find in every HTML table are the table element (<table>), the table row element (<tr>) and the table data element (<td>). In fact, some of the tables on this website use just these three elements. We will use all of these elements at some point in the examples that follow in order to demonstrate their use.
The best way to start learning about tables is probably to create one and have a look at how the various HTML table elements work together to produce the end result. The HTML code below creates a web page containing a (relatively) simple table that displays details of the astronauts of the Apollo space program who actually got to walk on the moon.
<!doctype html>
<html lang="en">
<head>
<meta charset="utf-8">
<title>Table Demo 01</title>
<style>
th, td {border: 1px solid grey; padding: 0.5em; text-align: center;}
</style>
</head>
<body>
<h1 style="text-align: center;">Moon Walkers</h1>
<p style="text-align: left;">
Twelve of the astronauts who participated in the Apollo space program walked on the Moon between July 1969 and December 1972. At the time of writing (October 2018), four of them are still alive. The table below lists the astronauts in the order in which they first set foot on the Moon together with brief details of the mission and other relevant information.
</p>
<table style="margin: auto; border-collapse: collapse;">
<caption><h2>Apollo astronauts who walked on the Moon</h2></caption>
<thead>
<tr>
<th>No.</th>
<th>Astronaut</th>
<th>Born</th>
<th>Died</th>
<th>Mission</th>
<th>Moonwalk Date(s)</th>
<th>Age at time</th>
</tr>
</thead>
<tbody>
<tr>
<td>01</td>
<td style="text-align: left;">Neil Armstrong</td>
<td>1930</td>
<td>2012</td>
<td>Apollo 11</td>
<td>21 Jul 1969</td>
<td>38</td>
</tr>
<tr>
<td>02</td>
<td style="text-align: left;">Buzz Aldrin</td>
<td>1930</td>
<td>-</td>
<td>Apollo 11</td>
<td>21 Jul 1969</td>
<td>39</td>
</tr>
<tr>
<td>03</td>
<td style="text-align: left;">Pete Conrad</td>
<td>1930</td>
<td>1999</td>
<td>Apollo 12</td>
<td>19 Nov 1969</td>
<td>39</td>
</tr>
<tr>
<td>04</td>
<td style="text-align: left;">Alan Bean</td>
<td>1932</td>
<td>2018</td>
<td>Apollo 12</td>
<td>19 Nov 1969</td>
<td>37</td>
</tr>
<tr>
<td>05</td>
<td style="text-align: left;">Alan Shepard</td>
<td>1923</td>
<td>1998</td>
<td>Apollo 14</td>
<td>5-6 Feb 1971</td>
<td>47</td>
</tr>
<tr>
<td>06</td>
<td style="text-align: left;">Edgar Mitchell</td>
<td>1930</td>
<td>2016</td>
<td>Apollo 14</td>
<td>5-6 Feb 1971</td>
<td>40</td>
</tr>
<tr>
<td>07</td>
<td style="text-align: left;">David Scott</td>
<td>1932</td>
<td>-</td>
<td>Apollo 15</td>
<td>31 Jul - 02 Aug 1971</td>
<td>39</td>
</tr>
<tr>
<td>08</td>
<td style="text-align: left;">James Irwin</td>
<td>1930</td>
<td>1991</td>
<td>Apollo 15</td>
<td>31 Jul - 02 Aug 1971</td>
<td>41</td>
</tr>
<tr>
<td>09</td>
<td style="text-align: left;">John Young</td>
<td>1930</td>
<td>2018</td>
<td>Apollo 16</td>
<td>21-23 Apr 1972</td>
<td>41</td>
</tr>
<tr>
<td>10</td>
<td style="text-align: left;">Charles Duke</td>
<td>1935</td>
<td>-</td>
<td>Apollo 16</td>
<td>21-23 Apr 1972</td>
<td>36</td>
</tr>
<tr>
<td>11</td>
<td style="text-align: left;">Eugene Cernan</td>
<td>1934</td>
<td>2017</td>
<td>Apollo 17</td>
<td>11-14 Dec 1972</td>
<td>38</td>
</tr>
<tr>
<td>12</td>
<td style="text-align: left;">Harrison Schmitt</td>
<td>1935</td>
<td>-</td>
<td>Apollo 17</td>
<td>11-14 Dec 1972</td>
<td>37</td>
</tr>
</tbody>
</table>
</body>
</html>
Copy and paste this code into a new file in your HTML editor, save the file as table-demo-01.html, and open the file in a web browser. You should see something like the following:

The table on this web page lists the astronauts who walked on the moon
At first glance, it might seem like we have written an awful lot of HTML code to produce this table. If you look at the code carefully, however, you will see that the bulk of the table consists of twelve blocks of almost identical code, each of which holds the details for one of the twelve astronauts. Indeed, the only difference between the blocks is in the information they contain. Exactly the same HTML tags are used in each block.
We'll go through the various bits of code in a bit more detail so that you can see what they do. Before we look at the table itself, however, let's consider the style information we have embedded in the head of the document:
<style>
th, td {border: 1px solid grey; padding: 0.5em; text-align: center;}
</style>
Unlike most of the other HTML code examples in these pages, we have used the HTML <style> element here to define some of the styling for our table - specifically, for the table header (<th>) and table data (<td>) elements. We have done this because we need a large number of these elements to build the table. If we were to style each element individually using the element's style attribute, we would have to include an awful lot of additional code.
The style information tells the browser that it should put a solid grey border with a width of one pixel around each cell (i.e. each table header and table data element) in the table (border: 1px solid grey;). By default, HTML tables are displayed without any borders; if we want them to have borders, we need to use styling.
It also tells the browser to leave some white space around the contents of each cell (padding: 0.5em;), and to centre-align the text in each cell (text-align: center;). Text in a table header cell is centre-aligned by default, so this last statement only affects the table data cells, which are left-aligned by default.
Now we come to the code for the table itself. The HTML table element tag set (<table> … </table>) encloses all of the other HTML elements that make up the table, so the first line of code we see is this:
<table style="margin: auto; border-collapse: collapse;">
Since there is only one table element in our code, we have chosen to define the styling information for the table inside the table element using its style attribute.
By default, tables are displayed flush with the left-hand page margin. We happen to think the table looks better in the centre of the page, so we have set it up to be equidistant from the left and right-hand page margins (margin: auto;).
Tables also insert a small amount of white space around each cell in the table in order to separate them from one another. We want to give our cells borders, but we don't really want to see a gap between the borders of individual cells. We can avoid this by telling the browser to "collapse" the table borders (border-collapse: collapse;). This effectively removes the white space around each cell, and creates a common boundary between adjacent cells.
The next line of code sets up a caption for the table using the <caption> element:
<caption><h2>Apollo astronauts who walked on the Moon</h2></caption>
Use of the <caption> element is optional, but if you do decide to use it, you should always place it immediately after the opening <table> tag. A table should only ever contain one <caption> element.
By default, the text used for the caption is displayed above the table itself and is centre-aligned but not otherwise formatted. We have used a level 2 heading (<h2>) between the opening and closing tags of the caption element to make the title of our table really stand out. It is possible to place a caption above a table without actually using a caption element, but W3C recommends its use to improve accessibility.
The next major chunk of code in our table sets up the column headers:
<thead>
<tr>
<th>No.</th>
<th>Astronaut</th>
<th>Born</th>
<th>Died</th>
<th>Mission</th>
<th>Moonwalk Date(s)</th>
<th>Age at time</th>
</tr>
</thead>
The table header element (<thead>) contains a table row element (<tr>) which contains all of the column headings for the table. The table header element has semantic value only; omitting it will not alter the appearance of your table. The table row element, on the other hand, must be used; all of the table's cells must be placed inside a table row element.
In the code fragment above, all of the cells are table header (<th>) elements. By default, any text inside a table header element is centred and displayed in a bold font. It is of course possible to achieve the same effect using table data cells (<td>) together with appropriate styling; there are however semantic benefits to using the table header element.
The remainder of the code that makes up the table is enclosed within the table body element (<tbody>). Like the table header element, the table body element could be omitted because it does not have any influence over how the table is displayed. Its purpose is purely semantic in that it identifies the enclosed HTML elements as belonging to the main body of the table.
We now come to the actual content of the table body, which consists of twelve table row elements, each of which contains seven table data elements (<td>). Here is the code for the first table row element:
<tr>
<td>01</td>
<td style="text-align: left;">Neil Armstrong</td>
<td>1930</td>
<td>2012</td>
<td>Apollo 11</td>
<td>21 Jul 1969</td>
<td>38</td>
</tr>
Perhaps the first thing to note here is that unless a particular table data element spans more than one column - a situation that is perfectly feasible - the number of table data elements in each row should be the same. It should also match the number of table header elements in the table header. We will be looking at the issue of cells that span multiple rows and/or columns later.
The second table data element has the text-align property of its style attribute set to "left". This is because we want the names of the astronauts to be left-aligned within the cell (it just looks neater that way). Table data is normally left aligned by default, but as you may recall, we right-aligned all of the table's cells using the <style> element in the document header.
Apart from that, the code is fairly straightforward. Each item of data is enclosed within its own table data element. We just need to be careful to maintain the correct order when inserting data into the table data cells so that each item of data appears under the correct heading. Essentially, once we have successfully created the first row of data in the body of your table, we can use it as a template for the remaining rows.
We have already seen an example of a table that has a caption element, and that uses both the header element and the body element. A table can also have a footer element. These elements define the structure of an HTML table.
Note that it is not mandatory to use these elements; we can create a table that has a caption, a header, a body and a footer using just the table row (<tr>) and table data (<td>) elements. There are however some good arguments for their use.
Most of the tables we create will have a caption that provides the table with a short description or title; a header typically comprising the column labels that tell us what kind of data the column contains; and a body that contains the actual table data. We might also have a footer at the bottom of the table that tells us something about the data, like when it was published or last updated.
W3C recommends the use of the caption, header, body and footer elements for tables (where appropriate) because it makes the table more accessible - for example, to sight-impaired visitors who use screen readers. In addition, search engines and other information retrieval systems can use the semantic information provided to quickly assess the table content and evaluate its relevance to search criteria.
Note that within the <table> … </table> tag set, the order in which the structural elements must be placed is as follows:
The <caption>, <thead>, and <tfoot> elements may only appear once in a table. The <tbody> element may appear multiple times, which is useful if you want to break your table down into a number of different sections. Note that the requirement in HTML 5 to place the <tfoot> element after the <tbody> element directly contradicts the requirement in HTML 4, which states:
"TFOOT must appear before TBODY within a TABLE definition so that user agents can render the foot before receiving all of the (potentially numerous) rows of data."
This has occasionally led to some confusion amongst web authors, although most browsers will render the <tfoot> element in the correct position (i.e. beneath the main body of the table) regardless of whether it appears before or after the <tbody> element in the HTML document.
The HTML code below creates a web page that displays a table representing the final Premiere League table for the 2017-2018 season of the English Premier League (for those with no knowledge of football, the Premier League is the top level of the English football league system). The table has all of the main structural elements described above.
<!doctype html>
<html lang="en">
<head>
<meta charset="utf-8">
<title>Table Demo 02</title>
<style>
th, td {border: 1px solid grey; padding: 0.25em 0.5em; text-align: center; font-size: smaller;}
</style>
</head>
<body>
<h1 style="text-align: center;">English Premier League</h1>
<table style="margin: auto; border-collapse: collapse;">
<caption><h2>2017/2018 Season </h2></caption>
<thead>
<tr>
<th>#</th><th>Team</th><th>Pl</th><th>W</th><th>D</th><th>L</th><th>F</th><th>A</th><th>GD</th><th>Pts</th>
</tr>
</thead>
<tbody>
<tr>
<td>01</td><td style="text-align: left;">Manchester City</td>
<td>38</td><td>32</td><td>4</td><td>2</td><td>106</td><td>27</td><td>79</td><td>100</td>
</tr>
<tr>
<td>02</td><td style="text-align: left;">Manchester United</td>
<td>38</td><td>25</td><td>6</td><td>7</td><td>68</td><td>28</td><td>40</td><td>81</td>
</tr>
<tr>
<td>03</td><td style="text-align: left;">Tottenham Hotspur</td>
<td>38</td><td>23</td><td>8</td><td>7</td><td>74</td><td>36</td><td>38</td><td>77</td>
</tr>
<tr>
<td>04</td><td style="text-align: left;">Liverpool</td>
<td>38</td><td>21</td><td>12</td><td>5</td><td>84</td><td>38</td><td>46</td><td>75</td>
</tr>
<tr>
<td>05</td><td style="text-align: left;">Chelsea</td>
<td>38</td><td>21</td><td>7</td><td>10</td><td>62</td><td>38</td><td>24</td><td>70</td>
</tr>
<tr>
<td>06</td><td style="text-align: left;">Arsenal</td>
<td>38</td><td>19</td><td>6</td><td>13</td><td>74</td><td>51</td><td>23</td><td>63</td>
</tr>
<tr>
<td>07</td><td style="text-align: left;">Burnley</td>
<td>38</td><td>14</td><td>12</td><td>12</td><td>36</td><td>39</td><td>-3</td><td>54</td>
</tr>
<tr>
<td>08</td><td style="text-align: left;">Everton</td>
<td>38</td><td>13</td><td>10</td><td>15</td><td>44</td><td>58</td><td>-14</td><td>49</td>
</tr>
<tr>
<td>09</td><td style="text-align: left;">Leicester City</td>
<td>38</td><td>12</td><td>11</td><td>15</td><td>56</td><td>60</td><td>-4</td><td>47</td>
</tr>
<tr>
<td>10</td><td style="text-align: left;">Newcastle United</td>
<td>38</td><td>12</td><td>8</td><td>18</td><td>39</td><td>47</td><td>-8</td><td>44</td>
</tr>
<tr>
<td>11</td><td style="text-align: left;">Crystal Palace</td>
<td>38</td><td>11</td><td>11</td><td>16</td><td>45</td><td>55</td><td>-10</td><td>44</td>
</tr>
<tr>
<td>12</td><td style="text-align: left;">Bournemouth</td>
<td>38</td><td>11</td><td>11</td><td>16</td><td>45</td><td>61</td><td>-16</td><td>44</td>
</tr>
<tr>
<td>13</td><td style="text-align: left;">West Ham United</td>
<td>38</td><td>10</td><td>12</td><td>16</td><td>48</td><td>68</td><td>-20</td><td>42</td>
</tr>
<tr>
<td>14</td><td style="text-align: left;">Watford</td>
<td>38</td><td>11</td><td>8</td><td>18</td><td>44</td><td>64</td><td>-20</td><td>41</td>
</tr>
<tr>
<td>15</td><td style="text-align: left;">Brighton and Hove Albion</td>
<td>38</td><td>9</td><td>13</td><td>16</td><td>34</td><td>54</td><td>-20</td><td>40</td>
</tr>
<tr>
<td>16</td><td style="text-align: left;">Huddersfield Town</td>
<td>38</td><td>9</td><td>10</td><td>19</td><td>28</td><td>58</td><td>-30</td><td>37</td>
</tr>
<tr>
<td>17</td><td style="text-align: left;">Southampton</td>
<td>38</td><td>7</td><td>15</td><td>16</td><td>37</td><td>56</td><td>-19</td><td>36</td>
</tr>
<tr>
<td>18</td><td style="text-align: left;">Swansea City</td>
<td>38</td><td>8</td><td>9</td><td>21</td><td>28</td><td>56</td><td>-28</td><td>33</td>
</tr>
<tr>
<td>19</td><td style="text-align: left;">Stoke City</td>
<td>38</td><td>7</td><td>12</td><td>19</td><td>35</td><td>68</td><td>-33</td><td>33</td>
</tr>
<tr>
<td>20</td><td style="text-align: left;">West Bromwich Albion</td>
<td>38</td><td>6</td><td>13</td><td>19</td><td>31</td><td>56</td><td>-25</td><td>31</td>
</tr>
</tbody>
<tfoot>
<tr>
<td colspan="10"><strong>Key:</strong><br><br>
<strong>Pl</strong> = Played
<strong>W</strong> = Won
<strong>D</strong> = Drawn
<strong>L</strong> = Lost<br>
<strong>F</strong> = For
<strong>A</strong> = Against
<strong>GD</strong> = Goal difference
<strong>Pts</strong> = Points<br><br>
</td>
</tr>
</tfoot>
</table>
</body>
</html>
Copy and paste this code into a new file in your HTML editor, save the file as table-demo-02.html, and open the file in a web browser. You should see something like the following:
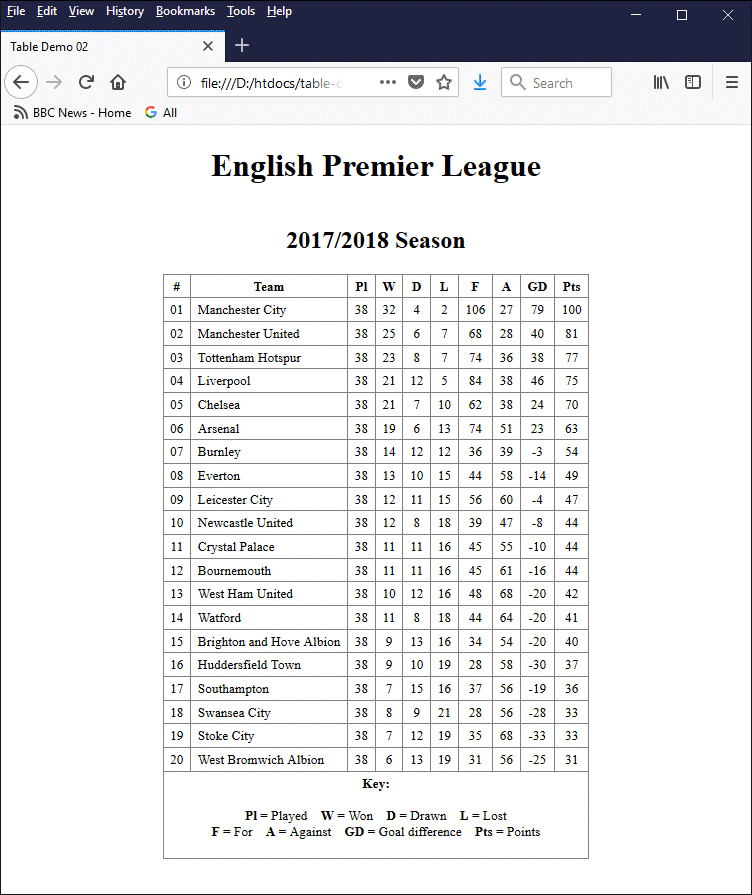
The table on this web page has a caption, a header, a body and a footer
The <tfoot> element is intended to contain one or more table rows summarising the information in the table's columns. The current (at the time of writing) W3C Working Draft document describes the element as follows:
"The tfoot element represents the block of rows that consist of the column summaries (footers) for the parent table element, if the tfoot element has a parent and it is a table."
In our view, this is sufficiently vague as to allow web developers a fairly broad interpretation of what kind of information should go into the table footer. In the above example, we have chosen to use the <tfoot> element to provide a key for the abbreviations used in the <th> elements within the <thead> element. This ensures that a user unfamiliar with these abbreviations will at least know what kind of data each column contains.
The colspan attribute (short for "column span") can be used to make a table data cell or a table header cell stretch over two or more columns, or even across the entire table. In fact, we saw an example of this in our Premier League table (above), where the table footer contains a single table data cell that spans all ten rows of the table:
<tfoot>
</tr>
<td colspan="10"><strong>Key:</strong><br><br>
.
.
.
.
</td>
</tr>
</tfoot>
The colspan attribute is placed inside the opening tag of a header or data cell, and its value is set to the number of columns that we want the cell to span. Suppose we have a table header cell that we want to stretch across three columns. The basic code we use is as follows:
<th colspan="3"> . . . </th>
If the cell containing the colspan attribute is the only cell in a row and the value assigned to colspan exceeds the total number of columns in the table, the cell will span the entire table as if the value assigned to colspan matched the total number of columns. If, on the other hand, there are cells in the same row to the right of the cell containing the colspan attribute, these cells will effectively be displaced to the right. Consider the following example:
<!doctype html>
<html lang="en">
<head>
<meta charset="utf-8">
<title>Table Demo 03</title>
<style>
th, td {border: 1px solid grey; padding: 0.25em 0.5em; text-align: center; font-size: smaller;}
</style>
</head>
<body>
<h1 style="text-align: center;">Table Demo 3</h1>
<p>
In the table below, the colspan attribute applied to the second data cell in the third row of data has been set to "3", but the total number of cells in the row has not been altered. In the final row there is just a single data cell, whose colspan attribute is set to "10". This is four more than the total number of cells (six) in most of the other rows.
</p>
<table style="margin: auto; border-collapse: collapse;">
<caption><h2>The colspan attribute</h2></caption>
<thead>
<tr>
<th>Header 1</th><th>Header 2</th><th>Header 3</th><th>Header 4</th><th>Header 5</th><th>Header 6</th>
</tr>
</thead>
<tbody>
<tr><td>data</td><td>data</td><td>data</td><td>data</td><td>data</td><td>data</td></tr>
<tr><td>data</td><td>data</td><td>data</td><td>data</td><td>data</td><td>data</td></tr>
<tr><td>data</td><td colspan="3">data</td><td>data</td><td>data</td><td>data</td><td>data</td></tr>
<tr><td>data</td><td>data</td><td>data</td><td>data</td><td>data</td><td>data</td></tr>
<tr><td>data</td><td>data</td><td>data</td><td>data</td><td>data</td><td>data</td></tr>
<tr><td>data</td><td>data</td><td>data</td><td>data</td><td>data</td><td>data</td></tr>
<tr><td>data</td><td>data</td><td>data</td><td>data</td><td>data</td><td>data</td></tr>
<tr><td>data</td><td>data</td><td>data</td><td>data</td><td>data</td><td>data</td></tr>
<tr><td>data</td><td>data</td><td>data</td><td>data</td><td>data</td><td>data</td></tr>
<tr><td colspan="10">data</td></tr>
</tbody>
</table>
</body>
</html>
Copy and paste this code into a new file in your HTML editor, save the file as table-demo-03.html, and open the file in a web browser. You should see something like the following:
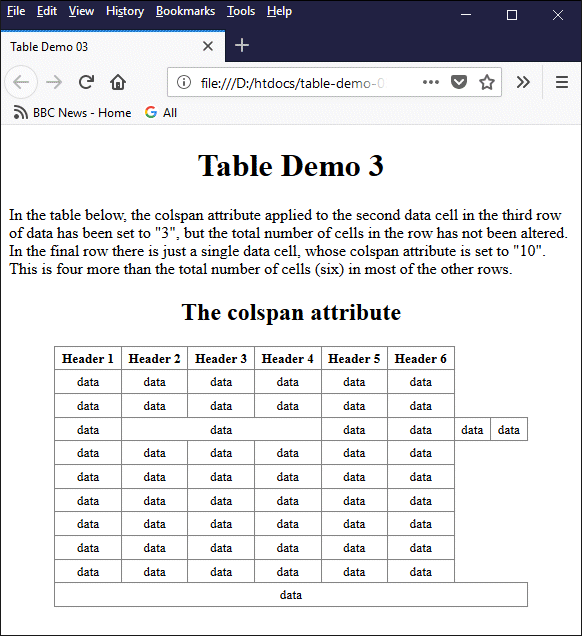
Care must be taken when using the colspan attribute
There are essentially two important things to note here. First, because we have used the colspan attribute to stretch the second data cell in row three across three columns, without removing any of the other cells in the row to compensate, we have effectively made this table row two cells wider than most of the other rows in the table. As you can see, the two "extra" cells are still displayed, but they appear to be outside the main table.
The second thing to note is the single data cell in row ten. Although we have set the colspan attribute in this cell to "10", it does not span ten columns. On the other hand, nor does it restrict itself to six columns as we might expect (since there are six table header cells, and most of the rows have only six cells). Instead, it matches what it calculates to be the maximum number of columns in the table, based on row three - i.e. eight columns.
The lesson to be learned here is that, while the number of cells in each row will normally be the same, any cell for which the colspan attribute has been set to n should be counted as n cells. This factor must be considered in any calculations we make concerning the number of cells we can define for a particular row.
In our experience, the majority of tables will have the same number of data cells in each row within the main body of the table, matching the number of header cells, so use of the colspan attribute is rarely necessary. There are occasions, however, when it can help us to create customised table layouts to accommodate data of a more complex nature. Consider the following example:
<!doctype html>
<html lang="en">
<head>
<meta charset="utf-8">
<title>Table Demo 04</title>
<style>
td,th {
font-weight: bold;
text-align: center;
vertical-align: center;
font-size: 83.33%;
width: 3em;
height: 3em;
padding: 0;
border: solid 2px white;
}
td.onm { background-color: lime; }
td.ng { background-color: lightCyan; }
td.am { background-color: gold; }
td.ae { background-color: lemonChiffon; }
td.m { background-color: darkSeaGreen; }
td.ptm { background-color: lightBlue; }
td.tm { background-color: lightPink; }
td.la { background-color: navajoWhite; }
td.ac { background-color: hotPink; }
</style>
<!-- onm = other non-metals -->
<!-- ng = noble gases -->
<!-- am = alkali metals -->
<!-- ae = alkaline earths -->
<!-- m = metalloids -->
<!-- ptm = post-transition metals -->
<!-- tm = transition metals -->
<!-- la = lanthanoids -->
<!-- ac = actinides -->
</head>
<body>
<h1 style="text-align: center;">Table Demo 4</h1>
<p>
The table below represents the <em>periodic table of elements</em> (or just <em>periodic table</em>) of elements, in which the chemical elements are ordered according to their atomic number, electron configuration, and chemical properties. Chemical elements with similar chemical properties appear in the the same column. Periodic table rows are called <em>periods</em> and columns are called <em>groups</em>. The periodic table is based largely on the work of Russian chemist Dmitri Mendeleev, who published his own early version of the periodic table in 1869.
</p>
<table style="margin: auto; border-collapse: collapse;">
<caption><h2>The Periodic Table</h2></caption>
<thead>
<tr>
<th>1</th><th>2</th><th>3</th><th>4</th><th>5</th><th>6</th>
<th>7</th><th>8</th><th>9</th><th>10</th><th>11</th><th>12</th>
<th>13</th><th>14</th><th>15</th><th>16</th><th>17</th><th>18</th>
</tr>
</thead>
<tbody>
<tr>
<td class="onm"><sup>1 </sup>H</td>
<td colspan="16"></td>
<td class="ng"><sup>2 </sup>He</td>
</tr>
<tr>
<td class="am"><sup>3 </sup>Li</td>
<td class="ae"><sup>4 </sup>Be</td>
<td colspan="10"></td>
<td class="m"><sup>5 </sup>B</td>
<td class="onm"><sup>6 </sup>C</td>
<td class="onm"><sup>7 </sup>N</td>
<td class="onm"><sup>8 </sup>O</td>
<td class="onm"><sup>9 </sup>F</td>
<td class="ng"><sup>10 </sup>Ne</td>
</tr>
<tr>
<td class="am"><sup>11 </sup>Na</td>
<td class="ae"><sup>12 </sup>Mg</td>
<td colspan="10"></td>
<td class="ptm"><sup>13 </sup>Al</td>
<td class="m"><sup>14 </sup>Si</td>
<td class="onm"><sup>15 </sup>P</td>
<td class="onm"><sup>16 </sup>S</td>
<td class="onm"><sup>17 </sup>Cl</td>
<td class="ng"><sup>18 </sup>Ar</td>
</tr>
<tr>
<td class="am"><sup>19 </sup>K</td>
<td class="ae"><sup>20 </sup>Ca</td>
<td class="tm"><sup>21 </sup>Sc</td>
<td class="tm"><sup>22 </sup>Ti</td>
<td class="tm"><sup>23 </sup>V</td>
<td class="tm"><sup>24 </sup>Cr</td>
<td class="tm"><sup>25 </sup>Mn</td>
<td class="tm"><sup>26 </sup>Fe</td>
<td class="tm"><sup>27 </sup>Co</td>
<td class="tm"><sup>28 </sup>Ni</td>
<td class="tm"><sup>29 </sup>Cu</td>
<td class="tm"><sup>30 </sup>Zn</td>
<td class="ptm"><sup>31 </sup>Ga</td>
<td class="m"><sup>32 </sup>Ge</td>
<td class="m"><sup>33 </sup>As</td>
<td class="onm"><sup>34 </sup>Se</td>
<td class="onm"><sup>35 </sup>Br</td>
<td class="ng"><sup>36 </sup>Kr</td>
</tr>
<tr>
<td class="am"><sup>37 </sup>Rb</td>
<td class="ae"><sup>38 </sup>Sr</td>
<td class="tm"><sup>39 </sup>Y</td>
<td class="tm"><sup>40 </sup>Zr</td>
<td class="tm"><sup>41 </sup>Nb</td>
<td class="tm"><sup>42 </sup>Mo</td>
<td class="tm"><sup>43 </sup>Tc</td>
<td class="tm"><sup>44 </sup>Ru</td>
<td class="tm"><sup>45 </sup>Rh</td>
<td class="tm"><sup>46 </sup>Pd</td>
<td class="tm"><sup>47 </sup>Ag</td>
<td class="tm"><sup>48 </sup>Cd</td>
<td class="ptm"><sup>49 </sup>Ln</td>
<td class="ptm"><sup>50 </sup>Sn</td>
<td class="m"><sup>51 </sup>Sb</td>
<td class="m"><sup>52 </sup>Te</td>
<td class="onm"><sup>53 </sup>I</td>
<td class="ng"><sup>54 </sup>Xe</td>
</tr>
<tr>
<td class="am"><sup>55 </sup>Cs</td>
<td class="ae"><sup>56 </sup>Ba</td>
<td class="la">57-71</td>
<td class="tm"><sup>72 </sup>Hf</td>
<td class="tm"><sup>73 </sup>Ta</td>
<td class="tm"><sup>74 </sup>W</td>
<td class="tm"><sup>75 </sup>Re</td>
<td class="tm"><sup>76 </sup>Os</td>
<td class="tm"><sup>77 </sup>Ir</td>
<td class="tm"><sup>78 </sup>Pt</td>
<td class="tm"><sup>79 </sup>Au</td>
<td class="tm"><sup>80 </sup>Hg</td>
<td class="ptm"><sup>81 </sup>Tl</td>
<td class="ptm"><sup>82 </sup>Pb</td>
<td class="ptm"><sup>83 </sup>Bi</td>
<td class="m"><sup>84 </sup>Po</td>
<td class="m"><sup>85 </sup>At</td>
<td class="ng"><sup>86 </sup>Rn</td>
</tr>
<tr>
<td class="am"><sup>87 </sup>Fr</td>
<td class="ae"><sup>88 </sup>Ra</td>
<td class="ac">89-103</td>
<td class="tm"><sup>104 </sup>Rf</td>
<td class="tm"><sup>105 </sup>Db</td>
<td class="tm"><sup>106 </sup>Sg</td>
<td class="tm"><sup>107 </sup>Bh</td>
<td class="tm"><sup>108 </sup>Hs</td>
<td class="tm"><sup>109 </sup>Mt</td>
<td class="tm"><sup>110 </sup>Ds</td>
<td class="tm"><sup>111 </sup>Rg</td>
<td class="tm"><sup>112 </sup>Cn</td>
<td class="ptm"><sup>113 </sup>Nh</td>
<td class="ptm"><sup>114 </sup>Fl</td>
<td class="ptm"><sup>115 </sup>Mc</td>
<td class="m"><sup>116 </sup>Lv</td>
<td class="m"><sup>117 </sup>Ts</td>
<td class="ng"><sup>118 </sup>Og</td>
</tr>
<tr>
<td colspan="2"></td>
<td><img src="https://www.technologyuk.net/assets/demo-images/down_arrow.gif" alt="Down arrow"></td>
<td colspan="15"></td>
</tr>
<tr>
<td colspan="2"></td>
<td class="la"><sup>57 </sup>La</td>
<td class="la"><sup>58 </sup>Ce</td>
<td class="la"><sup>59 </sup>Pr</td>
<td class="la"><sup>60 </sup>Nd</td>
<td class="la"><sup>61 </sup>Pm</td>
<td class="la"><sup>62 </sup>Sm</td>
<td class="la"><sup>63 </sup>Eu</td>
<td class="la"><sup>64 </sup>Gd</td>
<td class="la"><sup>65 </sup>Tb</td>
<td class="la"><sup>66 </sup>Dy</td>
<td class="la"><sup>67 </sup>Ho</td>
<td class="la"><sup>68 </sup>Er</td>
<td class="la"><sup>69 </sup>Tm</td>
<td class="la"><sup>70 </sup>Yb</td>
<td class="la"><sup>71 </sup>Lu</td>
<td></td>
</tr>
<tr>
<td colspan="2"></td>
<td class="ac"><sup>89 </sup>Ac</td>
<td class="ac"><sup>90 </sup>Th</td>
<td class="ac"><sup>91 </sup>Pa</td>
<td class="ac"><sup>92 </sup>U</td>
<td class="ac"><sup>93 </sup>Np</td>
<td class="ac"><sup>94 </sup>Pu</td>
<td class="ac"><sup>95 </sup>Am</td>
<td class="ac"><sup>96 </sup>Cm</td>
<td class="ac"><sup>97 </sup>Bk</td>
<td class="ac"><sup>98 </sup>Cf</td>
<td class="ac"><sup>99 </sup>Es</td>
<td class="ac"><sup>100 </sup>Fm</td>
<td class="ac"><sup>101 </sup>Md</td>
<td class="ac"><sup>102 </sup>No</td>
<td class="ac"><sup>103 </sup>Lr</td>
<td></td>
</tr>
</tbody>
</table>
</body>
</html>
This code creates a simplified version of the Periodic Table of Elements. The <style> element is used in the head of the HTML document to set a standard size for the table header and data cells. It also sets the font weight and font size, centres the text horizontally and vertically, and defines several CSS classes to define different background colours for the table data cells, depending on the type of element a particular data cell refers to (we will discuss CSS classes in more detail in the section "Introduction to CSS".
We have used the colspan attribute in a number of cells throughout the code in order to simulate the white space that appears in most versions of the periodic table. For example, the first row of the periodic table (each row is usually referred to as a period) has the first element (hydrogen) at the far left-hand side of the table and the second element (helium) at the far right-hand side, with nothing in between.
Because the table is eighteen columns wide in total, we set the colspan attribute of the (empty) second data cell in the first row of the main body of the table to "16" in order to make it span the gap between the first and second elements. The best way to see how the code works is to run it, so copy and paste it into a new file in your HTML editor, save the file as table-demo-04.html, and open the file in a web browser. You should see something like the following:
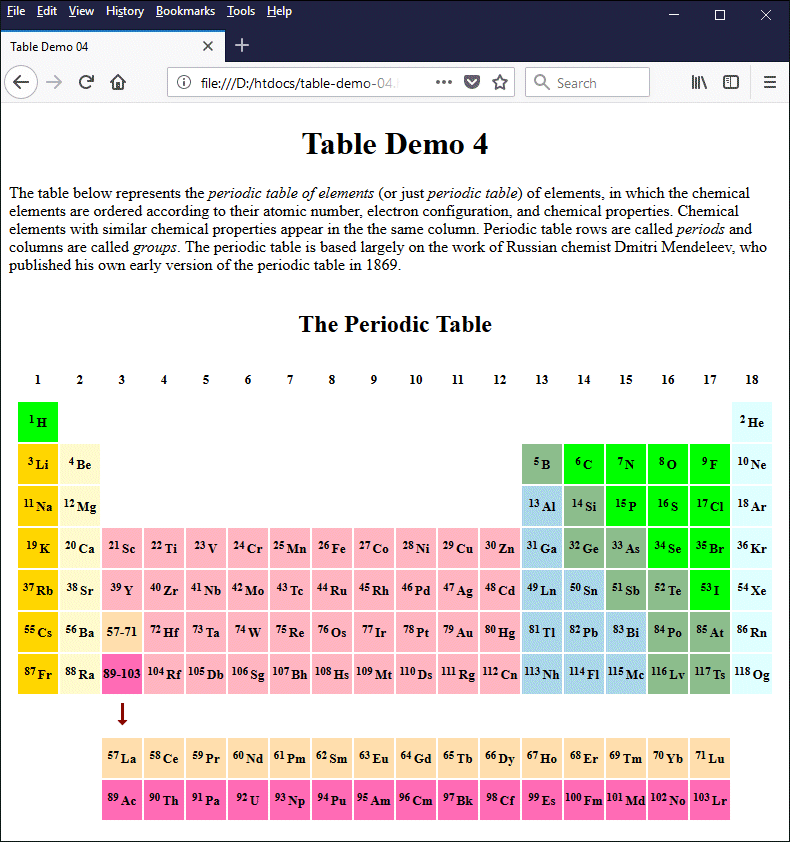
The colspan attribute is used here to create whitespace in the table
The rowspan attribute can be used to make a table data cell or a table header cell stretch over two or more table rows. The rowspan attribute is placed inside the opening tag of a header or data cell, and its value is set to the number of rows that we want the cell to span. Suppose we have a table data cell that we want to span four rows. The basic code we use is as follows:
<td rowspan="4"> . . . </td>
Suppose we have a table with several rows, each of which contains the same number of data cells. If one of the data cells in the first row contains a rowspan attribute whose value is set to a number greater than the total number of rows in the table, the cell will span the entire column within which it resides as if the value assigned to rowspan matched the total number of rows.
This will have one or two unwanted results. The first (and most serious) is that all of the cells in all of the remaining rows will be moved one place to the right, which is something we probably don't want to happen. In most browsers this appears to be the only side effect, but in the current version of Firefox we have noticed that the bottom border of the cell also disappears.
Something similar happens if we have a data cell elsewhere in the table for which the rowspan attribute has been set to a value greater than one. The row in which the data cell resides is not affected, but subsequent rows will have their data cells displaced to the right. The number of rows affected will be one less than the value assigned to the rowspan attribute. Let's look at a concrete example:
<!doctype html>
<html lang="en">
<head>
<meta charset="utf-8">
<title>Table Demo 05</title>
<style>
th, td {border: 1px solid grey; padding: 0.25em 0.5em; text-align: center; font-size: smaller;}
</style>
</head>
<body>
<h1 style="text-align: center;">Table Demo 5</h1>
<p>
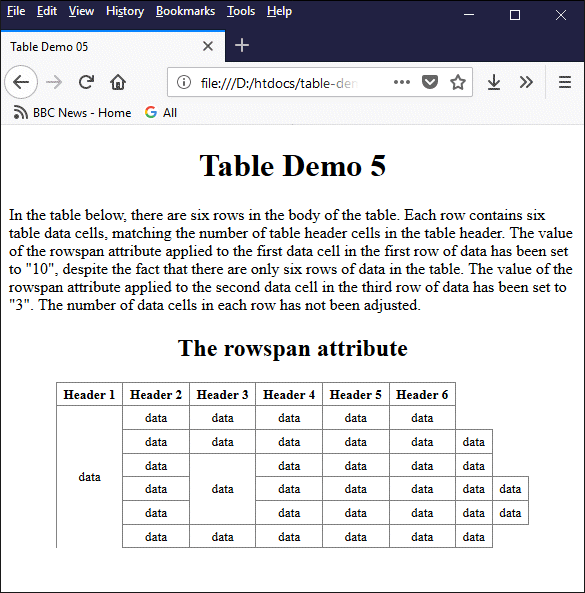
In the table below, there are six rows in the body of the table. Each row contains six table data cells, matching the number of table header cells in the table header. The value of the rowspan attribute applied to the first data cell in the first row of data has been set to "10", despite the fact that there are only six rows of data in the table. The value of the rowspan attribute applied to the second data cell in the third row of data has been set to "3". The number of data cells in each row has not been adjusted.
</p>
<table style="margin: auto; border-collapse: collapse;">
<caption><h2>The rowspan attribute</h2></caption>
<thead>
<tr>
<th>Header 1</th><th>Header 2</th><th>Header 3</th><th>Header 4</th><th>Header 5</th><th>Header 6</th>
</tr>
</thead>
<tbody>
<tr><td rowspan="10">data</td><td>data</td><td>data</td><td>data</td><td>data</td><td>data</td></tr>
<tr><td>data</td><td>data</td><td>data</td><td>data</td><td>data</td><td>data</td></tr>
<tr><td>data</td><td rowspan="3">data</td><td>data</td><td>data</td><td>data</td><td>data</td></tr>
<tr><td>data</td><td>data</td><td>data</td><td>data</td><td>data</td><td>data</td></tr>
<tr><td>data</td><td>data</td><td>data</td><td>data</td><td>data</td><td>data</td></tr>
<tr><td>data</td><td>data</td><td>data</td><td>data</td><td>data</td><td>data</td></tr>
</tbody>
</table>
</body>
</html>
Copy and paste this code into a new file in your HTML editor, save the file as table-demo-05.html, and open the file in a web browser. You should see something like the following:
Care must be taken when using the rowspan attribute
As you can see, the rowspan attribute will have an effect on one or more of the rows that follow the one in which it is used. The first data cell in row one spans all of the rows, and thus affects every row in the body of the table except for the one it is in. The third data cell in row three only spans three rows, and therefore affects only the fourth and fifth rows.
Assuming we actually want the first data cell to fill the first column, and for the third data cell in row three to span three rows, we simply need to remove the unwanted cells in the affected rows and set the rowspan attribute in the first cell to match the actual number of rows. Here is our revised code:
<!doctype html>
<html lang="en">
<head>
<meta charset="utf-8">
<title>Table Demo 06</title>
<style>
th, td {border: 1px solid grey; padding: 0.25em 0.5em; text-align: center; font-size: smaller;}
</style>
</head>
<body>
<h1 style="text-align: center;">Table Demo 6</h1>
<p>
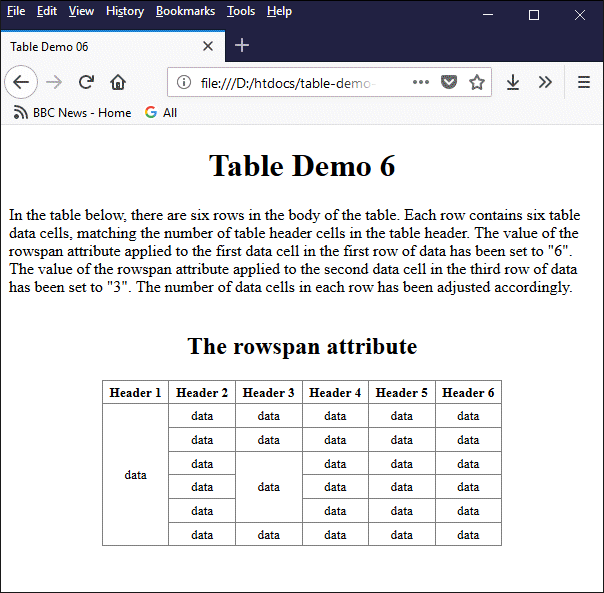
In the table below, there are six rows in the body of the table. Each row contains six table data cells, matching the number of table header cells in the table header. The value of the rowspan attribute applied to the first data cell in the first row of data has been set to "6". The value of the rowspan attribute applied to the second data cell in the third row of data has been set to "3". The number of data cells in each row has been adjusted accordingly.
</p>
<table style="margin: auto; border-collapse: collapse;">
<caption><h2>The rowspan attribute</h2></caption>
<thead>
<tr>
<th>Header 1</th><th>Header 2</th><th>Header 3</th><th>Header 4</th>
<th>Header 5</th><th>Header 6</th>
</tr>
</thead>
<tbody>
<tr><td rowspan="6">data</td><td>data</td><td>data</td><td>data</td><td>data</td><td>data</td></tr>
<tr><td>data</td><td>data</td><td>data</td><td>data</td><td>data</td></tr>
<tr><td>data</td><td rowspan="3">data</td><td>data</td><td>data</td><td>data</td></tr>
<tr><td>data</td><td>data</td><td>data</td><td>data</td></tr>
<tr><td>data</td><td>data</td><td>data</td><td>data</td></tr>
<tr><td>data</td><td>data</td><td>data</td><td>data</td><td>data</td></tr>
</tbody>
</table>
</body>
</html>
Copy and paste this revised code into a new file in your HTML editor, save the file as table-demo-06.html, and open the file in a web browser. You should see something like the following:
The number of cells in each row has been adjusted to take cells that span rows into account
For the majority of the tables we create, we won't need to use the rowspan attribute. Having said that, it can be quite useful if we need to create a customised table layout. The following HTML code creates a web page that displays a group timetable for an imaginary college course of the kind I used to teach on many years ago.
<!doctype html>
<html lang="en">
<head>
<meta charset="utf-8">
<title>Table Demo 07</title>
<style>
h1 { font-size: 1.55em; margin: 0.5em 0 0 0; }
h2 { font-size: 1.25em; }
th, td {border: 1px solid lightGray; padding: 4px; font-size: smaller;}
td {text-align: center; vertical-align: top; padding: 0 0.25em;}
tr {height: 1em;}
td.lesson {vertical-align: middle; background-color: LemonChiffon;}
td.min {text-align: right;}
</style>
</head>
<body>
<div style="text-align: center">
<h1>BTEC National Diploma</h1>
<h2>Media, Games and Computing</h2>
</div>
<table style="margin: auto; border-collapse: collapse;">
<caption>Group Timetable</caption>
<thead>
<tr>
<td colspan="2"></td>
<th>Monday</th>
<th>Tuesday</th>
<th>Wednesday</th>
<th>Thursday</th>
<th>Friday</th>
</tr>
</thead>
<tbody>
<tr>
<td rowspan="4">09</td>
<td class="min"><sup>00</sup></td>
<td rowspan="4"></td>
<td rowspan="4"></td>
<td rowspan="4"></td>
<td class="lesson" rowspan="4">
<strong>Tutorial</strong><br>
Room 209<br>Chris Wells
</td>
<td rowspan="4"></td>
</tr>
<tr><td class="min"><sup>15</sup></td></tr>
<tr><td class="min"><sup>30</sup></td></tr>
<tr><td class="min"><sup>45</sup></td></tr>
<tr>
<td rowspan="4">10</td>
<td class="min"><sup>00</sup></td>
<td></td>
<td rowspan="4"></td>
<td rowspan="4"></td>
<td class="lesson" rowspan="10">
Unit 03<br>
<strong>Information Systems</strong><br>
Room 209<br>Chris Wells
</td>
<td class="lesson" rowspan="12">
Unit 16<br>
<strong>Maintaining<br>
Computer Systems</strong><br>
Room 209<br>Chris Wells
</td>
</tr>
<tr>
<td class="min"><sup>15</sup></td>
<td class="lesson" rowspan="12">
Unit 18<br>
<strong>Principles of Software<br>
Design & Development</strong><br>
Room 204<br>Chris Wells
</td>
</tr>
<tr><td class="min"><sup>30</sup></td></tr>
<tr><td class="min"><sup>45</sup></td></tr>
<tr>
<td rowspan="4">11</td>
<td class="min"><sup>00</sup></td>
<td rowspan="4"></td>
<td rowspan="4"></td>
</tr>
<tr><td class="min"><sup>15</sup></td></tr>
<tr><td class="min"><sup>30</sup></td></tr>
<tr><td class="min"><sup>45</sup></td></tr>
<tr>
<td rowspan="4">12</td>
<td class="min"><sup>00</sup></td>
<td rowspan="4"></td>
<td rowspan="4"></td>
</tr>
<tr><td class="min"><sup>15</sup></td></tr>
<tr><td class="min"><sup>30</sup></td></tr>
<tr><td class="min"><sup>45</sup></td></tr>
<tr>
<td rowspan="4">13</td>
<td class="min"><sup>00</sup></td>
<td rowspan="4"></td>
<td rowspan="4"></td>
<td rowspan="4"></td>
<td rowspan="3"></td>
</tr>
<tr>
<td class="min"><sup>15</sup></td>
<td rowspan="3"></td>
</tr>
<tr><td class="min"><sup>30</sup></td></tr>
<tr>
<td class="min"><sup>45</sup></td>
<td class="lesson" rowspan="12">
Unit 01<br>
<strong>Communication &<br>Employabilty Skills<br>For IT</strong><br>
Room 209<br>Chris Wells
</td>
</tr>
<tr>
<td rowspan="4">14</td>
<td class="min"><sup>00</sup></td>
<td class="lesson" rowspan="12">
Unit 02<br>
<strong>Computer Systems</strong><br>
Room 005<br>
Chris Wells
</td>
<td rowspan="4"></td>
<td rowspan="4"></td>
<td class="lesson" rowspan="12">
Unit 08<br>
<strong>Communication<br>Technologies</strong><br>
Room 209<br>Chris Wells
</td>
</tr>
<tr>
<td class="min"><sup>15</sup></td>
</tr>
<tr><td class="min"><sup>30</sup></td></tr>
<tr><td class="min"><sup>45</sup></td></tr>
<tr>
<td rowspan="4">15</sup></td>
<td class="min"><sup>00</sup></td>
<td rowspan="4"></td>
<td rowspan="4"></td>
</tr>
<tr><td class="min"><sup>15</sup></td></tr>
<tr><td class="min"><sup>30</sup></td></tr>
<tr><td class="min"><sup>45</sup></td></tr>
<tr>
<td rowspan="4">16</td>
<td class="min"><sup>00</sup></td>
<td rowspan="4"></td>
<td rowspan="4"></td>
</tr>
<tr><td class="min"><sup>15</sup></td></tr>
<tr><td class="min"><sup>30</sup></td></tr>
<tr><td class="min"><sup>45</sup></td><td></td></tr>
</tbody>
</table>
</body>
</html>
Copy and paste this revised code into a new file in your HTML editor, save the file as table-demo-07.html, and open the file in a web browser. You should see something like the following:
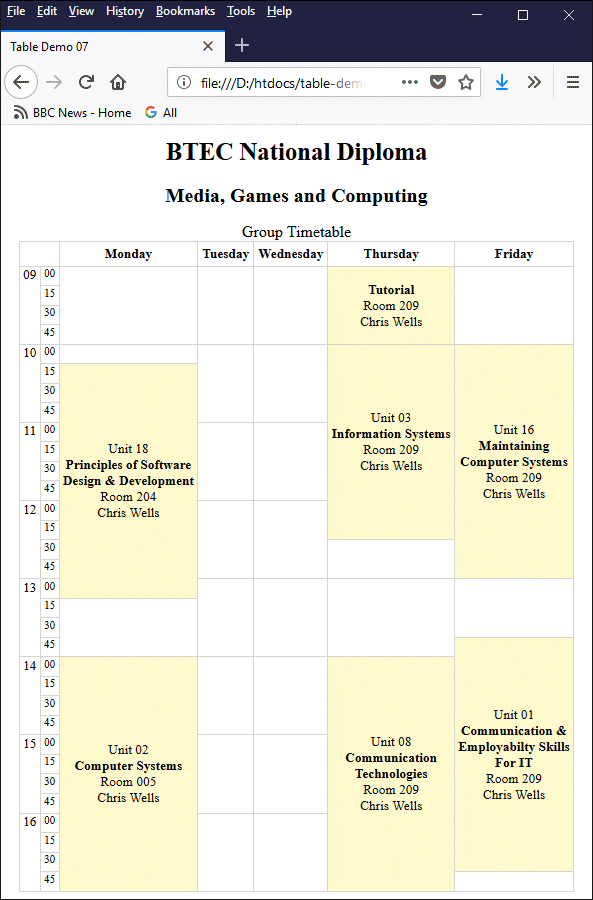
The timetable example demonstrates the use of the rowspan attribute
Writing HTML code for a table of this nature can be quite tricky, but there are a few things you can do to make it easier. Before you start writing any HTML code, make a rough sketch of the table layout using a grid to represent all of the rows and columns in the table. Then, mark the blocks of cells that will be created using the rowspan attribute (graph paper is quite good for this kind of thing).
Using your sketch, you should be able to see how many table data cells will be required in each row. Go through the rows one by one. For each row, write down the row number, and the number of cells in the row. To find the number of cells in a row, traverse the row from left to right, column by column. Only count a cell if it is not already included in a block extending down from one of the previous rows.
You may well find that your first attempt to code the table does not produce the outcome you were expecting. Check back to your sketch to see if you can spot where the problem is. If necessary, temporarily enter a unique number into each cell in your table so that you can see if the cells really are where you think they should be. Get the overall structure right first. You can tidy up the content and sort out the styling later.
The <colgroup> element (short for "column group") allows us to create structural divisions within a table by creating one or more groups of table columns. If a table does not contain a <colgroup> element, it can be thought of as containing a single (implicit) column group consisting of all of the table's columns.
The width of a column group (i.e. the number of columns it spans) can be specified in one of two mutually exclusive ways. We will deal with the most straightforward method first, which is to use the column group's span attribute as follows:
<table>
<colgroup span="5"></colgroup>
<colgroup span="3"></colgroup>
<thead>
<tr><th> . . . </th>
.
.
.
</thead>
<tbody>
.
.
.
The code fragment above creates two column groups, one of five columns and one of three (not that in order for this to be valid, the table must have at least eight columns). Columns are assigned to each column group in order, starting with the left-most column. The first column group spans columns 1 to 5, and the second spans columns 6 to 8. A column group for which the span attribute has been omitted is one column wide by default.
If you use <colgroup> elements, they must be placed after any <caption> element (if present), and before any <thead>, <th>, <tbody> or <td> elements. Note that column groups on their own do not alter the appearance of a table. They do however provide screen readers, search engines, and other intelligent information retrieval systems with information about the structure of a table.
As well as specifying the width of a column group using the span attribute, it is possible to set certain style properties for column groups. You can, for example, set the width and background colour for the columns in a column group, as well as the column group's border properties. You can even make the contents of a column group invisible!
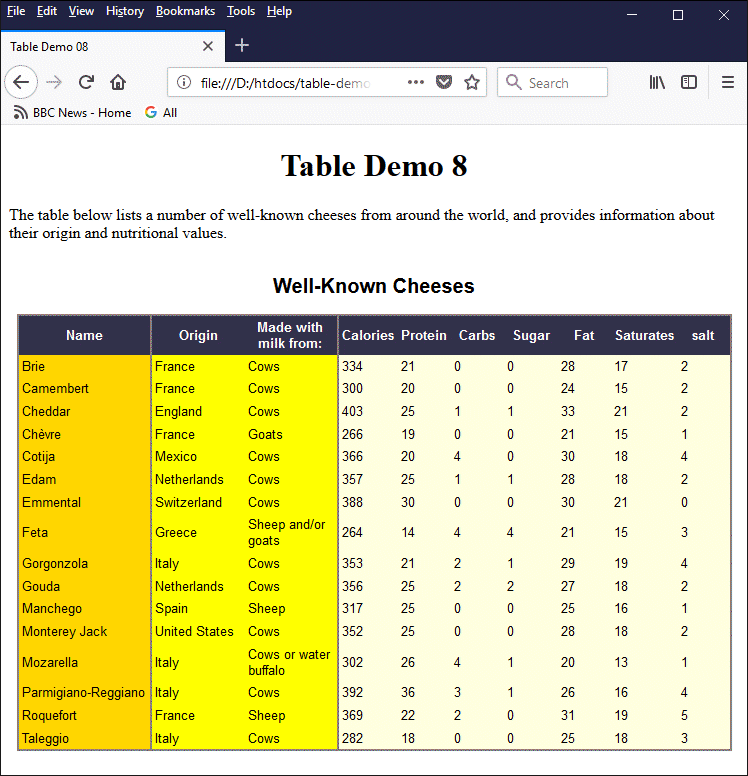
An example should serve to demonstrate the kind of thing you can do using just the <colgroup> element. The following HTML code creates a web page that contains a table displaying nutritional information for some of the world's best-known cheeses:
<!doctype html>
<html lang="en">
<head>
<meta charset="utf-8">
<title>Table Demo 08</title>
<style>
table { font-family: sans-serif; font-size: smaller; }
th, td { padding: 0.25em; }
th { background-color: #36304A; color: white; }
</style>
</head>
<body>
<h1 style="text-align: center;">Table Demo 8</h1>
<p>
The table below lists a number of well-known cheeses from around the world, and provides information about their origin and nutritional values.
</p>
<table style="border-collapse: collapse; margin: auto;">
<caption><h2>Well-Known Cheeses</h2></caption>
<colgroup style="width:10em; background-color: Gold; border: solid 2px grey;"></colgroup>
<colgroup span="2" style="width: 7em; background-color: Yellow; border: solid 2px grey;"></colgroup>
<colgroup span="7" style="width: 4em; background-color: LightYellow; border: solid 2px grey;"></colgroup>
<thead>
<tr>
<th>Name</th><th>Origin</th><th>Made with milk from:</th>
<th>Calories</th><th>Protein</th><th>Carbs</th>
<th>Sugar</th><th>Fat</th><th>Saturates</th><th>salt</th>
</tr>
</thead>
<tbody>
<tr>
<td>Brie</td><td>France</td><td>Cows</td>
<td>334</td><td>21</td><td>0</td><td>0</td><td>28</td><td>17</td><td>2</td>
</tr>
<tr>
<td>Camembert</td><td>France</td><td>Cows</td>
<td>300</td><td>20</td><td>0</td><td>0</td><td>24</td><td>15</td><td>2</td>
</tr>
<tr>
<td>Cheddar</td><td>England</td><td>Cows</td>
<td>403</td><td>25</td><td>1</td><td>1</td><td>33</td><td>21</td><td>2</td>
</tr>
<tr>
<td>Chèvre</td><td>France</td><td>Goats</td>
<td>266</td><td>19</td><td>0</td><td>0</td><td>21</td><td>15</td><td>1</td>
</tr>
<tr>
<td>Cotija</td><td>Mexico</td><td>Cows</td>
<td>366</td><td>20</td><td>4</td><td>0</td><td>30</td><td>18</td><td>4</td>
</tr>
<tr>
<td>Edam</td><td>Netherlands</td><td>Cows</td>
<td>357</td><td>25</td><td>1</td><td>1</td><td>28</td><td>18</td><td>2</td>
</tr>
<tr>
<td>Emmental</td><td>Switzerland</td><td>Cows</td>
<td>388</td><td>30</td><td>0</td><td>0</td><td>30</td><td>21</td><td>0</td>
</tr>
<tr>
<td>Feta</td><td>Greece</td><td>Sheep and/or goats</td>
<td>264</td><td>14</td><td>4</td><td>4</td><td>21</td><td>15</td><td>3</td>
</tr>
<tr>
<td>Gorgonzola</td><td>Italy</td><td>Cows</td>
<td>353</td><td>21</td><td>2</td><td>1</td><td>29</td><td>19</td><td>4</td>
</tr>
<tr>
<td>Gouda</td><td>Netherlands</td><td>Cows</td>
<td>356</td><td>25</td><td>2</td><td>2</td><td>27</td><td>18</td><td>2</td>
</tr>
<tr>
<td>Manchego</td><td>Spain</td><td>Sheep</td>
<td>317</td><td>25</td><td>0</td><td>0</td><td>25</td><td>16</td><td>1</td>
</tr>
<tr>
<td>Monterey Jack</td><td>United States</td><td>Cows</td>
<td>352</td><td>25</td><td>0</td><td>0</td><td>28</td><td>18</td><td>2</td>
</tr>
<tr>
<td>Mozarella</td><td>Italy</td><td>Cows or water buffalo</td>
<td>302</td><td>26</td><td>4</td><td>1</td><td>20</td><td>13</td><td>1</td>
</tr>
<tr>
<td>Parmigiano-Reggiano</td><td>Italy</td><td>Cows</td>
<td>392</td><td>36</td><td>3</td><td>1</td><td>26</td><td>16</td><td>4</td>
</tr>
<tr>
<td>Roquefort</td><td>France</td><td>Sheep</td>
<td>369</td><td>22</td><td>2</td><td>0</td><td>31</td><td>19</td><td>5</td>
</tr>
<tr>
<td>Taleggio</td><td>Italy</td><td>Cows</td>
<td>282</td><td>18</td><td>0</td><td>0</td><td>25</td><td>18</td><td>3</td>
</tr>
</tbody>
</table>
</body>
</html>
The styles defined within each <colgroup> element specify the background colour and column width of the columns, and put a two-pixel wide grey border around each column group. Additional styling for the table is defined in the <head> element of the document, and sets the font family and font size for the table, the padding for the table header and table data cells, and the text and background colours for the table header cells.
Copy and paste this code into a new file in your HTML editor, save the file as table-demo-08.html, and open the file in a web browser. You should see something like the following:
Each column group has a different background colour
We thought the colour scheme was rather appropriate for a page about cheese! Anyway . . . as you can see, the options for styling using the <colgroup> element alone are somewhat limited. It's time to consider using the <col> element.
The <col> element is not structural in nature; it implies no structural information whatsoever to browsers, search engines or screen readers and the like. It does however allow web developers to specify style information for one or more columns, and provides a little more control over the appearance of a table.
We stated above that the width of a column group (i.e. the number of columns it spans) can be declared in two mutually exclusive ways, the first of which (using the column group's span attribute) we have already seen. The second method involves using one or more <col> elements inside the <colgroup> element.
Each <col> element inside a <colgroup> element represents one or more columns in the column group. The number of columns represented by a <col> element is specified using the element's span attribute. If the span attribute is omitted, the <col> element represents a single column by default. Note that if columns are defined within a column group, the column group's span attribute should not be used (if it is used it will be ignored).
Let's see how this works. We will revisit our previous example, making a few changes to the HTML code. The code now looks like this:
<!doctype html>
<html lang="en">
<head>
<meta charset="utf-8">
<title>Table Demo 09</title>
<style>
table { font-family: sans-serif; font-size: smaller; }
th, td { padding: 0.25em; }
th { background-color: #36304A; color: white; }
</style>
</head>
<body>
<h1 style="text-align: center;">Table Demo 9</h1>
<p>
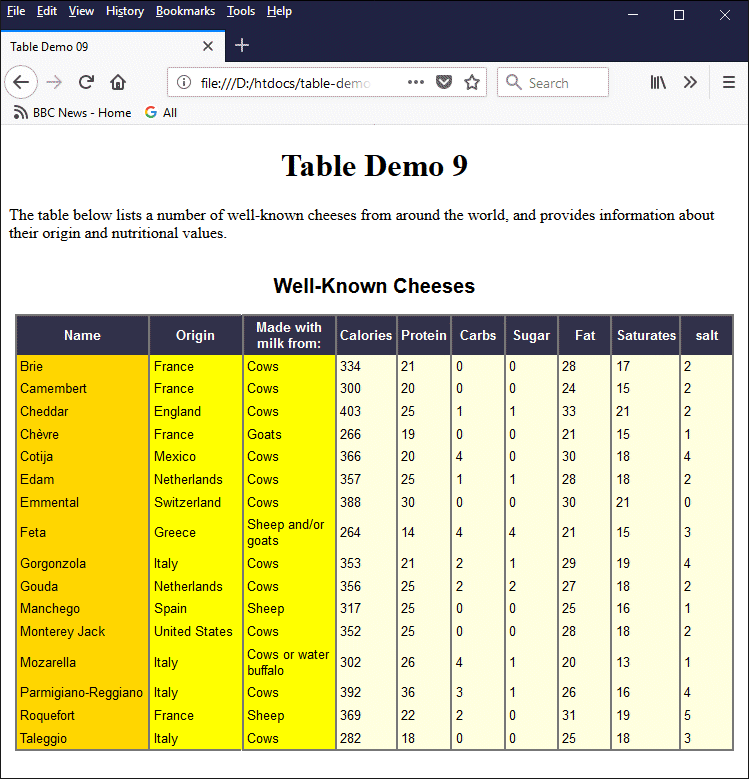
The table below lists a number of well-known cheeses from around the world, and provides information about their origin and nutritional values.
</p>
<table style="border-collapse: collapse; margin: auto;">
<caption><h2>Well-Known Cheeses</h2></caption>
<colgroup>
<col style="width: 10em; background-color: Gold; border: solid 2px grey;">
</colgroup>
<colgroup>
<col span="2" style="width: 7em; background-color: Yellow; border: solid 2px grey;">
</colgroup>
<colgroup>
<col span="7" style="width: 4em; background-color: LightYellow; border: solid 2px grey;">
</colgroup>
<thead>
<tr>
<th>Name</th><th>Origin</th><th>Made with milk from:</th>
<th>Calories</th><th>Protein</th><th>Carbs</th>
<th>Sugar</th><th>Fat</th><th>Saturates</th><th>salt</th>
</tr>
</thead>
<tbody>
<tr>
<td>Brie</td><td>France</td><td>Cows</td>
<td>334</td><td>21</td><td>0</td><td>0</td><td>28</td><td>17</td><td>2</td>
</tr>
<tr>
<td>Camembert</td><td>France</td><td>Cows</td>
<td>300</td><td>20</td><td>0</td><td>0</td><td>24</td><td>15</td><td>2</td>
</tr>
<tr>
<td>Cheddar</td><td>England</td><td>Cows</td>
<td>403</td><td>25</td><td>1</td><td>1</td><td>33</td><td>21</td><td>2</td>
</tr>
<tr>
<td>Chèvre</td><td>France</td><td>Goats</td>
<td>266</td><td>19</td><td>0</td><td>0</td><td>21</td><td>15</td><td>1</td>
</tr>
<tr>
<td>Cotija</td><td>Mexico</td><td>Cows</td>
<td>366</td><td>20</td><td>4</td><td>0</td><td>30</td><td>18</td><td>4</td>
</tr>
<tr>
<td>Edam</td><td>Netherlands</td><td>Cows</td>
<td>357</td><td>25</td><td>1</td><td>1</td><td>28</td><td>18</td><td>2</td>
</tr>
<tr>
<td>Emmental</td><td>Switzerland</td><td>Cows</td>
<td>388</td><td>30</td><td>0</td><td>0</td><td>30</td><td>21</td><td>0</td>
</tr>
<tr>
<td>Feta</td><td>Greece</td><td>Sheep and/or goats</td>
<td>264</td><td>14</td><td>4</td><td>4</td><td>21</td><td>15</td><td>3</td>
</tr>
<tr>
<td>Gorgonzola</td><td>Italy</td><td>Cows</td>
<td>353</td><td>21</td><td>2</td><td>1</td><td>29</td><td>19</td><td>4</td>
</tr>
<tr>
<td>Gouda</td><td>Netherlands</td><td>Cows</td>
<td>356</td><td>25</td><td>2</td><td>2</td><td>27</td><td>18</td><td>2</td>
</tr>
<tr>
<td>Manchego</td><td>Spain</td><td>Sheep</td>
<td>317</td><td>25</td><td>0</td><td>0</td><td>25</td><td>16</td><td>1</td>
</tr>
<tr>
<td>Monterey Jack</td><td>United States</td><td>Cows</td>
<td>352</td><td>25</td><td>0</td><td>0</td><td>28</td><td>18</td><td>2</td>
</tr>
<tr>
<td>Mozarella</td><td>Italy</td><td>Cows or water buffalo</td>
<td>302</td><td>26</td><td>4</td><td>1</td><td>20</td><td>13</td><td>1</td>
</tr>
<tr>
<td>Parmigiano-Reggiano</td><td>Italy</td><td>Cows</td>
<td>392</td><td>36</td><td>3</td><td>1</td><td>26</td><td>16</td><td>4</td>
</tr>
<tr>
<td>Roquefort</td><td>France</td><td>Sheep</td>
<td>369</td><td>22</td><td>2</td><td>0</td><td>31</td><td>19</td><td>5</td>
</tr>
<tr>
<td>Taleggio</td><td>Italy</td><td>Cows</td>
<td>282</td><td>18</td><td>0</td><td>0</td><td>25</td><td>18</td><td>3</td>
</tr>
</tbody>
</table>
</body>
</html>
Copy and paste this revised code into a new file in your HTML editor, save the file as table-demo-09.html, and open the file in a web browser. You should see something like the following:
Column properties can now be styled individually if required
If you look carefully at the code you will see that now, instead of using the style attribute in each opening <colgroup> tag to set column widths, background colours and border properties for the table's columns, we do this within each <col> tag.
We can use any number of <col> elements within a column group, which means that we can, if we wish, apply different styles to each column within a column group separately. If a column belongs to both a <col> element and a <colgroup> element, and the same properties have been set for the column within both elements, then the values specified by the <col> element take precedence.
The properties we can set for columns are exactly the same properties we can set for column groups, namely the column width, background colour, visibility and border properties. In fact, the only change you will notice when you open the revised version of the page is that each column now has its own border - something we couldn't do using column groups alone.
One more thing to note here is that the <col> element can be used on its own; it does not need to be enclosed within a <colgroup> element. In fact, we could replace the following block of code:
<colgroup>
<col style="width: 10em; background-color: Gold; border: solid 2px grey;">
</colgroup>
<colgroup>
<col span="2" style="width: 7em; background-color: Yellow; border: solid 2px grey;">
</colgroup>
<colgroup>
<col span="7" style="width: 4em; background-color: LightYellow; border: solid 2px grey;">
</colgroup>
with this:
<col style="width: 10em; background-color: Gold; border: solid 2px grey;">
<col span="2" style="width: 7em; background-color: Yellow; border: solid 2px grey;">
<col span="7" style="width: 4em; background-color: LightYellow; border: solid 2px grey;">
We have simply removed the opening and closing <colgroup> tags altogether. When displayed in a browser, the web page will look exactly the same as it did before. Bear in mind, however, that the primary purpose of the <colgroup> element is to impart structural information about a table rather than to define its presentational aspects, so this is not entirely surprising.
We should also probably point out at this point that, in our examples, the border-collapse property of the <table> element's style attribute is set to "collapse". If this were not so, the border properties applied to the <colgroup> and <col> elements would have no effect.
Furthermore, any background colours set for the <colgroup> and <col> elements apply directly only to those elements; they will of course affect the appearance of table rows (<tr>), table header cells (<th>), and table data cells (<td>) whose background colour is set to transparent (this is the default setting), but only because those elements sit on top of the <colgroup> and <col> elements.
In short, the <colgroup> element can only contain <col> elements; and because the <col> element is an empty (or void) element, it does not contain any table rows or table cells (or anything else). Any styling applied to the <colgroup> and <col> elements therefore only affects table rows, table header cells and table data cells indirectly.
If we want to apply additional styling to the header and data cells in our table, we have to do so directly. In the above example, we style the table header cells using the <style> element in the head of our HTML document, as shown here:
<style>
table { font-family: sans-serif; font-size: smaller; }
th, td { padding: 0.25em; }
th { background-color: #36304A; color: white; }
</style>
Let's suppose, then, that we are reasonably happy with our table of cheeses, but that we want to centre the text in the columns containing the nutritional values (calories, protein, carbs etc.), and that we also want these values to be displayed using a serif font because we think that this is more suitable for numerical data. And, just for fun, we'll make the text red!
There is no quick one-line solution to re-styling these cells; we have to apply the styling to each of the table data cells individually. The easiest way to do this is probably to declare a class within the <style> element and apply it to all of the cells we want to change (we will be investigating classes in more detail in the section "Introduction to CSS"). Here is our revised <style> element:
<style>
table { font-family: sans-serif; font-size: smaller; }
th, td { padding: 0.25em; }
th { background-color: #36304A; color: white; }
.num { text-align: center; font-family: serif; color: red; }
</style>
And here is how we apply our new class to the data cells containing the nutritional values in the first table row in the body of our table:
<tr>
<td>Brie</td><td>France</td><td>Cows</td>
<td class="num">334</td><td class="num">21</td><td class="num">0</td>
<td class="num">0</td><td class="num">28</td><td class="num">17</td>
<td class="num">2</td>
</tr>
The complete, revised version of our HTML code is now as follows:
<!doctype html>
<html lang="en">
<head>
<meta charset="utf-8">
<title>Table Demo 10</title>
<style>
table { font-family: sans-serif; font-size: smaller; }
th, td { padding: 0.25em; }
th { background-color: #36304A; color: white; }
.num { text-align: center; font-family: serif; color: red; }
</style>
</head>
<body>
<h1 style="text-align: center;">Table Demo 10</h1>
<p>
The table below lists a number of well-known cheeses from around the world, and provides information about their origin and nutritional values.
</p>
<table style="border-collapse: collapse; margin: auto;">
<caption><h2>Well-Known Cheeses</h2></caption>
<colgroup>
<col style="width: 10em; background-color: Gold; border: solid 2px grey;">
</colgroup>
<colgroup>
<col span="2" style="width: 7em; background-color: Yellow; border: solid 2px grey;">
</colgroup>
<colgroup>
<col span="7" style="width: 4em; background-color: LightYellow; border: solid 2px grey;">
</colgroup>
<thead>
<tr>
<th>Name</th><th>Origin</th><th>Made with milk from:</th>
<th>Calories</th><th>Protein</th><th>Carbs</th>
<th>Sugar</th><th>Fat</th><th>Saturates</th><th>salt</th>
</tr>
</thead>
<tbody>
<tr>
<td>Brie</td><td>France</td><td>Cows</td>
<td class="num">334</td><td class="num">21</td><td class="num">0</td>
<td class="num">0</td><td class="num">28</td><td class="num">17</td>
<td class="num">2</td>
</tr>
<tr>
<td>Camembert</td><td>France</td><td>Cows</td>
<td class="num">300</td><td class="num">20</td><td class="num">0</td>
<td class="num">0</td><td class="num">24</td><td class="num">15</td>
<td class="num">2</td>
</tr>
<tr>
<td>Cheddar</td><td>England</td><td>Cows</td>
<td class="num">403</td><td class="num">25</td><td class="num">1</td>
<td class="num">1</td><td class="num">33</td><td class="num">21</td>
<td class="num">2</td>
</tr>
<tr>
<td>Chèvre</td><td>France</td><td>Goats</td>
<td class="num">266</td><td class="num">19</td><td class="num">0</td>
<td class="num">0</td><td class="num">21</td><td class="num">15</td>
<td class="num">1</td>
</tr>
<tr>
<td>Cotija</td><td>Mexico</td><td>Cows</td>
<td class="num">366</td><td class="num">20</td><td class="num">4</td>
<td class="num">0</td><td class="num">30</td><td class="num">18</td>
<td class="num">4</td>
</tr>
<tr>
<td>Edam</td><td>Netherlands</td><td>Cows</td>
<td class="num">357</td><td class="num">25</td><td class="num">1</td>
<td class="num">1</td><td class="num">28</td><td class="num">18</td>
<td class="num">2</td>
</tr>
<tr>
<td>Emmental</td><td>Switzerland</td><td>Cows</td>
<td class="num">388</td><td class="num">30</td><td class="num">0</td>
<td class="num">0</td><td class="num">30</td><td class="num">21</td>
<td class="num">0</td>
</tr>
<tr>
<td>Feta</td><td>Greece</td><td>Sheep and/or goats</td>
<td class="num">264</td><td class="num">14</td><td class="num">4</td>
<td class="num">4</td><td class="num">21</td><td class="num">15</td>
<td class="num">3</td>
</tr>
<tr>
<td>Gorgonzola</td><td>Italy</td><td>Cows</td>
<td class="num">353</td><td class="num">21</td><td class="num">2</td>
<td class="num">1</td><td class="num">29</td><td class="num">19</td>
<td class="num">4</td>
</tr>
<tr>
<td>Gouda</td><td>Netherlands</td><td>Cows</td>
<td class="num">356</td><td class="num">25</td><td class="num">2</td>
<td class="num">2</td><td class="num">27</td><td class="num">18</td>
<td class="num">2</td>
</tr>
<tr>
<td>Manchego</td><td>Spain</td><td>Sheep</td>
<td class="num">317</td><td class="num">25</td><td class="num">0</td>
<td class="num">0</td><td class="num">25</td><td class="num">16</td>
<td class="num">1</td>
</tr>
<tr>
<td>Monterey Jack</td><td>United States</td><td>Cows</td>
<td class="num">352</td><td class="num">25</td><td class="num">0</td>
<td class="num">0</td><td class="num">28</td><td class="num">18</td>
<td class="num">2</td>
</tr>
<tr>
<td>Mozarella</td><td>Italy</td><td>Cows or water buffalo</td>
<td class="num">302</td><td class="num">26</td><td class="num">4</td>
<td class="num">1</td><td class="num">20</td><td class="num">13</td>
<td class="num">1</td>
</tr>
<tr>
<td>Parmigiano-Reggiano</td><td>Italy</td><td>Cows</td>
<td class="num">392</td><td class="num">36</td><td class="num">3</td>
<td class="num">1</td><td class="num">26</td><td class="num">16</td>
<td class="num">4</td>
</tr>
<tr>
<td>Roquefort</td><td>France</td><td>Sheep</td>
<td class="num">369</td><td class="num">22</td><td class="num">2</td>
<td class="num">0</td><td class="num">31</td><td class="num">19</td>
<td class="num">5</td>
</tr>
<tr>
<td>Taleggio</td><td>Italy</td><td>Cows</td>
<td class="num">282</td><td class="num">18</td><td class="num">0</td>
<td class="num">0</td><td class="num">25</td><td class="num">18</td>
<td class="num">3</td>
</tr>
</tbody>
</table>
</body>
</html>
Copy and paste this final version of the code into a new file in your HTML editor, save the file as table-demo-10.html, and open it in a web browser. You should see something like this:
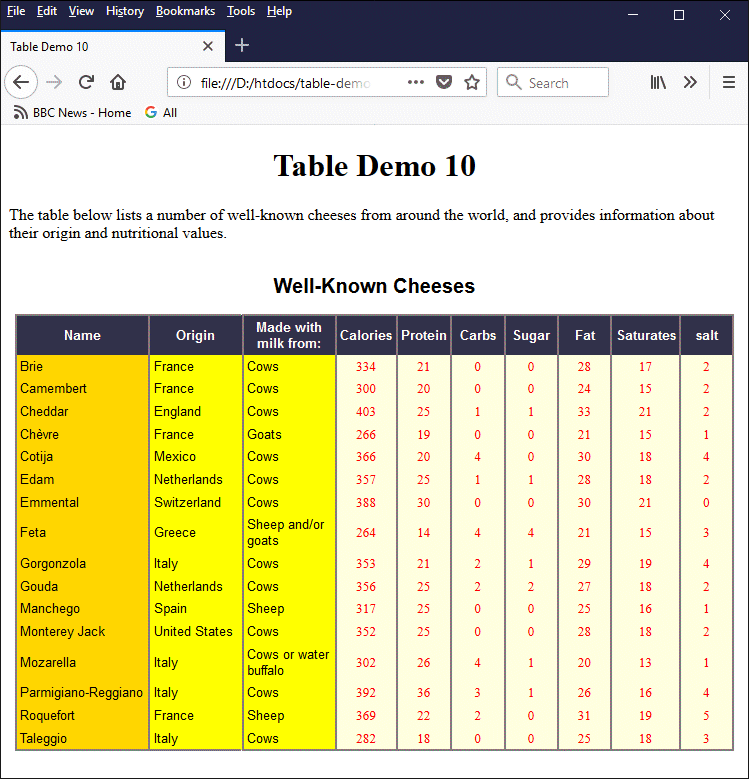
The final version of the "Well-Known Cheeses" page
Whether or not to use the <colgroup> and <col> elements in tables is a decision that each web developer must take for themselves. Their usefulness as a tool for implementing the presentational features of a table is relatively limited, and they should not really be used solely for this purpose. On the other hand - and depending on the nature of your tables and the data therein - you may wish to consider using them to provide structural information about your tables to screen readers and information retrieval systems.
In a nutshell, you could probably put almost any HTML element in a table. The question should probably be "what else should we put in a table?" The short answer is that any kind of information you see in tables elsewhere - in text books, magazines, newspapers - and even on your television screen - is probably appropriate for an HTML table. It all depends on the context. Always ask yourself "do I actually need to put this information in a table?"
The illustration below shows how tables are typically used.

Typical usage of an HTML table
As you can see, a table represents data in a two-dimensional grid-like format. Each column can be viewed as a field in the sense that each cell in the column contains the same kind of data. Each row, on the other hand, can be regarded as a record consisting of a set of related data items. Each table data cell thus represents a unique intersection between one row and one column.
In the examples seen so far, the data in our tables has consisted only of text (sometimes imaginatively formatted), but there is no reason why we should not put other HTML elements in a table - as long as we remember that tables were invented for the purpose of imposing order on a collection of related data items and presenting them in a concise format rather than to facilitate the creation of page layouts.
The following HTML code creates a web page containing a table that displays information about various kinds of regular polygon, including a graphic representation of each:
<!doctype html>
<html lang="en">
<head>
<meta charset="utf-8">
<title>Table Demo 11</title>
<style>
table { font-family: sans-serif; font-size: smaller; }
th, td { border: 1px solid lightGray; padding: 0.25em; text-align: center; }
th { background-color: #36304A; color: white; }
</style>
</head>
<body>
<h1 style="text-align: center;">Table Demo 11</h1>
<p>
A <em>polygon</em> (from the Greek words "poly" meaning "many" and "gon" meaning "angle") is a closed, two dimensional figure with multiple (i.e. three or more) straight sides. A <em>regular polygon</em> is one in which all of the sides have the same length (i.e. the figure is <em>equilateral</em>) and all of the internal angles (and consequently all external angles) are of the same magnitude (i.e. the figure is <em>equiangular</em>). You will no doubt be familiar with the <em>equilateral triangle</em> - a three-sided figure with internal angles of 60°, the <em>square</em> - a four-sided figure in which all of the internal angles are 90°, the <em>pentagon</em> - a five-sided figure with internal angles of 108°, and the <em>hexagon</em> - a six-sided figure with internal angles of 120°. Details of other convex regular polygons are given in the table below.
</p>
<table style="border-collapse: collapse; margin: auto;">
<caption><h2>Other Regular Polygons</h2></caption>
<thead>
<tr>
<th>Shape</th>
<th>Number of Sides</th>
<th>Name</th>
<th>Internal Angle</th>
<th>Sum of Internal Angles</th>
<th>External Angle</th>
</tr>
</thead>
<tbody>
<tr>
<td><img src="https://www.technologyuk.net/assets/demo-images/polygon01.gif" alt="Heptagon"></td>
<td>7</td>
<td>Heptagon</td>
<td>128.57°</td>
<td>900°</td>
<td>51.43°</td>
</tr>
<tr>
<td><img src="https://www.technologyuk.net/assets/demo-images/polygon02.gif" alt="Octagon"></td>
<td>8</td>
<td>Octagon</td>
<td>135.00°</td>
<td>1080°</td>
<td>45.00°</td>
</tr>
<tr>
<td><img src="https://www.technologyuk.net/assets/demo-images/polygon03.gif" alt="Nonagon"></td>
<td>9</td>
<td>Nonagon</td>
<td>140.00°</td>
<td>1260°</td>
<td>40.00°</td>
</tr>
<tr>
<td><img src="https://www.technologyuk.net/assets/demo-images/polygon04.gif" alt="Decagon"></td>
<td>10</td>
<td>Decagon</td>
<td>144.00°</td>
<td>1440°</td>
<td>36.00°</td>
</tr>
<tr>
<td><img src="https://www.technologyuk.net/assets/demo-images/polygon05.gif" alt="Hendecagon"></td>
<td>11</td>
<td>Hendecagon</td>
<td>147.27°</td>
<td>1620°</td>
<td>32.73°</td>
</tr>
<tr>
<td><img src="https://www.technologyuk.net/assets/demo-images/polygon06.gif" alt="Dodecagon"></td>
<td>12</td>
<td>Dodecagon</td>
<td>150.00°</td>
<td>1800°</td>
<td>30.00°</td>
</tr>
</tbody>
</table>
</body>
</html>
Copy and paste the code into a new file in your HTML editor, save the file as table-demo-11.html, and open it in a web browser. You should see something like the illustration below:

The table on this page displays an image in the first cell of each row of table data
Other HTML elements you could use inside a table data cell include hypertext links (perhaps linking to a page of information that relates to the table data), buttons, or lists. You could probably even include audio or video clips if the media content therein had some relevance to the other data in the table! For now, we will simply create a web page with a table that utilises HTML's unordered list element (<ul>). Consider the following illustration:
The logical data structure for a hospital system
The image shows the logical data structure (LDS) of a hypothetical hospital database system that holds information about patients, wards, and prescriptions. For those interested in such things, the original article from which this image is taken is called "Relational Data Analysis", and can be found here.
The purpose of developing diagrams like the one shown above is to enable a systems analyst to identify the data entities in a system and determine the relationships between them. A database programmer can then use this information to create the necessary database tables and link them together in a relational database.
Let's assume that the systems analyst has finished modelling the hospital system, and has produced final versions of the systems analysis diagrams, including the logical data structure diagram shown above. The following HTML code produces a web page that summarises the information on the diagram in a table:
<!doctype html>
<html lang="en">
<head>
<meta charset="utf-8">
<title>Table Demo 12</title>
<style>
table { font-family: sans-serif; font-size: smaller; }
th, td { border: 1px solid lightGray; padding: 0.25em; text-align: left; vertical-align: top; }
th { background-color: #36304A; color: white; }
ul {margin-top: 0; list-style-type: none; padding-left: 0.25em; }
li.key { text-decoration: underline; font-weight: bold; }
</style>
</head>
<body>
<h1 style="text-align: center;">Hospital System</h1>
<table style="border-collapse: collapse; margin: auto;">
<caption><h2>Database Tables</h2></caption>
<thead>
<tr>
<th>Name</th>
<th>Type</th>
<th>Parent(s)</th>
<th>Child(ren)</th>
<th>Attributes</th>
</tr>
</thead>
<tbody>
<tr>
<td><strong>Ward</strong></td>
<td>Master</td>
<td>None</td>
<td>Patient</td>
<td>
<ul>
<li class="key">Ward No</li>
<li>Ward Name</li>
<li>Type</li>
<li>No of Beds</li>
</ul>
</td>
</tr>
<tr>
<td><strong>Drug</strong></td>
<td>Master</td>
<td>None</td>
<td>Prescription</td>
<td>
<ul>
<li class="key">Med Code</li>
<li>Med Name</li>
</ul>
</td>
</tr>
<tr>
<td><strong>Patient</strong></td>
<td>Detail</td>
<td>Ward</td>
<td>Prescription</td>
<td>
<ul>
<li class="key">Pat No</li>
<li>Surname</li>
<li>Forename</li>
<li>Sex</li>
<li>Date of Birth</li>
<li>Ward No*</li>
</ul>
</td>
</tr>
<tr>
<td><strong>Prescription</strong></td>
<td>Link</td>
<td>Patient, Drug</td>
<td>None</td>
<td>
<ul>
<li class="key">Pat No*</li>
<li class="key">Prescription Date</li>
<li class="key">Med Code*</li>
<li>Dosage</li>
<li>Length of Treatment</li>
</ul>
</td>
</tr>
</tbody>
</table>
</body>
</html>
Copy and paste the code into a new file in your HTML editor, save the file as table-demo-12.html, and open it in a web browser. You should see something like the following:
The last column of the table lists the attributes of each database table
As you can see from examining the HTML code and looking at the screenshot above, each row of data in the table contains details of a single database entity. The final data cell in each row contains a list of the entity's attributes, implemented using an unordered list element (<ul>).
We have again used a <style> element in the head of the HTML document to (among other things) change the default behaviour of the unordered list element, which would normally indent the list items to a much greater degree and format them as a bulleted list.
If you are thinking that we could have perhaps achieved exactly the same result without using lists, you would of course be right. On the other hand, there may be some mileage in representing what is, after all, a list of attributes, using a list element - if only from a semantic point of view.
We saw above that tables can contain other HTML elements, including images and lists. It may have occurred to you that tables can even contain other tables - and they can! In fact, this is sometimes the best solution for creating tables that might otherwise become too complex in terms of their internal structure or formatting.
The HTML code below creates a web page that uses a table to display the primary solution angles (a set of trigonometric constants) frequently used in trigonometric calculations. The angles are expressed in terms of radians, and some of them are fractional values. In order to display these values as fractions, we have used nested tables. Styling has been applied to the nested tables to ensure that they are presented in the required format.
<!doctype html>
<html lang="en">
<head>
<meta charset="utf-8">
<title>Table Demo 13</title>
<style>
table { margin: auto; padding: 0; font-size: 88%; }
th, td {
border: 1px solid lightGray;
padding: 0.2em;
text-align: center;
vertical-align: middle;
}
th { background-color: #36304A; color: white; }
td.num, td.den { font-size: smaller; padding: 0; }
td.num{ border-style: none none solid none; vertical-align: bottom; }
td.den{ border-style: none; vertical-align: top; }
</style>
</head>
<body>
<h1 style="text-align: center;">Trigonometric Constants</h1>
<table style="border-collapse: collapse; margin: auto;">
<caption><h2>The Primary Solution Angles</h2></caption>
<thead>
<tr>
<th>Degrees</th>
<th>Radians</th>
<th>sin</th>
<th>cos</th>
<th>tan</th>
<th>csc</th>
<th>sec</th>
<th>cot</th>
</tr>
</thead>
<tbody>
<tr>
<td>0° (360°)</td>
<td>0 (2π)</td>
<td>0</td>
<td>1</td>
<td>0</td>
<td>-</td>
<td>1</td>
<td>-</td>
</tr>
<tr>
<td>30°</td>
<td>
<table class="fraction">
<tr><td class="num">π</td></tr>
<tr><td class="den">6</td></tr>
</table>
</td>
<td>
<table class="fraction">
<tr><td class="num">1</td></tr>
<tr><td class="den">2</td></tr>
</table>
</td>
<td>
<table class="fraction">
<tr><td class="num">√3</td></tr>
<tr><td class="den">2</td></tr>
</table>
</td>
<td>
<table class="fraction">
<tr><td class="num">1</td></tr>
<tr><td class="den">√3</td></tr>
</table>
</td>
<td>2</td>
<td>
<table class="fraction">
<tr><td class="num">2√3</td></tr>
<tr><td class="den">3</td></tr>
</table>
</td>
<td>√3</td>
</tr>
<tr>
<td>45°</td>
<td>
<table class="fraction">
<tr><td class="num">!π</td></tr>
<tr><td class="den">4</td></tr>
</table>
</td>
<td>
<table class="fraction">
<tr><td class="num">√2</td></tr>
<tr><td class="den">2</td></tr>
</table>
</td>
<td>
<table class="fraction">
<tr><td class="num">√2</td></tr>
<tr><td class="den">2</td></tr>
</table>
</td>
<td>1</td>
<td>√2</td>
<td>√2</td>
<td>1</td>
</tr>
<tr>
<td>60°</td>
<td>
<table class="fraction">
<tr><td class="num">π</td></tr>
<tr><td class="den">3</td></tr>
</table>
</td>
<td>
<table class="fraction">
<tr><td class="num">√3</td></tr>
<tr><td class="den">2</td></tr>
</table>
</td>
<td>
<table class="fraction">
<tr><td class="num">1</td></tr>
<tr><td class="den">2</td></tr>
</table>
</td>
<td>√3</td>
<td>
<table class="fraction">
<tr><td class="num">2√3</td></tr>
<tr><td class="den">3</td></tr>
</table>
</td>
<td>2</td>
<td>
<table class="fraction">
<tr><td class="num">1</td></tr>
<tr><td class="den">√3</td></tr>
</table>
</td>
</tr>
<tr>
<td>90°</td>
<td>
<table class="fraction">
<tr><td class="num">π</td></tr>
<tr><td class="den">2</td></tr>
</table>
</td>
<td>1</td>
<td>0</td>
<td>-</td>
<td>1</td>
<td>-</td>
<td>0</td>
</tr>
<tr>
<td>120°</td>
<td>
<table class="fraction">
<tr><td class="num">2π</td></tr>
<tr><td class="den">3</td></tr>
</table>
</td>
<td>
<table class="fraction">
<tr><td class="num">√3</td></tr>
<tr><td class="den">2</td></tr>
</table>
</td>
<td>
<table class="fraction">
<tr><td class="num">-1</td></tr>
<tr><td class="den">2</td></tr>
</table>
</td>
<td>-√3</td>
<td>
<table class="fraction">
<tr><td class="num">2√3</td></tr>
<tr><td class="den">3</td></tr>
</table>
</td>
<td>-2</td>
<td>
<table class="fraction">
<tr><td class="num">-1</td></tr>
<tr><td class="den">√3</td></tr>
</table>
</td>
</tr>
<tr>
<td>135°</td>
<td>
<table class="fraction">
<tr><td class="num">3π</td></tr>
<tr><td class="den">4</td></tr>
</table>
</td>
<td>
<table class="fraction">
<tr><td class="num">√2</td></tr>
<tr><td class="den">2</td></tr>
</table>
</td>
<td>
<table class="fraction">
<tr><td class="num">-√2</td></tr>
<tr><td class="den">2</td></tr>
</table>
</td>
<td>-1</td>
<td>√2</td>
<td>-√2</td>
<td>-1</td>
</tr>
<tr>
<td>150°</td>
<td>
<table class="fraction">
<tr><td class="num">5π</td></tr>
<tr><td class="den">6</td></tr>
</table>
</td>
<td>
<table class="fraction">
<tr><td class="num">1</td></tr>
<tr><td class="den">2</td></tr>
</table>
</td>
<td>
<table class="fraction">
<tr><td class="num">-√3</td></tr>
<tr><td class="den">2</td></tr>
</table>
</td>
<td>
<table class="fraction">
<tr><td class="num">-1</td></tr>
<tr><td class="den">√3</td></tr>
</table>
</td>
<td>2</td>
<td>
<table class="fraction">
<tr><td class="num">-2√3</td></tr>
<tr><td class="den">3</td></tr>
</table>
</td>
<td>-√3</td>
</tr>
<tr>
<td>180°</td>
<td>π</td>
<td>0</td>
<td>-1</td>
<td>0</td>
<td>-</td>
<td>-1</td>
<td>-</td>
</tr>
<tr>
<td>210°</td>
<td>
<table class="fraction">
<tr><td class="num">7π</td></tr>
<tr><td class="den">6</td></tr>
</table>
</td>
<td>
<table class="fraction">
<tr><td class="num">-1</td></tr>
<tr><td class="den">2</td></tr>
</table>
</td>
<td>
<table class="fraction">
<tr><td class="num">-√3</td></tr>
<tr><td class="den">2</td></tr>
</table>
</td>
<td>
<table class="fraction">
<tr><td class="num">1</td></tr>
<tr><td class="den">√3</td></tr>
</table>
</td>
<td>-2</td>
<td>
<table class="fraction">
<tr><td class="num">-2√3</td></tr>
<tr><td class="den">3</td></tr>
</table>
</td>
<td>√3</td>
</tr>
<tr>
<td>225°</td>
<td>
<table class="fraction">
<tr><td class="num">5π</td></tr>
<tr><td class="den">4</td></tr>
</table>
</td>
<td>
<table class="fraction">
<tr><td class="num">-√2</td></tr>
<tr><td class="den">2</td></tr>
</table>
</td>
<td>
<table class="fraction">
<tr><td class="num">-√2</td></tr>
<tr><td class="den">2</td></tr>
</table>
</td>
<td>1</td>
<td>-√2</td>
<td>-√2</td>
<td>1</td>
</tr>
<tr>
<td>240°</td>
<td>
<table class="fraction">
<tr><td class="num">4π</td></tr>
<tr><td class="den">3</td></tr>
</table>
</td>
<td>
<table class="fraction">
<tr><td class="num">-√3</td></tr>
<tr><td class="den">2</td></tr>
</table>
</td>
<td>
<table class="fraction">
<tr><td class="num">-1</td></tr>
<tr><td class="den">2</td></tr>
</table>
</td>
<td>√3</td>
<td>
<table class="fraction">
<tr><td class="num">-2√3</td></tr>
<tr><td class="den">3</td></tr>
</table>
</td>
<td>-2</td>
<td>
<table class="fraction">
<tr><td class="num">1</td></tr>
<tr><td class="den">√3</td></tr>
</table>
</td>
</tr>
<tr>
<td>270°</td>
<td>
<table class="fraction">
<tr><td class="num">3π</td></tr>
<tr><td class="den">2</td></tr>
</table>
</td>
<td>-1</td>
<td>0</td>
<td>-</td>
<td>-1</td>
<td>-</td>
<td>0</td>
</tr>
<tr>
<td>300°</td>
<td>
<table class="fraction">
<tr><td class="num">5π</td></tr>
<tr><td class="den">3</td></tr>
</table>
</td>
<td>
<table class="fraction">
<tr><td class="num">-√3</td></tr>
<tr><td class="den">2</td></tr>
</table>
</td>
<td>
<table class="fraction">
<tr><td class="num">1</td></tr>
<tr><td class="den">2</td></tr>
</table>
</td>
<td>-√3</td>
<td>
<table class="fraction">
<tr><td class="num">-2√3</td></tr>
<tr><td class="den">3</td></tr>
</table>
</td>
<td>2</td>
<td>
<table class="fraction">
<tr><td class="num">-1</td></tr>
<tr><td class="den">√3</td></tr>
</table>
</td>
</tr>
<tr>
<td>315°</td>
<td>
<table class="fraction">
<tr><td class="num">7π</td></tr>
<tr><td class="den">4</td></tr>
</table>
</td>
<td>
<table class="fraction">
<tr><td class="num">-√2</td></tr>
<tr><td class="den">2</td></tr>
</table>
</td>
<td>
<table class="fraction">
<tr><td class="num">√2</td></tr>
<tr><td class="den">2</td></tr>
</table>
</td>
<td>-1</td>
<td>-√2</td>
<td>√2</td>
<td>-1</td>
</tr>
<tr>
<td>330°</td>
<td>
<table class="fraction">
<tr><td class="num">11π</td></tr>
<tr><td class="den">6</td></tr>
</table>
</td>
<td>
<table class="fraction">
<tr><td class="num">-1</td></tr>
<tr><td class="den">2</td></tr>
</table>
</td>
<td>
<table class="fraction">
<tr><td class="num">√3</td></tr>
<tr><td class="den">2</td></tr>
</table>
</td>
<td>
<table class="fraction">
<tr><td class="num">-1</td></tr>
<tr><td class="den">√3</td></tr>
</table>
</td>
<td>-2</td>
<td>
<table class="fraction">
<tr><td class="num">2√3</td></tr>
<tr><td class="den">3</td></tr>
</table>
</td>
<td>-√3</td>
</tr>
</tbody>
</table>
</body>
</html>
Copy and paste the code into a new file in your HTML editor, save the file as table-demo-13.html, and open it in a web browser. You should see something like the following:
Fractional angle values are represented in this table using nested tables
We apologise for the length of the code in this example. If you examine it, however, you will see that the bulk of it is essentially composed of the same block of code repeated many times over, but with different values.
Although this particular example of using nested tables may appear relatively trivial, we have used nested tables frequently throughout this website in order to construct acceptable web-based representations of some of the more complex mathematical and scientific formulae.
We have already seen how the <caption>, <colgroup>, <col>, <thead>, <tbody> and <tfoot> elements are used in HTML tables. These elements constitute semantic markup; their main purpose is to provide information about the meaning and structure of the table's content, rather than having any significant effect on its appearance. Listed below are some additional attributes that we should consider in this respect. These attributes can be applied to the table header (<th>) and table data (<td>) elements.
Let's look at some examples of how these attributes might be used, starting with the headers attribute. The following HTML code fragment is taken from a revised version of our "Moonwalkers" page (the first example on this page):
<table style="margin: auto; border-collapse: collapse;">
<caption><h2>Apollo astronauts who walked on the Moon</h2></caption>
<thead>
<tr>
<th id="h1">No.</th>
<th id="h2">Astronaut</th>
<th id="h3">Born</th>
<th id="h4">Died</th>
<th id="h5">Mission</th>
<th id="h6">Moonwalk Date(s)</th>
<th id="h7">Age at time</th>
</tr>
</thead>
<tbody>
<tr>
<td headers="h1">01</td>
<td headers="h2" style="text-align: left;">Neil Armstrong</td>
<td headers="h3">1930</td>
<td headers="h4">2012</td>
<td headers="h5">Apollo 11</td>
<td headers="h6">21 Jul 1969</td>
v<td headers="h7">38</td>
</tr>
Whilst we have not carried out extensive testing on the effectiveness of this semantic markup, we did try this version of the "Moonwalkers" page with the current edition of the NVDA screen reader software. To cut a long story short, for each data cell the screen reader encounters in the table, it reads out the contents of the column header, followed by the contents of the data cell. For example, the second data cell in row one of the table body is rendered as "Astronaut column two Neil Armstrong". However, it does exactly the same thing for the original version, which does not implement the headers attribute.
We could achieve the same end result (from a semantic viewpoint) using the scope attribute instead of the headers attribute to ensure that the column headers are associated with the data cells in one or more columns. The code fragment above, for example, could be re-written as follows:
<table style="margin: auto; border-collapse: collapse;">
<caption><h2>Apollo astronauts who walked on the Moon</h2></caption>
<thead>
<tr>
<th scope="column">No.</th>
<th scope="column">Astronaut</th>
<th scope="column">Born</th>
<th scope="column">Died</th>
<th scope="column">Mission</th>
<th scope="column">Moonwalk Date(s)</th>
<th scope="column">Age at time</th>
</tr>
</thead>
<tbody>
<tr>
<td>01</td>
<td style="text-align: left;">Neil Armstrong</td>
<td>1930</td>
<td>2012</td>
<td>Apollo 11</td>
<td>21 Jul 1969</td>
<td>38</td>
</tr>
Each instance of the scope attribute in this example associates the current table header cell with all of the table data cells in the current column. In simple use cases, i.e. where a single header cell refers only to the data cells directly below it in a table column, use of the scope attribute would probably be the better option because it achieves the same result and involves less coding.
There are however situations in which the headers attribute can be used together with the scope attribute in order to avoid ambiguity. The HTML code below creates a web page containing a table that summarises the modules and stages of the Structured Systems Analysis and Design Methodology (SSADM). The code for the table is essentially a modified (and greatly simplified) version of the code for the original table, which can be found here.
<!doctype html>
<html lang="en">
<head>
<meta charset="utf-8">
<title>Table Demo 14</title>
<style>
th, td {border: 1px solid grey; padding: 0.5em; vertical-align: top; }
</style>
</head>
<body>
<h1 style="text-align: center;">SSADM</h1>
<p>
The table below summarises the modules and stages in the <em>Structured Systems Analysis and Design Methodology</em> (SSADM) - a highly structured and rigorous approach to the analysis and design of information systems.
</p>
<table style="margin: auto; border-collapse: collapse; font-size: smaller">
<caption><h2>The SSADM framework</h2></caption>
<thead>
<tr><th>Module</th><th>Stage</th><th>Description</th></tr>
</thead>
<tbody>
<tr>
<td scope="rowgroup"><strong>Feasibility Study</strong><br>(module 1)</td>
<td><strong>Feasibility</strong><br>(Stage 0)</td>
<td>The high level analysis of a business area to determine whether a proposed system can cost effectively support the business requirements identified. A <em>Busine
ss Activity Model</em> (BAM) is produced that describes . . . . .</td>
</tr>
</tbody>
<tbody>
<tr>
<td rowspan="2" scope="rowgroup"><strong>Requirements Analysis</strong><br>(module 2)</td>
<td><strong>Investigation of Current Environment</strong><br>(stage 1)</td>
<td>The systems requirements are identified and the current business environment is modelled using data flow diagrams and logical data modelling.</td>
</tr>
<tr>
<td><strong>Business System Options</strong><br>(stage 2)</td>
<td>Up to six business system options are presented, of which one will be adopted. Data flow diagrams and logical data models are produced to support each option. The option selected defines the boundary of the system to be developed.</td>
</tr>
</tbody>
<tbody>
<tr>
<td scope="rowgroup"><strong>Requirements Specification</strong><br>(module 3)</td>
<td><strong>Definition of Requirements</strong><br>(stage 3)</td>
<td>Detailed functional and non-functional requirements (for example, the levels of service required) are identified and the required processing and system data structures are defined. The data flow diagrams and logical data model are . . . . .</td>
</tr>
</tbody>
<tbody>
<tr>
<td rowspan="2" scope="rowgroup"><strong>Logical System Specification</strong><br>(module 4)</td>
<td><strong>Technical System Options</strong><br>(stage 4)</td>
<td>Up to six technical options for the development and implementation of the system are proposed, and one is selected.</td>
</tr>
<tr>
<td><strong>Logical Design</strong><br>(stage 5)</td>
<td>In this stage the logical design of the system, including user dialogues and database enquiry and update processing, is undertaken.</td>
</tr>
</tbody>
<tbody>
<tr>
<td scope="rowgroup"><strong>Physical Design</strong><br>(module 5)</td>
<td><strong>Physical Design</strong><br>(stage 6)</td>
<td>The logical design and the selected technical system option provide the basis for the physical database design and a set of program specifications.</td>
</tr>
</tbody>
</table>
</body>
</html>
Copy and paste the code into a new file in your HTML editor, save the file as table-demo-14.html, and open it in a web browser. You should see something like the following:
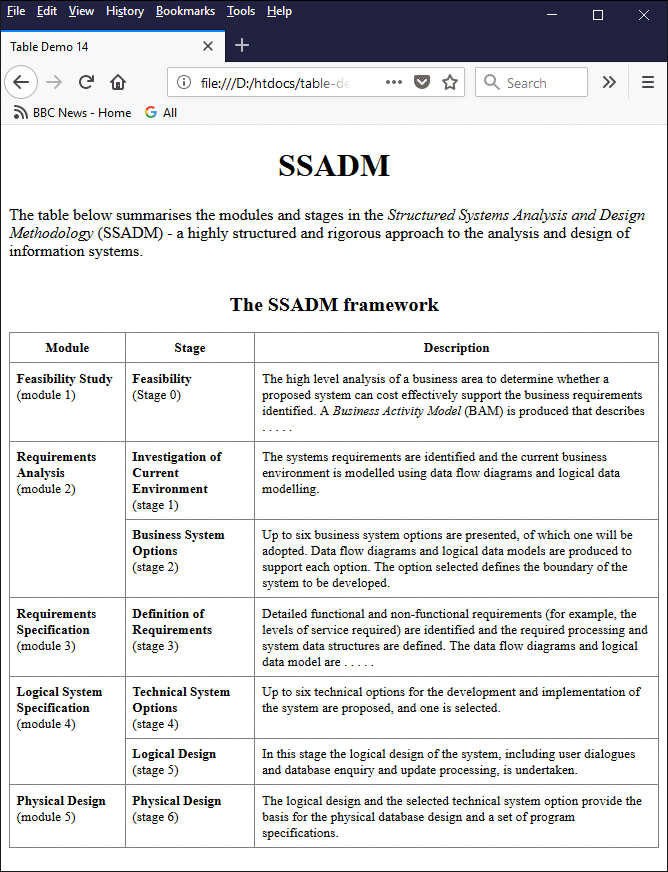
A table summarising the modules and stages of SSADM
If you examine the code carefully you will notice that we have grouped the rows containing the details for each module using the <tbody> element because, although some of the modules have only a single stage, others have two stages.
Since we cannot rely on a one-to-one correlation between the modules in column one and the stages in column two, we have used the scope attribute in each cell of column one, and assigned it the value "rowgroup". This ensures that the rows in each section of the table (defined using the <tbody> … </tbody> tag set), each of which represents a stage, are associated with the correct module.
Headers that span multiple columns can similarly be associated with those columns by setting the value of the scope attribute to "colgroup" (assuming, of course, that we have grouped those columns using the <colgroup> element).
To provide further examples would probably be overkill. We think you probably get the point by now, which is that the judicious use of attributes like headers and scope has the potential to make tables more accessible to information retrieval systems and those using assistive technologies.
The extent to which web developers need to use these attributes - or for that matter, the degree to which they should use any semantic markup - should probably be assessed on a case by case basis. Someone creating a personal web page intended purely for their own enjoyment, and that is likely to be seen only by friends and family, is unlikely to worry too much about whether their pages are meaningful to a web crawler or screen reader.
At the other end of the spectrum, developers engaged in creating websites for public service institutions and government departments are surely under an obligation to ensure that, not only can their content be found by as many people as possible, but that its meaning and structure can be correctly interpreted and understood.
Somewhere in between are those web developers who want to create content that reaches as many people as possible within a certain demographic, but who do not have unlimited time or resources at their disposal. This website is a case in point. It is aimed primarily at those of you undertaking studies or teaching in the field of technology, and we lean towards the view that the quality of our content is most important consideration.
On the one hand, therefore, we feel that our time and resources should be used to add new content, and to maintain and improve the quality of existing content. We cannot however ignore the fact that sematic markup is becoming increasingly important to the way in which web pages are processed by search engines and assistive technologies, and that the use of semantic markup can potentially help us to reach more people.
In terms of document markup, HTML tables present both a challenge and an opportunity. The challenge arises because we now need to ensure that our tables can be processed and interpreted correctly by automated information retrieval systems and assistive technologies - and this does mean investing a certain amount of time and effort into using the appropriate semantic markup.
The opportunity comes from the fact that, unlike the printed media we have relied on for centuries to convey tabular information of various kinds, we now have the means to embed metadata in a table that vastly increases the chances of it being accessed and understood by our target audience.